Practice Quiz 2a
Quiz 2a will cover Topic 5 and Topic 6, including Tutorial 4 and Tutorial 5. In addition to studying those materials, the best way to study is by complete the practice quizzes (below):
Written Portion Practice Problems
Half of quiz 2a will be paper-based. For this portion, you will not be able to use a computer, but you may bring a 1-page cheatsheet. Here are some practice problems that you can use to prepare for the paper portion of the quiz.
Hands-On Coding Portion
Please download the starter files (below) and complete the tasks described below. Read the instructions that are outlined under each task very carefully. You must complete each exercise exactly as the instructions indicate to receive full credit. Otherwise, you will receive partial credit for the parts you correctly completed.
1. Change Colors
Open the exercise01 folder and add click event handlers to all of the div tags. When a div element is clicked, its background should change color (pick any color you like). When you’re done, your page should look like the demo shown below:

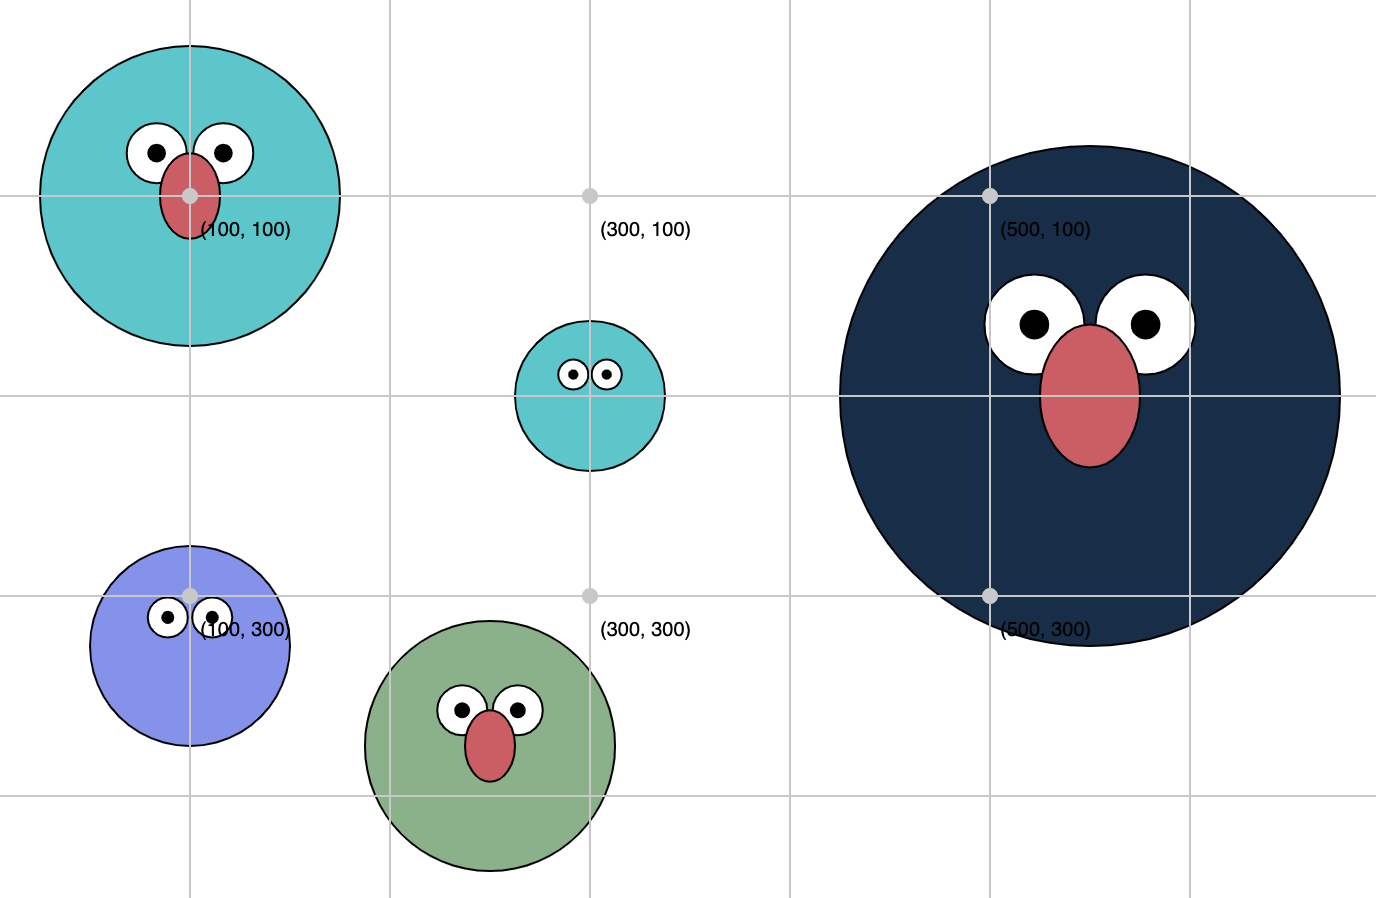
2. Draw a Monster
Open the exercise02 folder and create a function called drawMonster that draws a picture of a monster as pictured below. The function should have the following parameters defined (in order):
x(number) – the x-coordinate of the center of the square(s).y(number) – the y-coordinate of the center of the square(s).size(number) – the width of the larger square.color(number) – the color of the monster’s face.isSurprised(boolean) – whether or not the monster should look surprised
If the argument for isSurprised is set to true, a “surprised mouth” should be drawn (smaller). Otherwise, a “regular mouth” should be drawn. When I invoke your function as follows (within the setup() function)…
drawMonster(100, 100, 150, '#0bc9cd', false);
drawMonster(300, 200, 75, '#8093f1', true);
drawMonster(100, 325, 100, '#8093f1', false);
drawMonster(250, 375, 125, '#7fb285', true);
drawMonster(550, 200, 250, '#7fb285', false);
…the image pictured below should be drawn to the screen:

Implementation suggestions (optional):
- Use p5.js’s built-in rect function.
- If you include this statement,
rectMode(CENTER);therect()function will treat the x- and y-coordinates as the center of the rectangle (instead of as the top left-hand corner). You can read more about rectMode here.
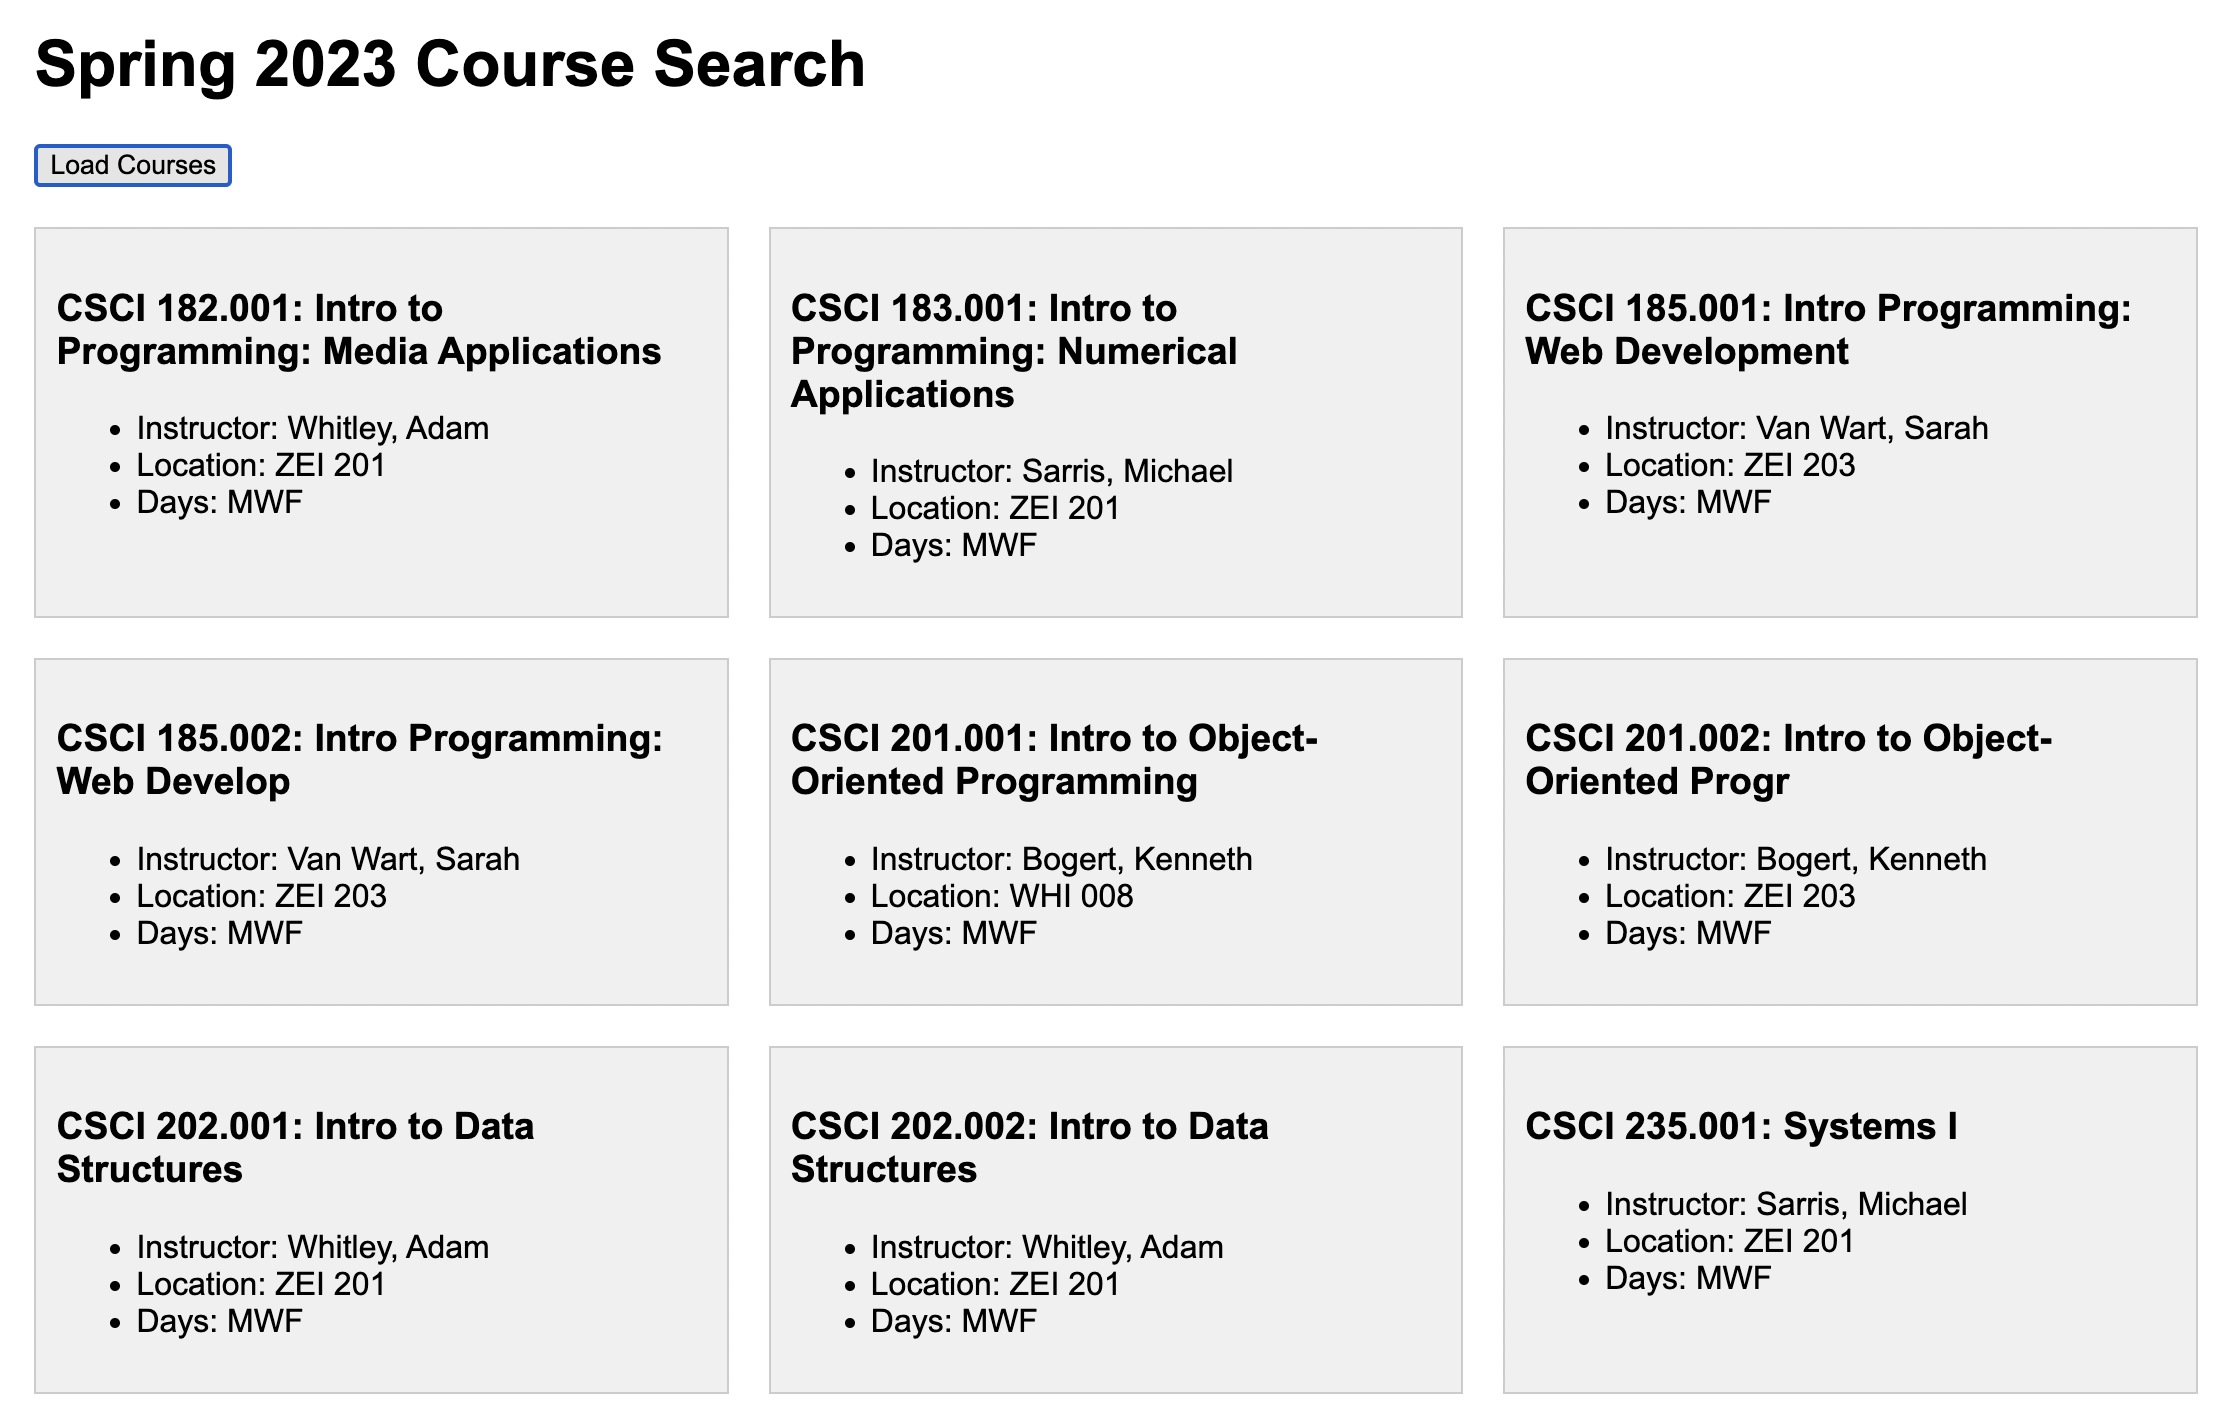
3. Course Viewer
Open the exercise03 folder and examine all of the files. Inside of main.js, there is a fetchCourses function (already built for you) that fetches all of the UNCA course offerings for Spring, 2023: (here). Note that by modifying the year or term in the URL string, you can also view course offerings from previous semesters. Your job is to:
- Modify the function body of the
displayResults(courses)function so that it outputs to the#resultselement only courses that offered within the CSCI department. You may use any kind of loop that you like. - Ensure that your HTML snippet displays the following information for each course (using a template literal):
- Title
- Instructor
- Location
- Days (i.e., which days does the course meet?)
- Location and Days may be
null. That’s OK for this exercise (though in real life, you’d probably want to output a friendlier message).
Hints
- Loop through the
coursesarray. - If the current course’s
Departmentproperty is “CSCI”, then insert an HTML representation of the course into the<div class="results"></div>container. - Partial credit will be given.
- We went over this in Lectures 22-24 (and there are lecture videos that you can even follow along with).
- A sample of the HTML representation of a course is shown below, and also in
exercise03/template.html:
 <section class="course">
    <h3>NM 101.001: Digital Design Principles</h3>
    <ul>
        <li>Instructor: Cosette, Ashe</li>
        <li>Location: OWE 305</li>
        <li>Days: MW</li>
    </ul>
</section>
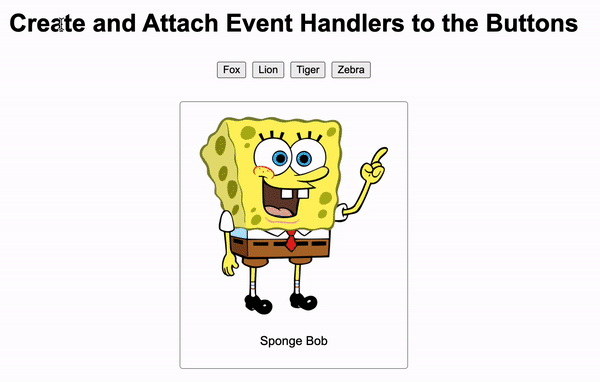
4. DOM Manipulation
Open the exercise04 folder and add event handlers to all of the buttons. When a button is clicked, the image tag should display the corresponding animal (see the images folder), and there should be a label below the image describing the picture. When you’re done, your page should look like the animation shown below:
5. Functions
Open the exercise05 folder and create a function called drawElmo that draws a picture of Elmo. The function should have the following parameters defined (in order):
x(number) – the x-coordinate of the center of the circle(s).y(number) – the y-coordinate of the center of the circle(s).size(number) – the diameter of the larger circle.color(number) – the color of Elmo’s face.hasNose(boolean) – whether or not Elmo should have a nose (just default the color to a reddish color).
If the argument for hasNose is set to true, a nose is drawn. Otherwise, no nose is drawn. A decent looking nose can be made with the ellipse function…
fill('#db5461');
ellipse(500, 500, 70, 100);  // x, y, width, height (but yours needs to scale)
…but of course yours will need to be dynamically positioned / scaled according to the function arguments (just like you’ve been doing for the past several weeks).
When I invoke your function as follows (within the setup() function)…
drawElmo(100, 100, 150, '#0bc9cd', true);   // nose drawn
drawElmo(300, 200, 75, '#0bc9cd', false);   // no nose drawn
drawElmo(100, 325, 100, '#8093f1', false);  // no nose drawn
drawElmo(250, 375, 125, '#7fb285', true);   // nose drawn
drawElmo(550, 200, 250, '#102e4a', true);   // nose drawn
…the image pictured below should be drawn to the screen:
6. Loops + Conditionals
Open the exercise06 folder. Inside of main.js, write a program, using any kind of loop you want, that draws all of the pictures to the screen where the is_favorite property is set to true. You don’t have to worry about formatting (the CSS), so long as following 8 images are displayed:

Hints
- Loop through the
photosarray. - If the current photo’s
is_favoriteproperty is set to true, append an image element (imgtag) to the<div class="images"></div>container. - Consider using a template literal.
- Partial credit will be given.