Assignments > Tutorial 4: Programming Review
Due on Mon, 02/17 @ 11:59PM. 6 Points.
Part 1. Set Up
1. Download and examine the code
Download the Tutorial 4 zip file, unzip it, and save it inside of your tutorials folder:
Open your index.html file inside the tutorial04 folder and take a look at it. You should see a very simple HTML file that looks like this:
<!DOCTYPE html>
<html lang="en">

<head>
    <meta charset="UTF-8">
    <meta http-equiv="X-UA-Compatible" content="IE=edge">
    <meta name="viewport" content="width=device-width, initial-scale=1.0">
    <link rel="stylesheet" href="style.css">
    <script src="https://cdnjs.cloudflare.com/ajax/libs/p5.js/1.10.0/p5.min.js" defer></script>
    <script src="utilities.js" defer></script>
    <script src="main.js" defer></script>
    <title>Loop & Function Practice</title>
</head>

<body>
    <main>
    </main>
</body>

</html>
This HTML file uses a third-party library called p5.js to draw various shapes on an HTML5 canvas. You can take a look at the documentation here. For this tutorial, you will be editing the main.js file:
let canvasWidth = window.innerWidth;
let canvasHeight = window.innerHeight;

// in p5.js, the function runs on page load:
function setup() {
    createCanvas(canvasWidth, canvasHeight);

    // invoke any drawing functions inside of setup.
    // functions should all go between "createCanvas()" and "drawGrid()"
    draw5Circles();
    //draw5RedSquares();
    drawGrid(canvasWidth, canvasHeight);
}

// my first function
function draw5Circles() {
    noFill();
    // fill('red');
    circle(100, 200, 50); // centerX, centerY, diameter
    circle(100, 250, 50);
    circle(100, 300, 50);
    circle(100, 350, 50);
    circle(100, 400, 50);
}

function draw5RedSquares() {
    fill("red");
    square(320, 200, 50); // topLeftX, topLeftY, width
    square(320, 250, 50);
    square(320, 300, 50);
    square(320, 350, 50);
    square(320, 400, 50);
}
The most important thing to understand in the main.js file is that setup() runs when the page first loads. This means that if you want to draw anything, the setup() function needs to invoke the function that does the drawing.
- Note in the code sample above,
draw5Circles()is invoked in the setup. If you uncommentdraw5RedSquares(), 5 squares will be drawn as well.
2. View file in Web Browser
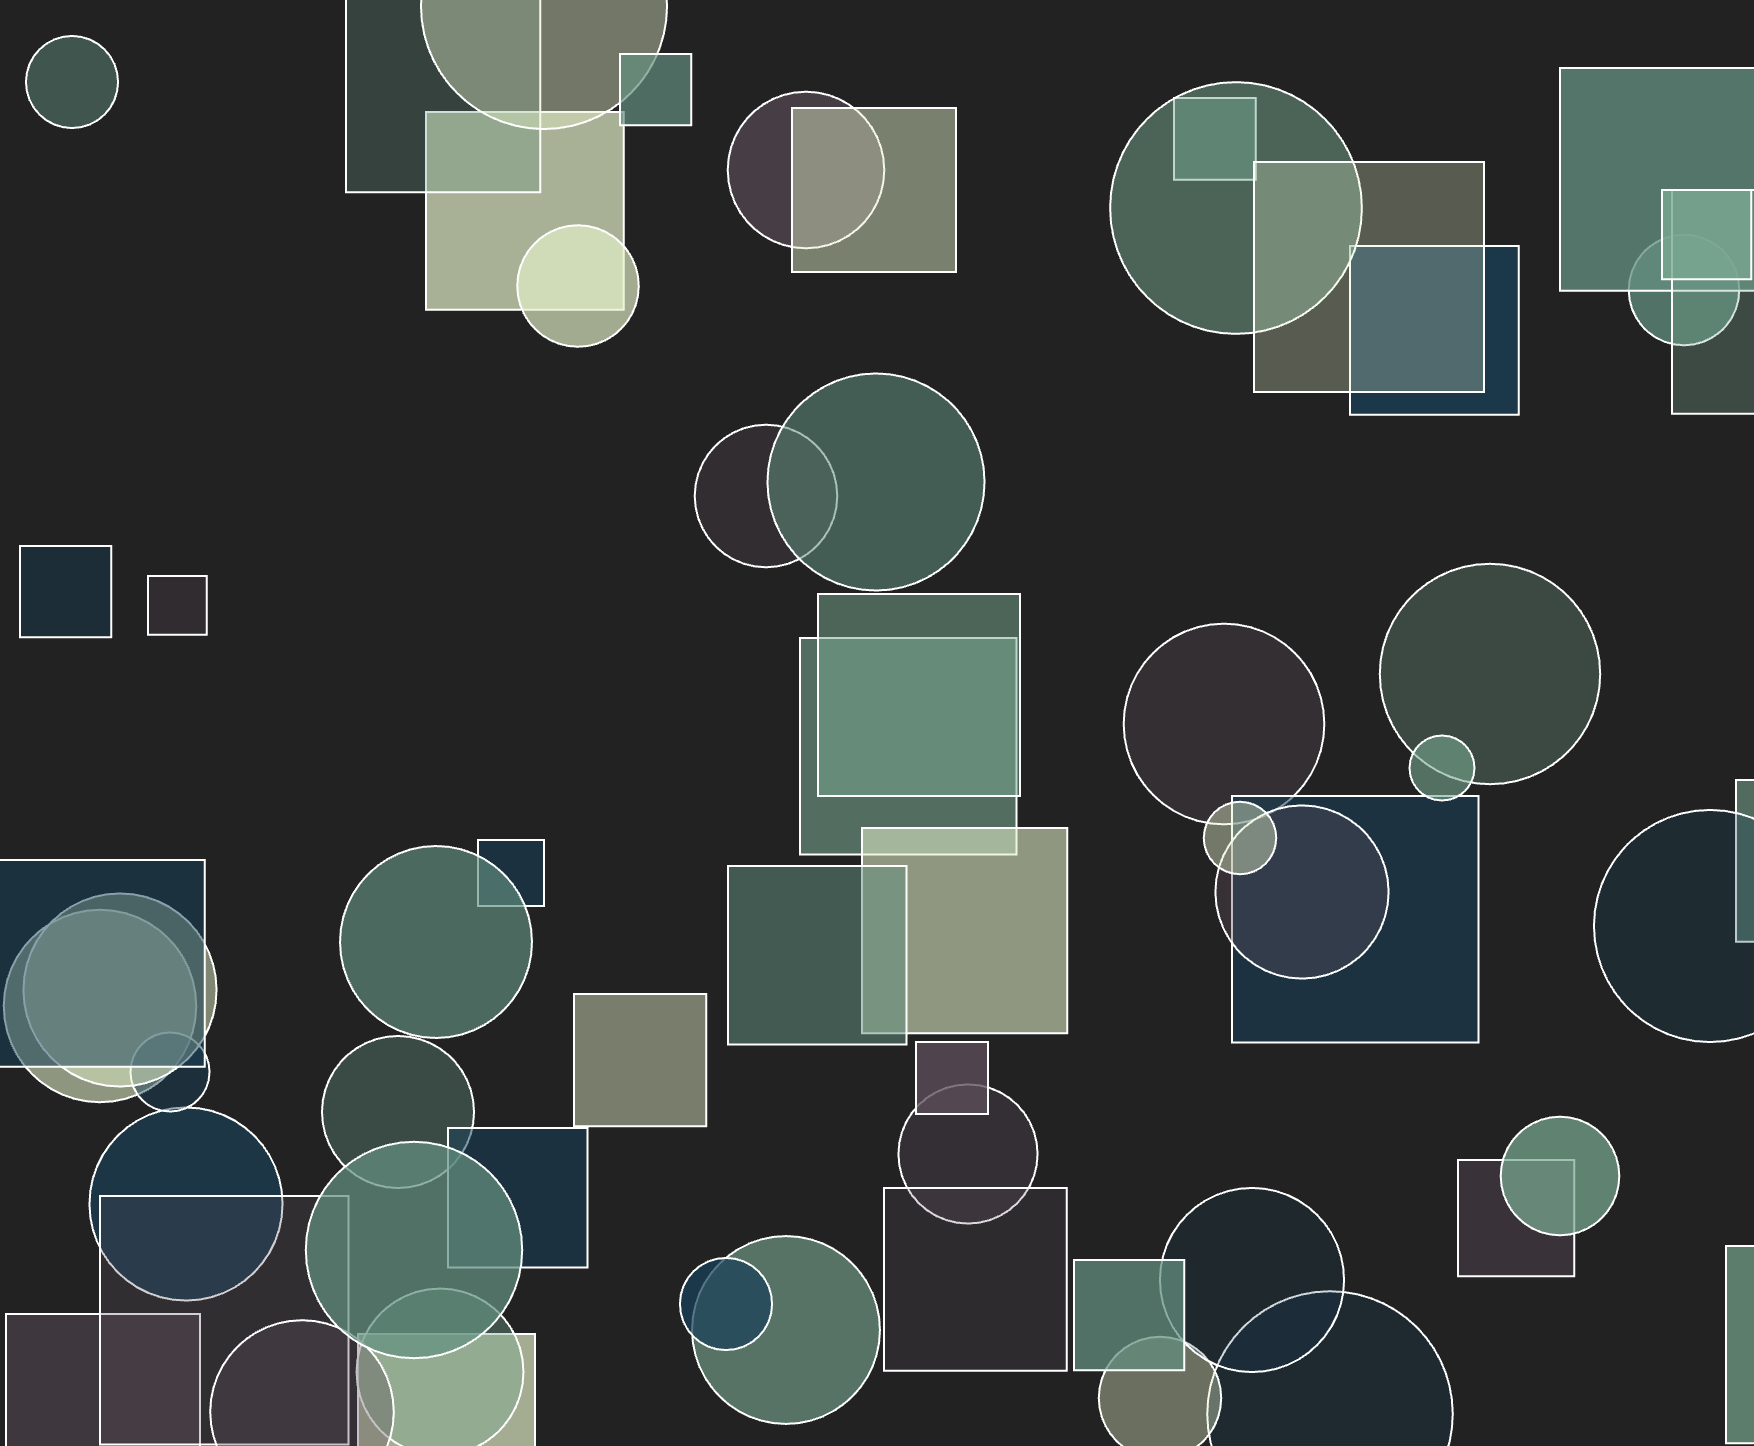
Once you’ve taken a look at the code in VS Code, view it in your browser using the Live Server plugin you installed on Monday. It should look something like this:
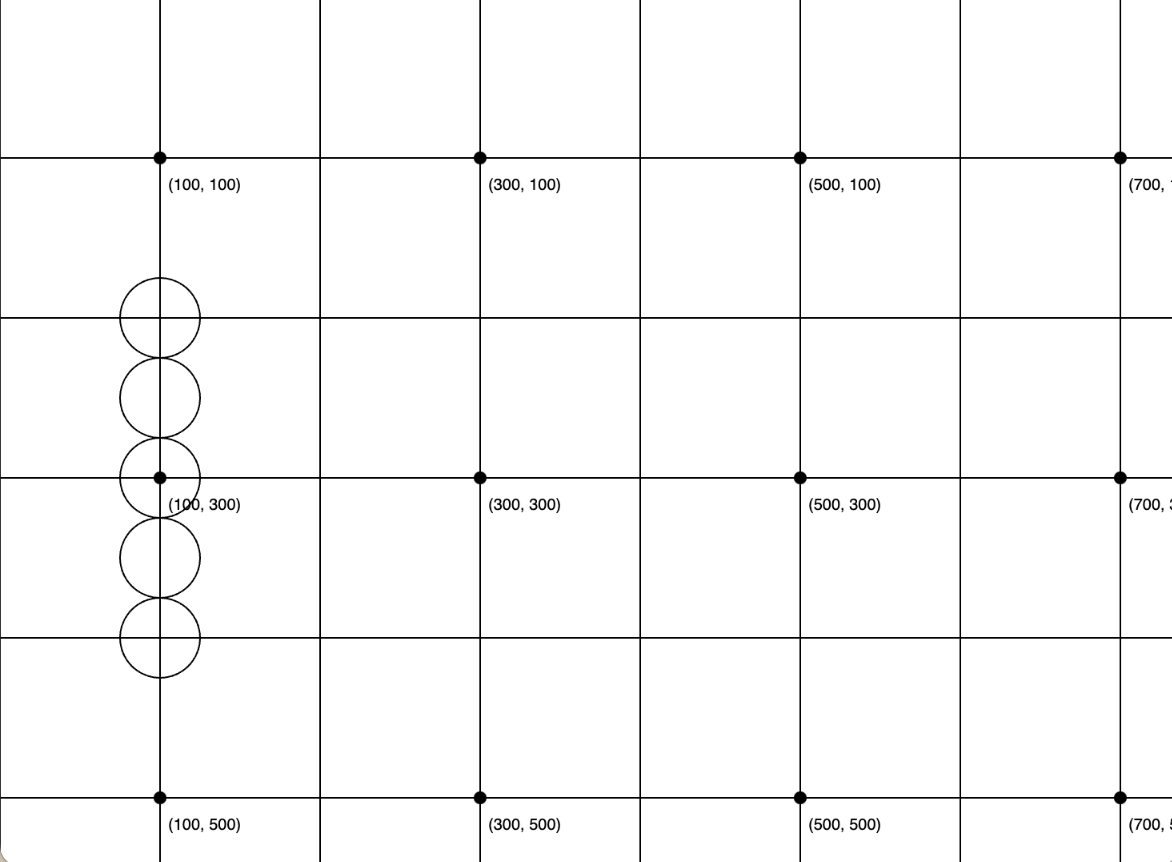
Try uncommenting draw5RedSquares(); to see what happens!
Part 2. Completing the Exercises
Now that you’re set up, please complete the 6 tasks below. You are more than welcome to work collaboratively on this assignment and to use ChatGPT – not as a replacement for critical thinking, but as a way to refresh yourself on important programming techniques.
1. While Loop - 5 Times
Create a function called draw5CirclesWhile() that uses a while loop to draw the same 5 circles. Instead of copying the same circle function invocation 5 times, your function will use a while loop instead. Each time the loop iterates, the circle should be drawn below the previous. Don’t forget to invoke your new function inside of the setup() function body. Consider using different x-positions for your circles so that they don’t draw on top of the existing ones. Pseudocode:
while less that 5 circles drawn:
    draw another circle directly below the first
2. For Loop - 5 Times
Create a function called draw5CirclesFor() that uses a for loop to draw the same 5 circles. Instead of copying the same circle function invocation 5 times, your function will use a for loop instead. Each time the loop iterates, the circle should be drawn below the previous. Don’t forget to invoke your new function inside of the setup() function body. Consider using different x-positions for your circles so that they don’t draw on top of the existing ones.
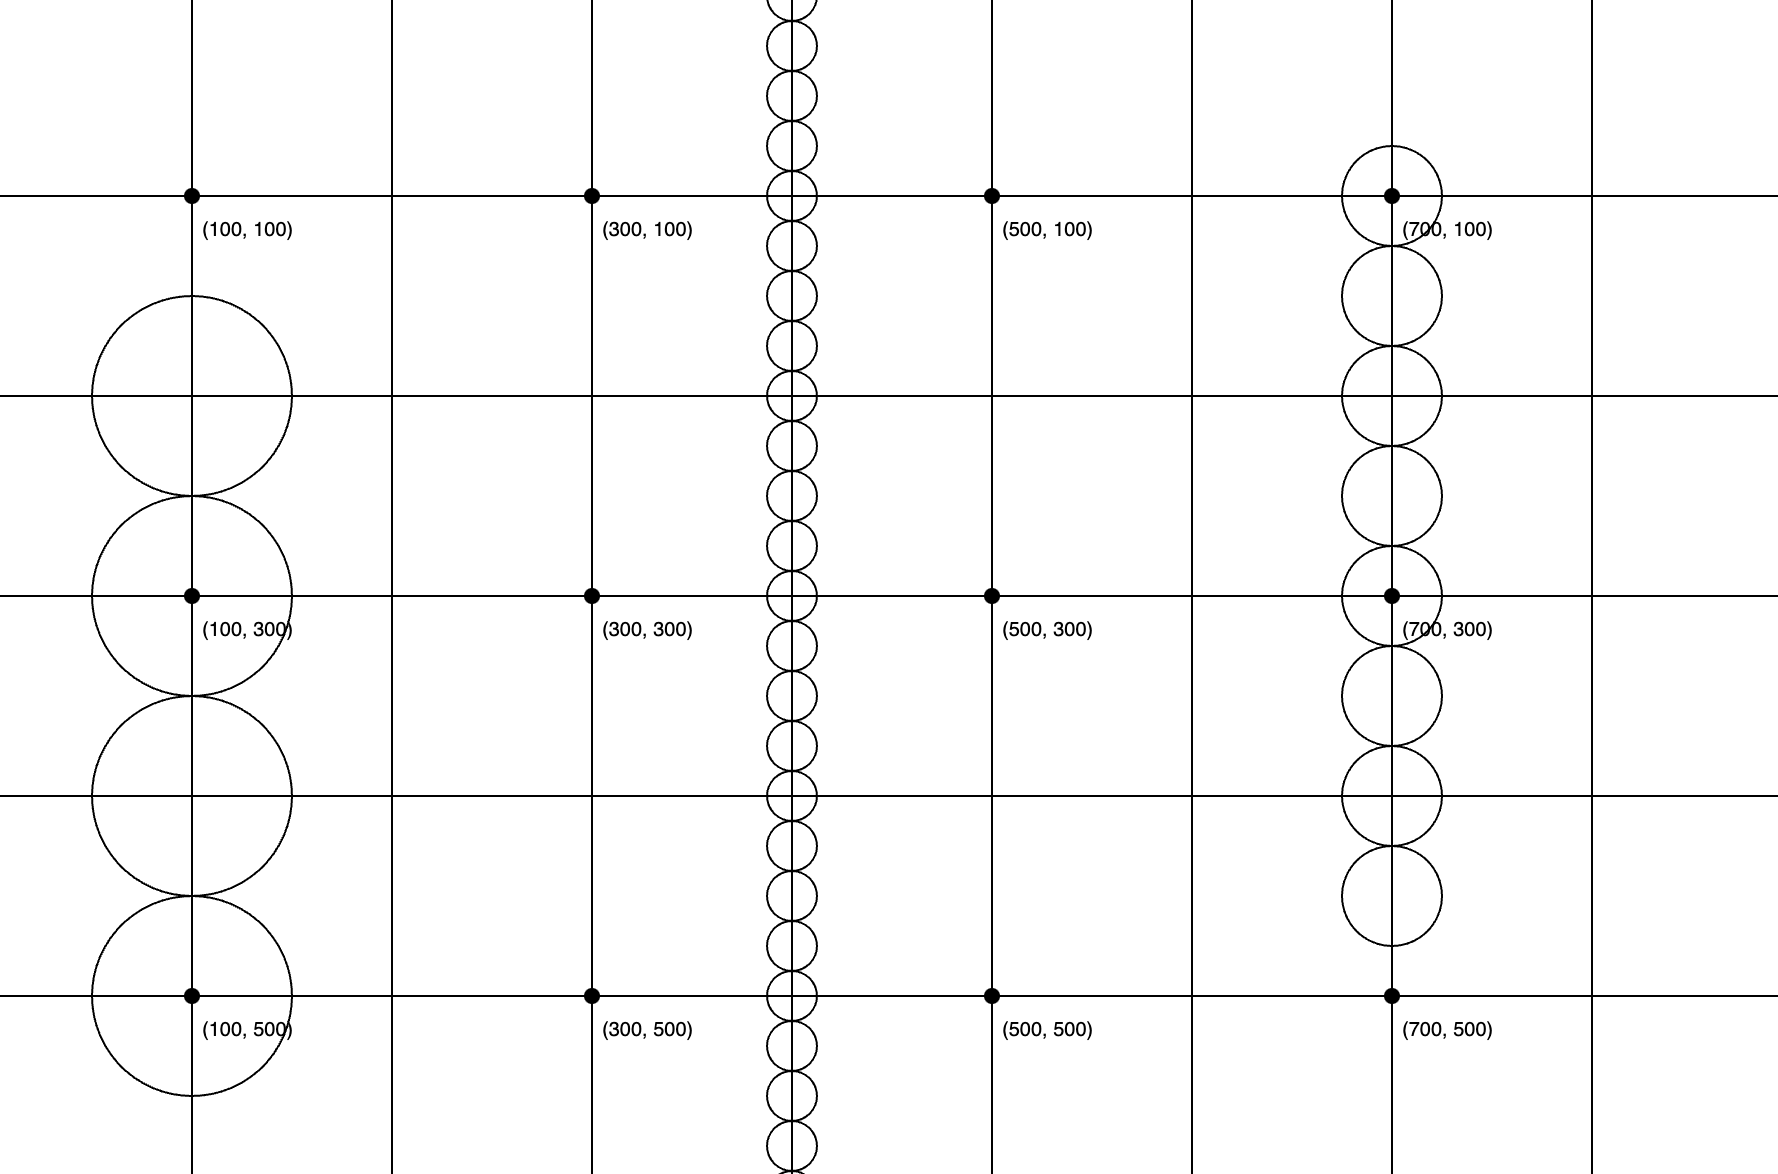
3. For Loop - N Times
Create a function called drawNCircles(n) that uses a for loop to draw any number of circles in a vertical column. If I invoke your function as follows: drawNCircles(20) it should draw 20 circles in a vertical column. Consider using different starting x and y position for your circles so that they don’t draw on top of the existing ones.
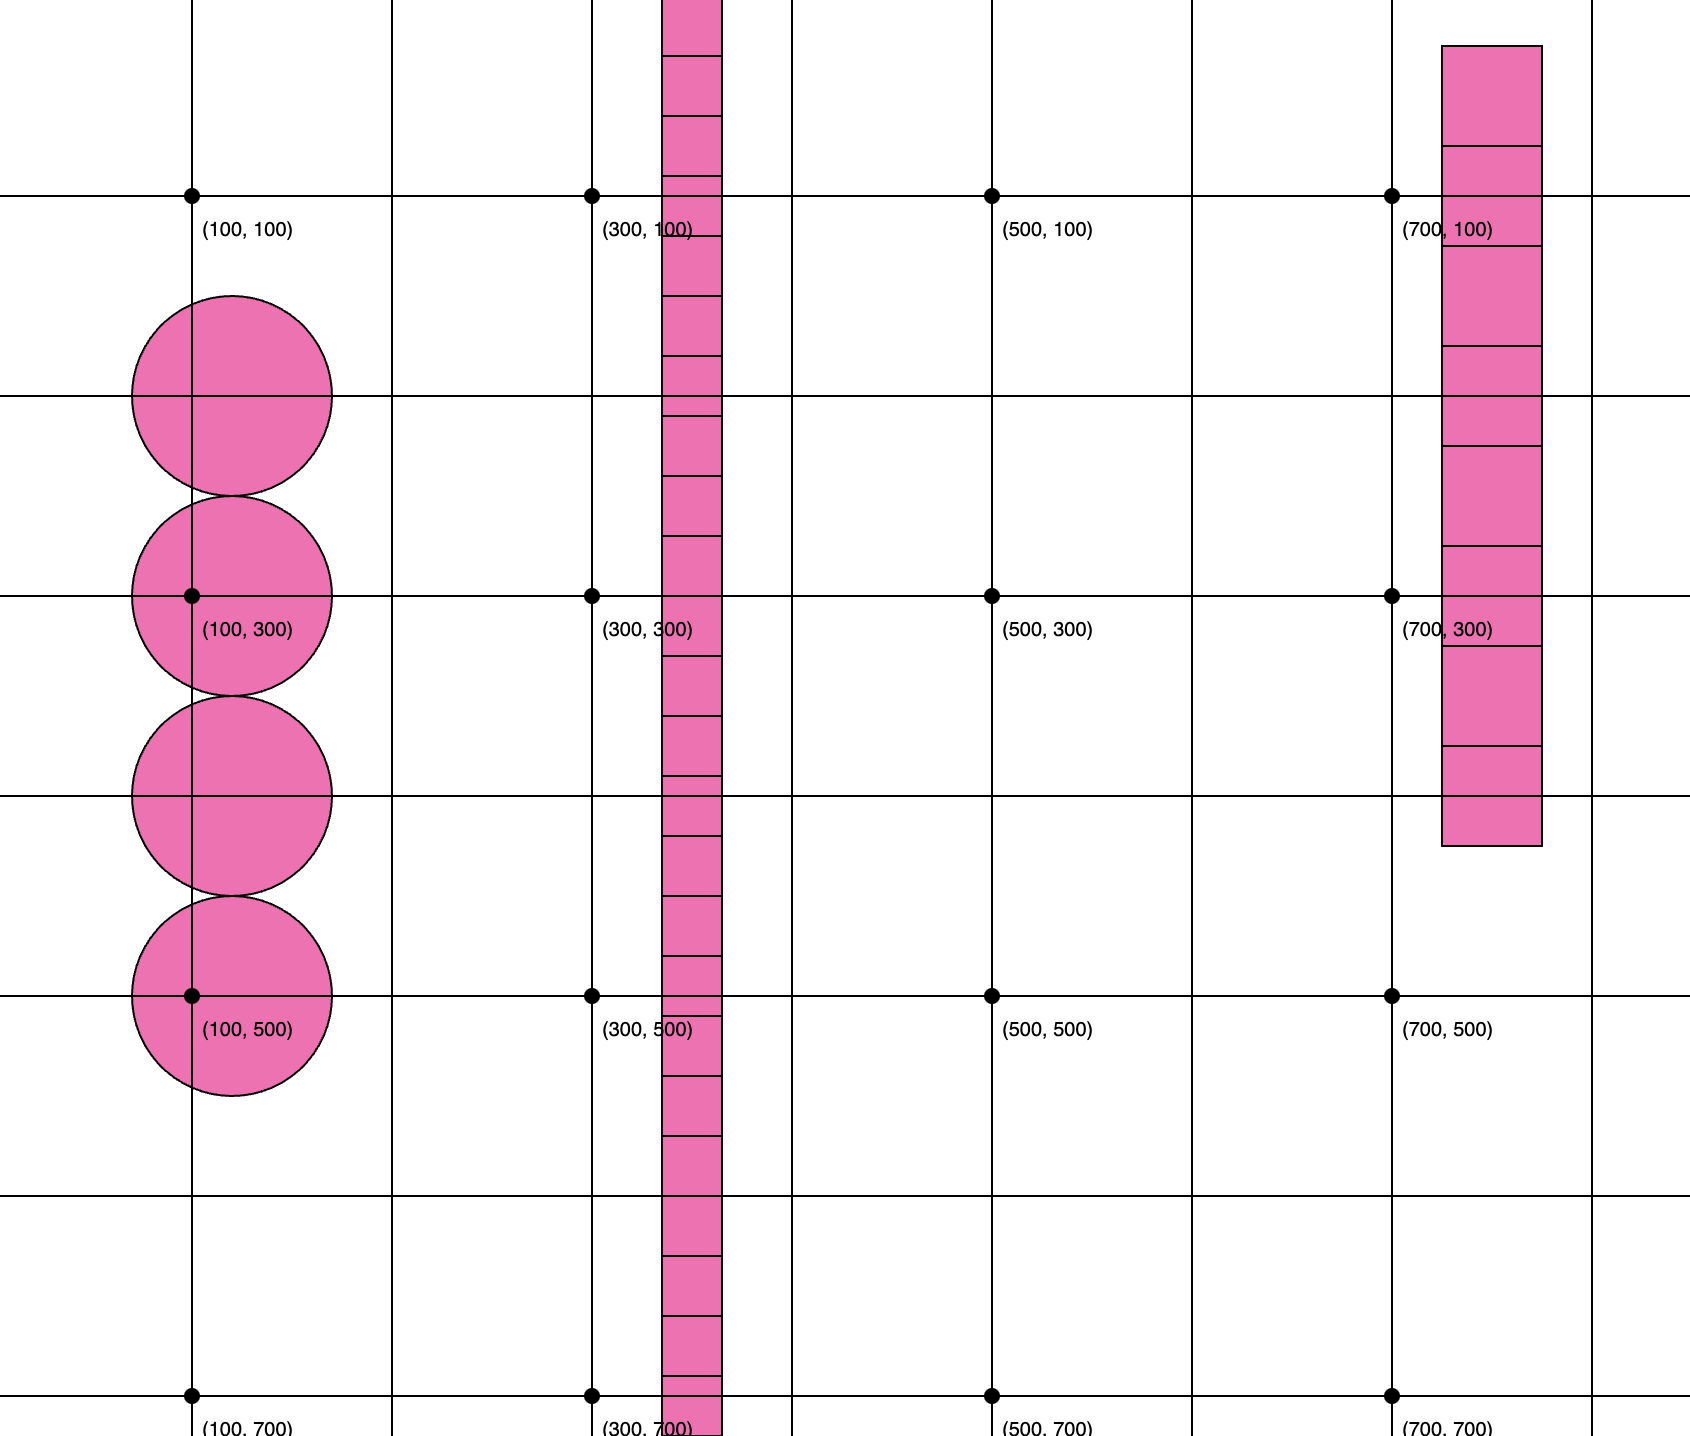
4. For Loop - More flexibility
Create a function called drawNCirclesFlexible(n, size, x, y) that uses a for loop to draw a column of circles of any size, starting at any x, y position. If I invoke your function within the setup() function as follows…
function setup() {
    // sets up the canvas:
    createCanvas(canvasWidth, canvasHeight);

    // code invoking the function you just wrote:
    drawNCirclesFlexible(30, 25, 400, 0);
    drawNCirclesFlexible(4, 100, 100, 200);
    drawNCirclesFlexible(8, 50, 700, 100);

    // draws grid at the end:
    drawGrid(canvasWidth, canvasHeight);
}
…it should produce the following picture:
5. For Loop - Even more flexibility
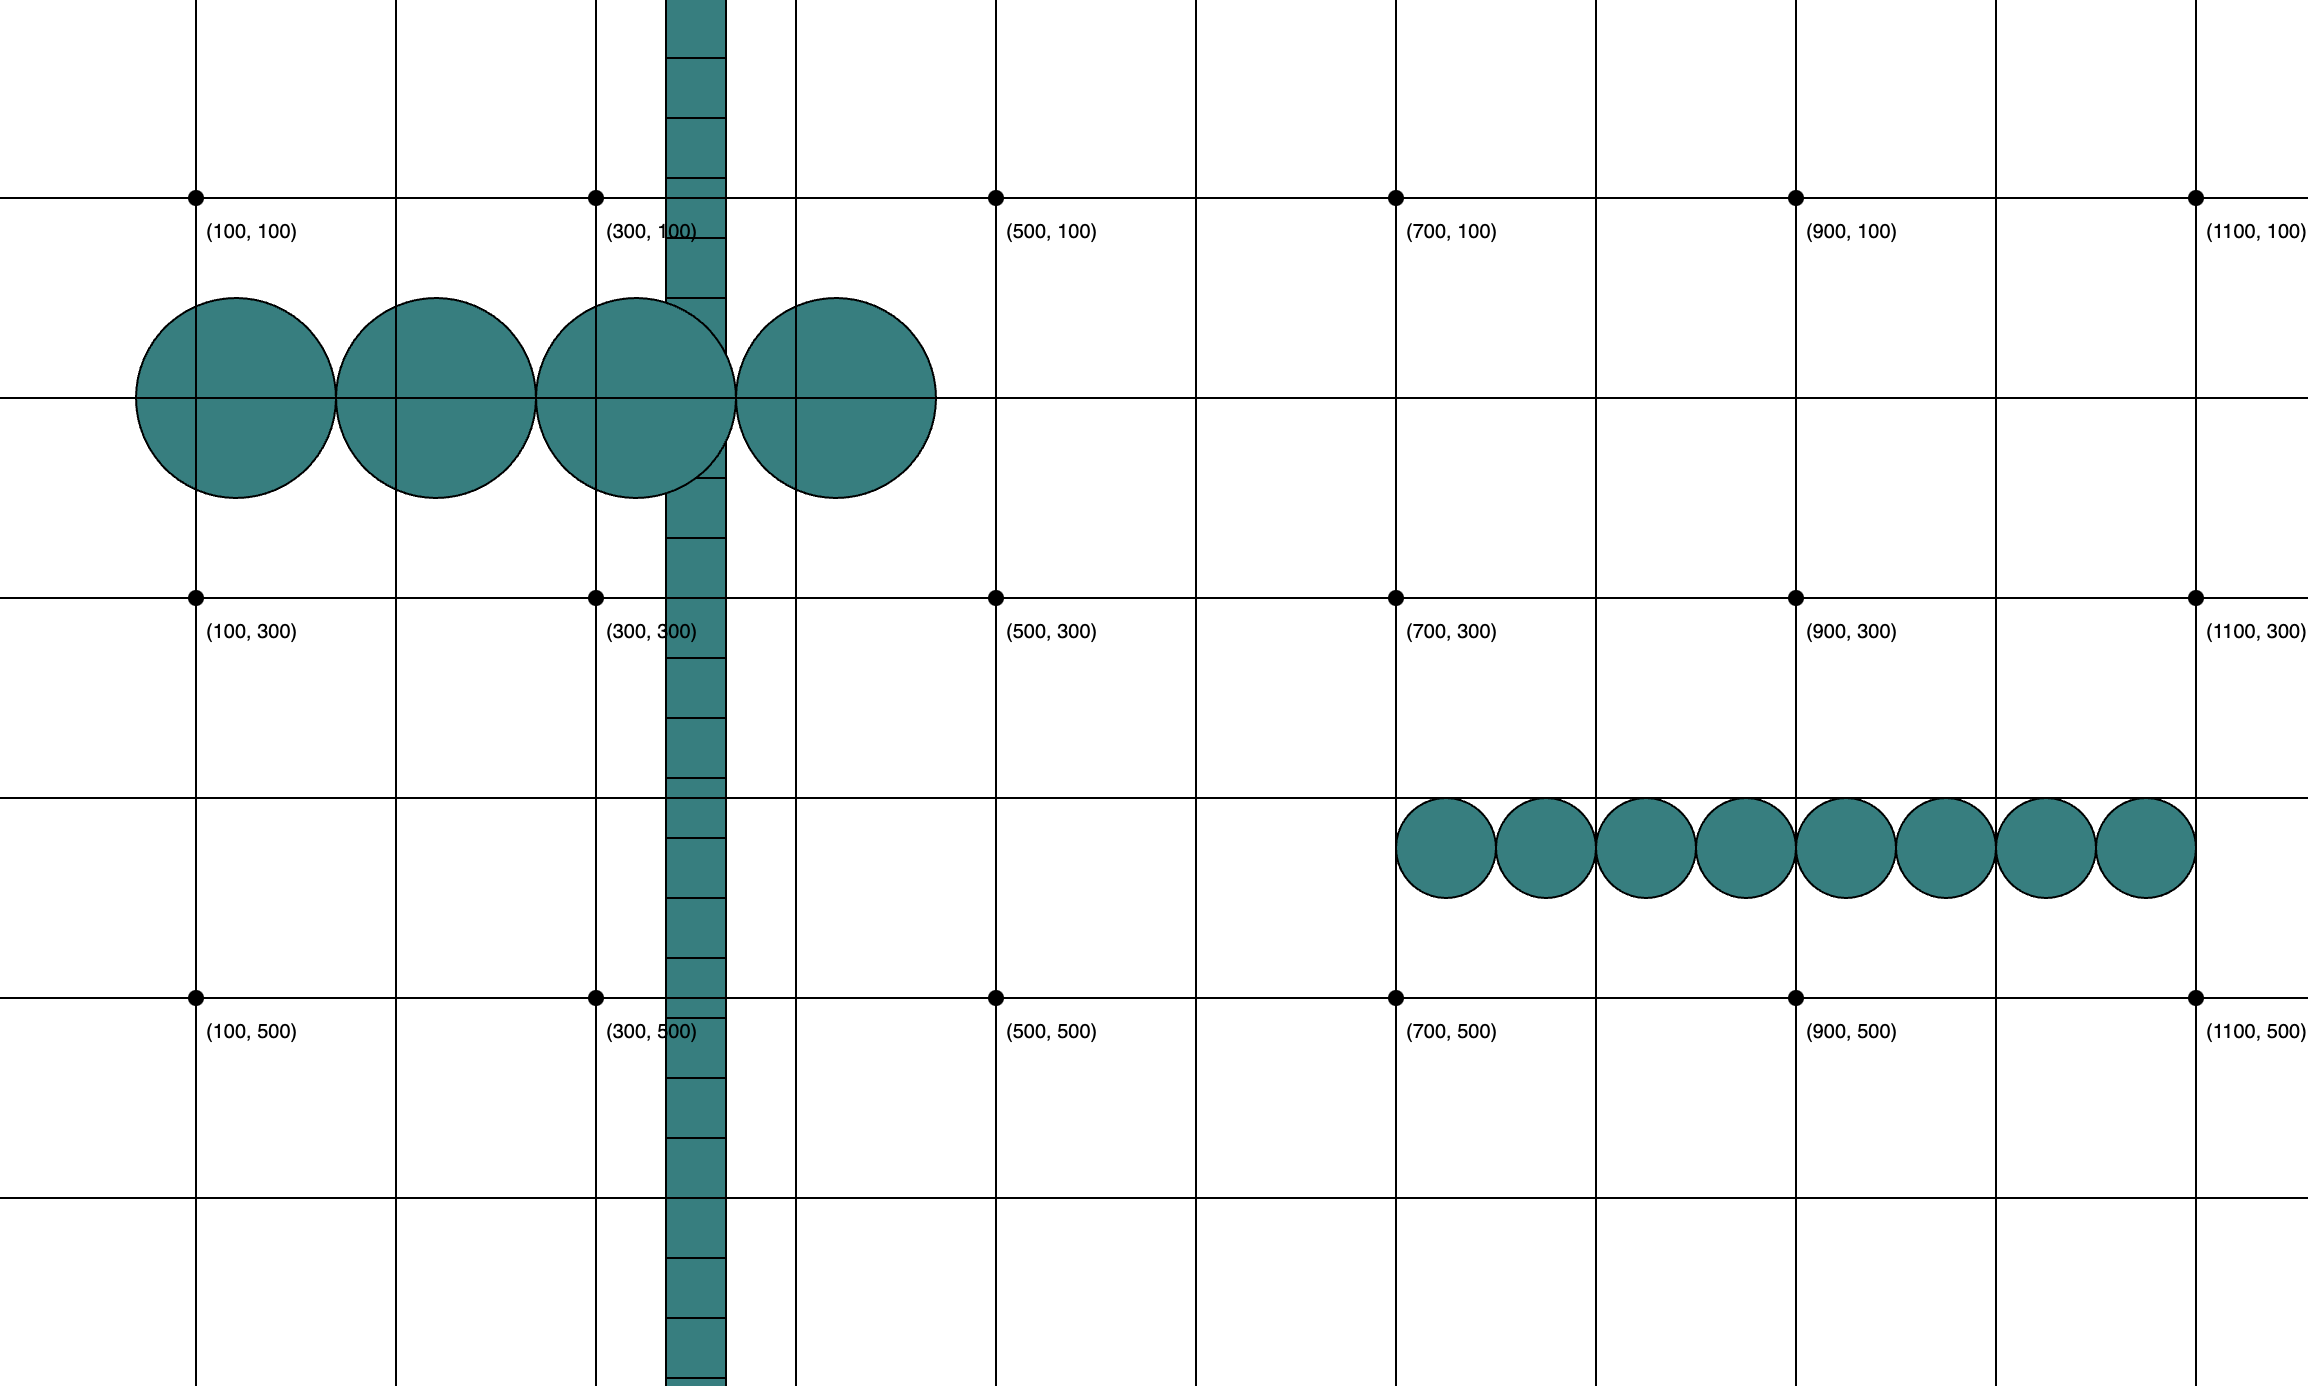
Create a function called drawNShapesFlexible(n, size, x, y, shape) that uses a for loop to draw a column of shapes of any size, starting at any x, y position. If the shape === “circle”, it will draw a column of circles. Otherwise it will draw a column of squares. If I invoke your function within the setup() function as follows…
function setup() {
    // sets up the canvas:
    createCanvas(canvasWidth, canvasHeight);

    // code invoking the function you just wrote:
    drawNShapesFlexible(30, 30, 335, 0, "square");
    drawNShapesFlexible(4, 100, 120, 200, "circle");
    drawNShapesFlexible(8, 50, 725, 25, "square");

    // draws grid at the end:
    drawGrid(canvasWidth, canvasHeight);
}
…it should produce the following picture (pick any color you want):
6. For Loop - Still more flexibility
Create a function called drawNShapesDirectionFlexible(n, size, x, y, shape, direction) that uses a for loop to draw a column of shapes of any size, starting at any x, y position.
- If the shape === “circle”, it will draw a column of circles. Otherwise it will draw a column of squares.
- If direction === “row”, it will draw a column of shapes. Otherwise it will draw a column of shapes.
If I invoke your function within the setup() function as follows…
function setup() {
    // sets up the canvas:
    createCanvas(canvasWidth, canvasHeight);

    // code invoking the function you just wrote:
    drawNShapesDirectionFlexible(30, 30, 335, 0, "square", "column");
    drawNShapesDirectionFlexible(4, 100, 120, 200, "circle", "row");
    drawNShapesDirectionFlexible(8, 50, 725, 425, "circle", "row");

    // draws grid at the end:
    drawGrid(canvasWidth, canvasHeight);
}
…it should produce the following picture (pick any color you want):
7. [Optional] Make some algorithmic art
Create some interesting art based on the techniques you experimented with. Use the fill() function to change the colors. Use the Math.random() function to randomly place your shapes, or to randomly change the sizes and colors of your shapes. Here are some drawings you could make:


For Folks Wanting More Programming Practice…
I highly recommend that you review all of these introductory exercises, using JavaScript. Here’s a suggested workflow:
- Review the reference materials (e.g., data, expressions and statements, control, etc.)
- Select a problem to try (say, 6.1.1. Data Type Conversion).
- Make a new directory inside of your
csci344folder calledprogramming-practice- Inside of your
programming-practice, create a file calleddata-type-practice.mjs(.mjsindicates that you’re making a JavaScript module).- Write the code to solve the problem.
- Open GitBash (Windows) or Terminal (Mac) and navigate to your
programming-practicefolder. If you don’t know how to do this, come to office hours.- Test your solution using the node interpreter on the command line:
node data-type-practice.mjsIf you have any questions about how to do this, please come to office hours!
What to turn in
Please commit and push all of your edits to GitHub. Then, paste a link to your GitHub Repository and to your GitHub pages in the Moodle submission.