Assignments > Tutorial 7: JavaScript: Handling POST & DELETE Actions
Due on Fri, 02/24 @ 11:59PM. 6 Points.
Introduction
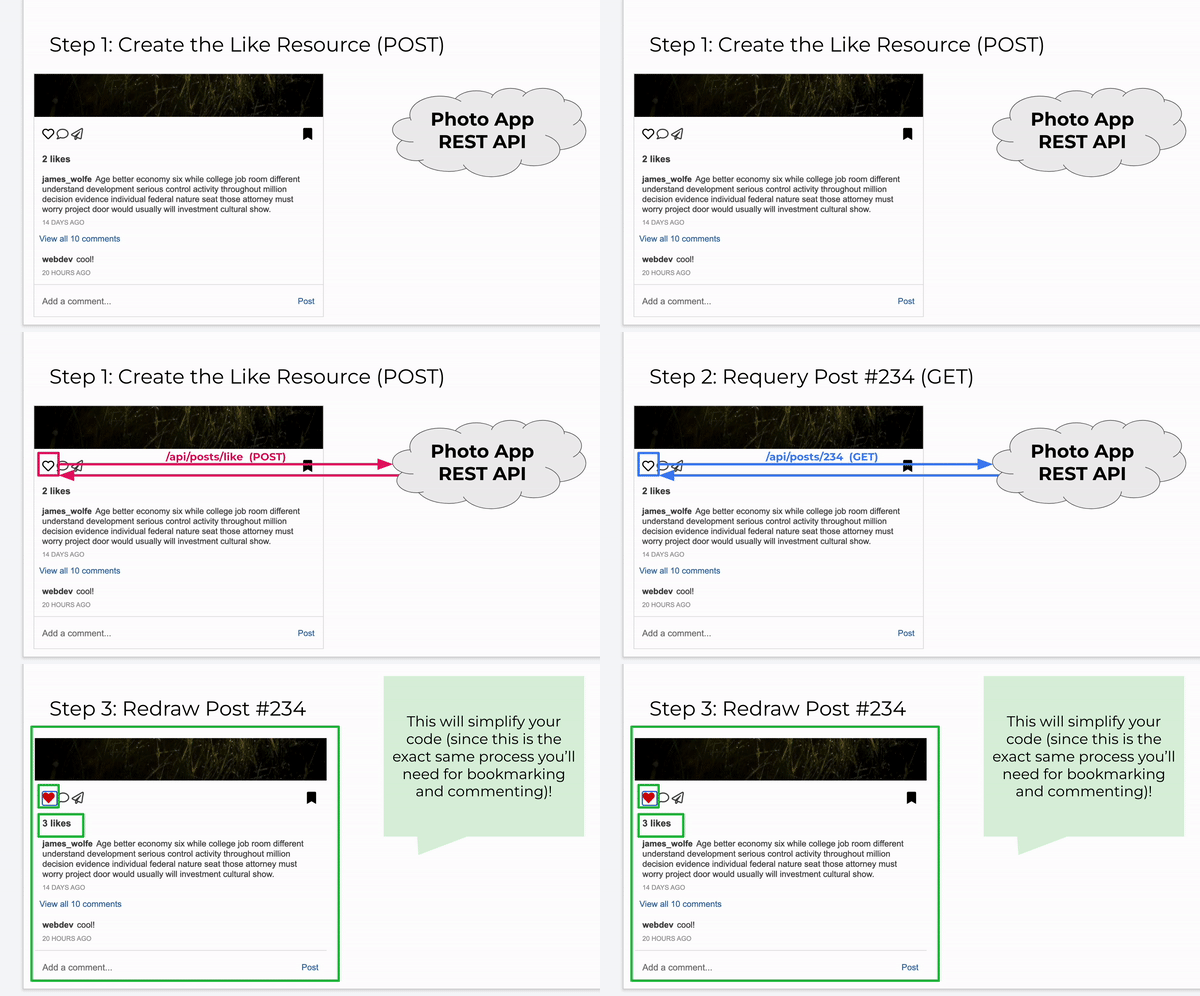
Today we will be making sure that everyone understands how to complete HW5. The general process for completing all of the HW5 event handlers is:
- Attach an event handler to the appropriate control.
- Issue the appropriate HTTP request (POST or DELETE) to modify the relevant resource on the server.
- [If Applicable] Re-query the API for any relevant state changes (e.g., if you add / remove a
Like,Bookmark, orCommentresource, the data structure of thePostresource will change). - Redraw a section of the screen to reflect the state change.
Endpoints
To understand how to interact with the API, please see the Photo App API tester: https://photo-app-secured.herokuapp.com/api. Below, I have listed the relevant endpoints with which you will have to interact:
| Resource | Endpoint | Methods | Job | Notes |
|---|---|---|---|---|
| Bookmark (Today) | /api/bookmarks/ |
POST | Creates a Bookmark resource |
Modifies state of corresponding Post |
/api/bookmarks/<id> |
DELETE | DELETES a Bookmark resource |
Modifies state of corresponding Post | |
| Like | /api/posts/likes/ |
POST | Creates a Like resource |
Modifies state of corresponding Post |
/api/posts/likes/<id> |
DELETE | DELETES a Like resource |
Modifies state of corresponding Post | |
| Comment | /api/comments/ |
POST | Creates a Comment resource |
Modifies state of corresponding Post |
/api/comments/<id> |
DELETE | DELETES a Comment resource |
Modifies state of corresponding Post | |
| Following | /api/following/ |
POST | Creates a new Following resource |
|
/api/following/<id> |
DELETE | Deletes a new Following resource |
||
| Post | /api/posts/<id> |
GET | Retrieves a single Post resource |
For re-querying a single Post |
Two design patterns to be aware of…
There are two “design patterns” for implementing the event handlers: (1) one for bookmarking, liking, and commenting, and (2) one for following / unfollowing users.
1. Bookmarking, Liking, and Commenting
If you create / delete a Bookmark, Like, or Comment resource, the structure of the Post resource also changes. This is because a Post includes (for convenience) information about comments, likes, and whether the current user has liked or bookmarked the current post (see data structure below):
{
   "id": 2,
   "image_url": "https://picsum.photos/600/430?id=300",
   "user": {...},
   "caption": "Some Text",
   "alt_text": photo caption,
   "display_time": "14 days ago",
   "likes": [
      {...},
      {...},
      {...}
   ],
   "comments": [
      {...},
      {...},
      {...}
   ],
   "current_user_like_id": 671,
   "current_user_bookmark_id": 566
}
Therefore, each event handler (add / remove bookmark, add / remove like, add comment) ought to implement following workflow:
- Issue the POST / DELETE Request to the appropriate endpoint.
- When the response resolves, issue a second GET request to re-query the “Post” resource
/api/posts/<id>(to get its updated state). - When the second response resolves, redraw the modified “Post” by:
- Invoking the
postToHtml()function using the updatedPost, and - Replacing the existing HTML representation of the post (within the DOM) with the new one you just made.
- Invoking the
- Tip: If the current user has liked / bookmarked a post, you will have to embed the like / bookmark id as a button attribute so that you know what to delete later on.

2. Following / Unfollowing
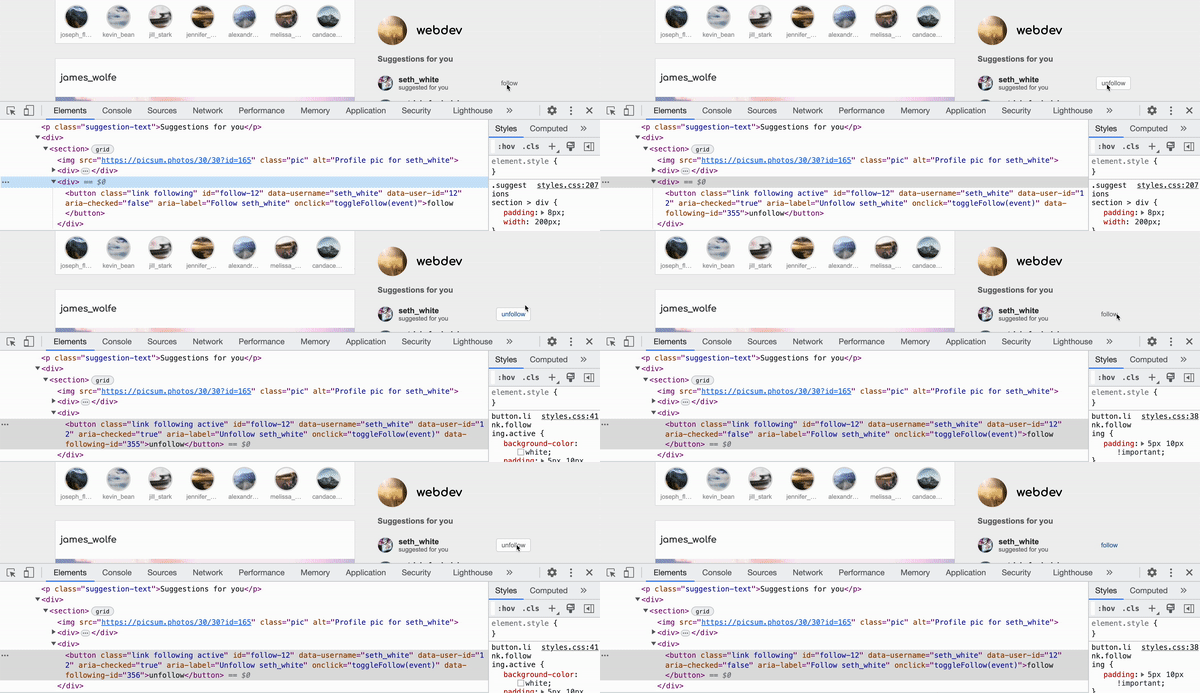
Creating or deleting a Following resource has no bearing on the state of any other resource. As such, the workflow is simpler:
- Issue the POST / DELETE Request to the appropriate endpoint.
- When the response resolves, modify the button to have the right innerHTML (follow / unfollow) and accessibility attributes.
- Tip: Note that if you want the ability to “unfollow” a user after having just created a
Followingresource, you will have to embed the id of the following resource in the element (so you know which resource to delete later on). See animation below:

Your Task
For today’s tutorial we will be implementing the “Bookmark Button” together. Download the starter code and save it in tutorials/tutorial07.
Then, complete the following tasks:
- Create a bookmark button that is hollow if the post is not bookmarked and solid if it is (see tips below).
- When the user clicks the button…
- If the post has not been bookmarked by the current user, issue a
POSTrequest to the/api/bookmarksendpoint (which will create a new Bookmark resource documenting that the current user has bookmarked the post). - If the post has been bookmarked by the current user, issue a
DELETErequest to the/api/bookmarks/<id>endpoint (which will delete the Bookmark resource).
- If the post has not been bookmarked by the current user, issue a
- After the bookmark has been created or deleted, requery for the post by issuing a
GETrequest to the/api/posts/<id>endpoint. - Redraw the post.
- If time, implement the accessibility features.
Hints, Tips, and Sample Code
Bookmark Icons
<!-- solid bookmark -->
<i class="fa-solid fa-bookmark"></i>

<!-- hollow bookmark -->
<i class="fa-regular fa-bookmark"></i>
Example of Using POST Method: Bookmark
const createBookmark = async () => {
    // define the endpoint:
    const endpoint = `https://photo-app-secured.herokuapp.com/api/bookmarks/`;
    const postData = {
        "post_id": SOME_ID_GOES_HERE // replace with the actual post ID
    };

    // Create the bookmark:
    const response = await fetch(endpoint, {
        method: "POST",
        headers: {
            'Content-Type': 'application/json',
            'Authorization': 'Bearer ' + token
        },
        body: JSON.stringify(postData)
    })
    const data = await response.json();
    console.log(data);
}
Example of Using DELETE Method: Bookmark
const deleteBookmark = async () => {
    // define the endpoint:
    const endpoint = `https://photo-app-secured.herokuapp.com/api/bookmarks/<bookmark_id>`;

    // Create the bookmark:
    const response = await fetch(endpoint, {
        method: "DELETE",
        headers: {
            'Content-Type': 'application/json',
            'Authorization': 'Bearer ' + token
        }
    })
    const data = await response.json();
    console.log(data);
}
Replacing a DOM element with another DOM element
Sarah has created a helper function called `` to make it easy for you to replace DOM elements (see below; already included in the starter files).
const targetElementAndReplace = (selector, newHTML) => {
    const div = document.createElement('div');
    div.innerHTML = newHTML;
    const newEl = div.firstElementChild;
    const oldEl = document.querySelector(selector);
    oldEl.parentElement.replaceChild(newEl, oldEl);
}
If you want to replace an existing DOM element with a different one, here is an example of how you might use it:
Before
<main>
    <div id="div1">Morning</div>
    <div id="div2">Hello</div>
    <div id="div3">Howdy</div>
</main>
Invoke targetElementAndReplace
targetElementAndReplace('#div2', <div id="div2_new">Goodbye</div>');
After
<main>
    <div id="div1">Morning</div>
    <div id="div2_new">Goodbye</div>
    <div id="div3">Howdy</div>
</main>
What to Submit
- A zip file of your completed Tutorial 7
- If you worked with a partner, please name your partner by adding a comment in the Moodle.