Assignments > HW4: Building a JavaScript Client: Part I
Due on Mon, 02/27 @ 11:59PM. 25 Points.
Collaboration and Code Sharing Policy is the same as HW 3
1. Introduction
In this assignment, you will build a “data-driven” version of the interface you built in HW2 using JavaScript. Specifically, you will:
- Set up git and GitHub pages so that you can deploy your website to a web server that is accessible to the outside world.
- Build a very simple HTML “skeleton,” and then write some “client-side” JavaScript to:
- Query data from a server (using a REST API) and
- Build DOM elements based on the data returned from the server.
- Ensure that your interface is accessible.
You may NOT use any outside CSS or JavaScript libraries (other than Font Awesome). Everything should be done by writing your own “vanilla” HTML, CSS, and JavaScript.
Working Demo
If you want to see a working demo of the completed HW4 interface (ignore the login screen), take a look:
https://photo-app-secured.herokuapp.com/
- username: webdev
- password: password
The app may be asleep (because I’m using the cheap version of Heroku), so you may need to wait about 10 seconds for it to load.
2. Set Up
Before beginning the assignment, please set up git and GitHub, and configure your files.
1. Install git
In order to interact with GitHub, you need to install git. Before you install it, check and make sure it’s not already installed by:
- Windows: search for the software program “GitBash.” If you find it, git is already installed.
- Mac:
- Opening your Terminal and type the word
gitat the command prompt. - If you get a message that says “not recognized” or something along those lines, then you need to install it.
- Opening your Terminal and type the word
If you need to install it, follow these instructions: https://git-scm.com/book/en/v2/Getting-Started-Installing-Git.
2. Register for an account on GitHub using your student email
Register for a student GitHub account if you don’t have one already: https://github.com/join. Some notes:
- Please register using your
@unca.eduaccount. - After Spring Break, you will need to sign up for the Student Developer Pack to access to some free cloud hosting services. Please register for these services as soon as possible.
3. Tell git who you are
Tell git who you are by running the following commands in GitBash (Windows) or in the Terminal (Mac):
git config --global user.name "Sarah"
git config --global user.email "my_email@unca.edu"
Please use your name and the UNCA email you used when registering with GitHub.
Note for Computer Lab Computers
If you are using a computer lab computer, you will need to complete this step (step 4) each time you use git.
4. Open your folder in VS Code
- Download the starter files and save them somewhere that makes sense
- Rename the
hw04folder you just downloaded / unzipped tophoto-app. - Replace the the
index-replace.htmlandstyles-replace.cssfiles inphoto-appwith theindex.htmlandstyles.cssfiles you made in HW2. - Add the following script tag to the
index.htmlfile that you made from HW2 to link it to the starter JavaScript file
<script src="js/main.js" type="module" defer></script> - Open your
photo-appfolder in VS Code.
Your folder structure should look like this:
photo-app
├── index.html  # your HW2 file
├── js
│   ├── main.js
│   └── utilities.js
└── styles.css  # your HW 2 file
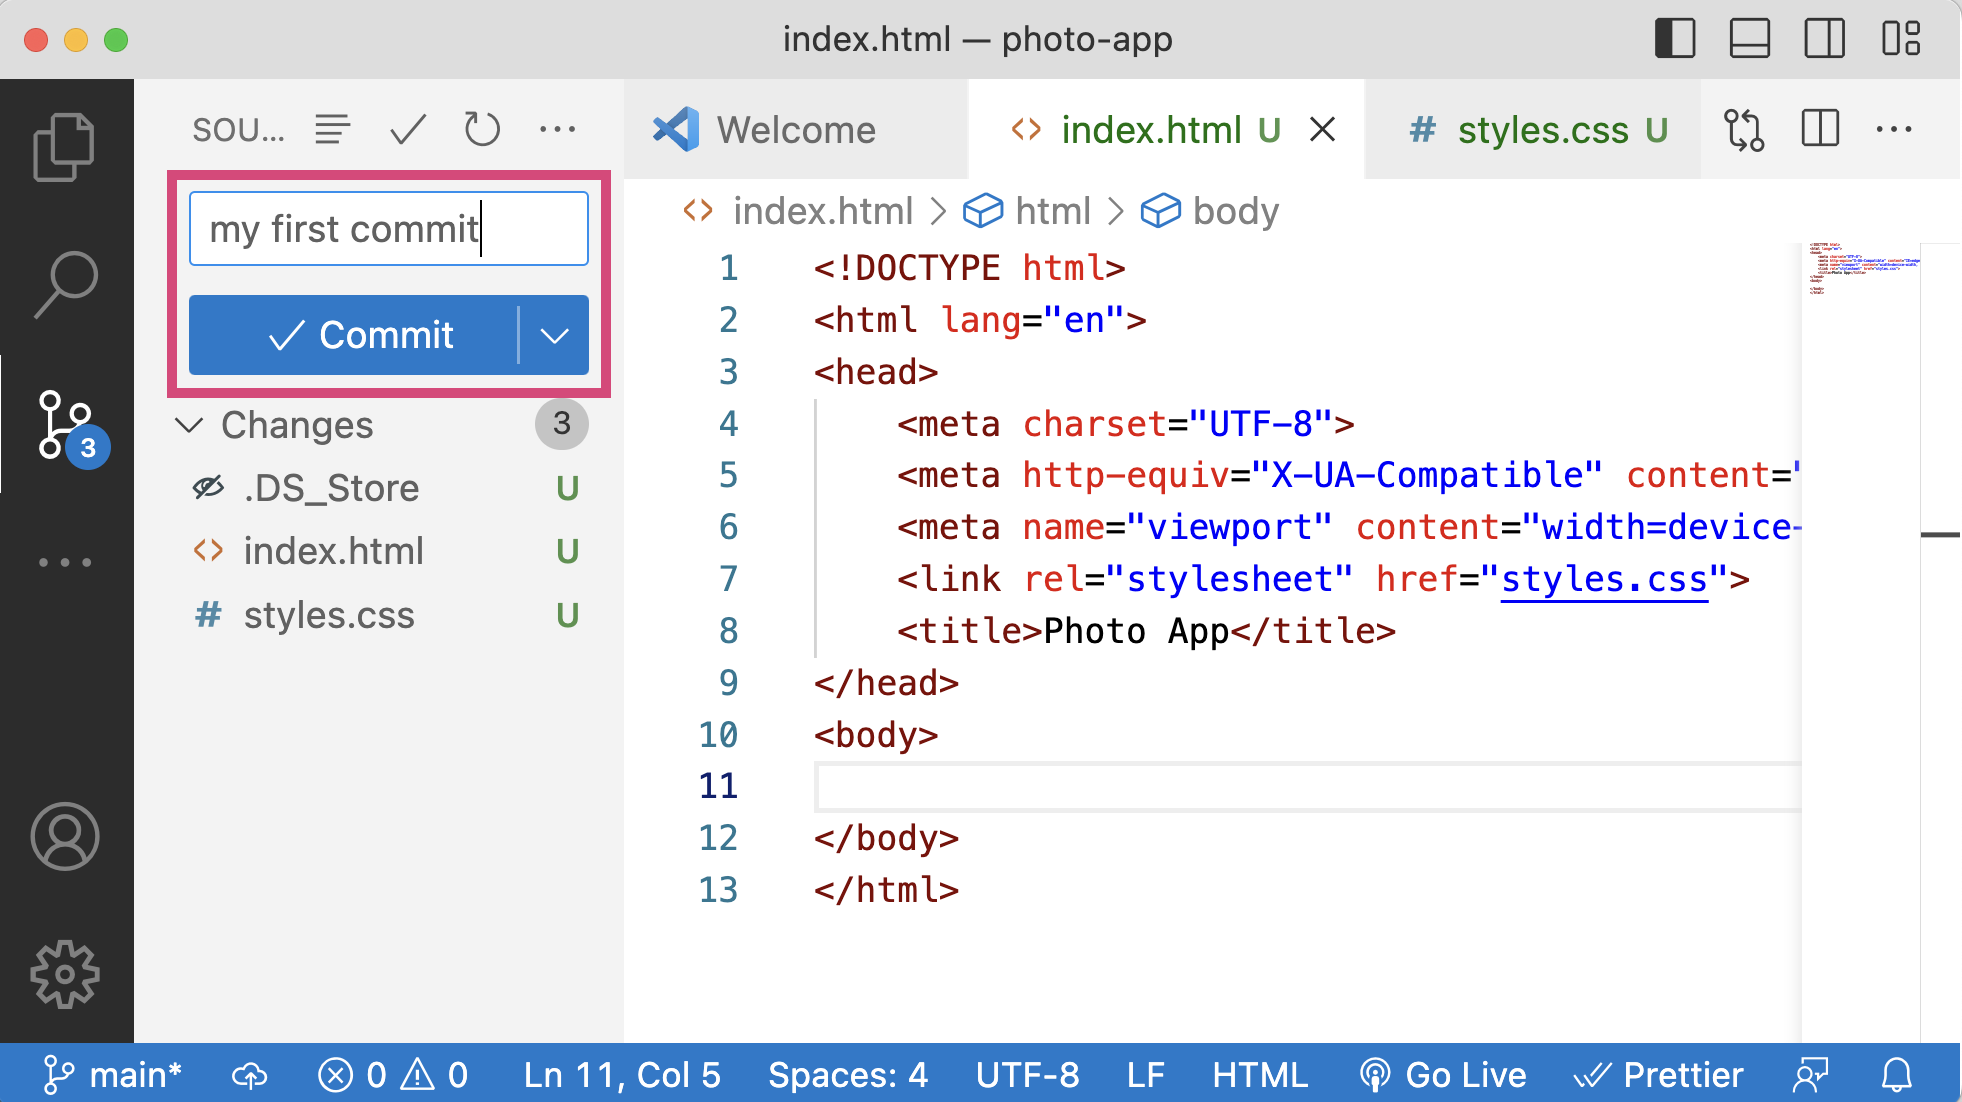
5. Initialize your repository and commit your files
Within VS Code, click on the “Branch” icon, and then click the blue “Initialize Repository” button.
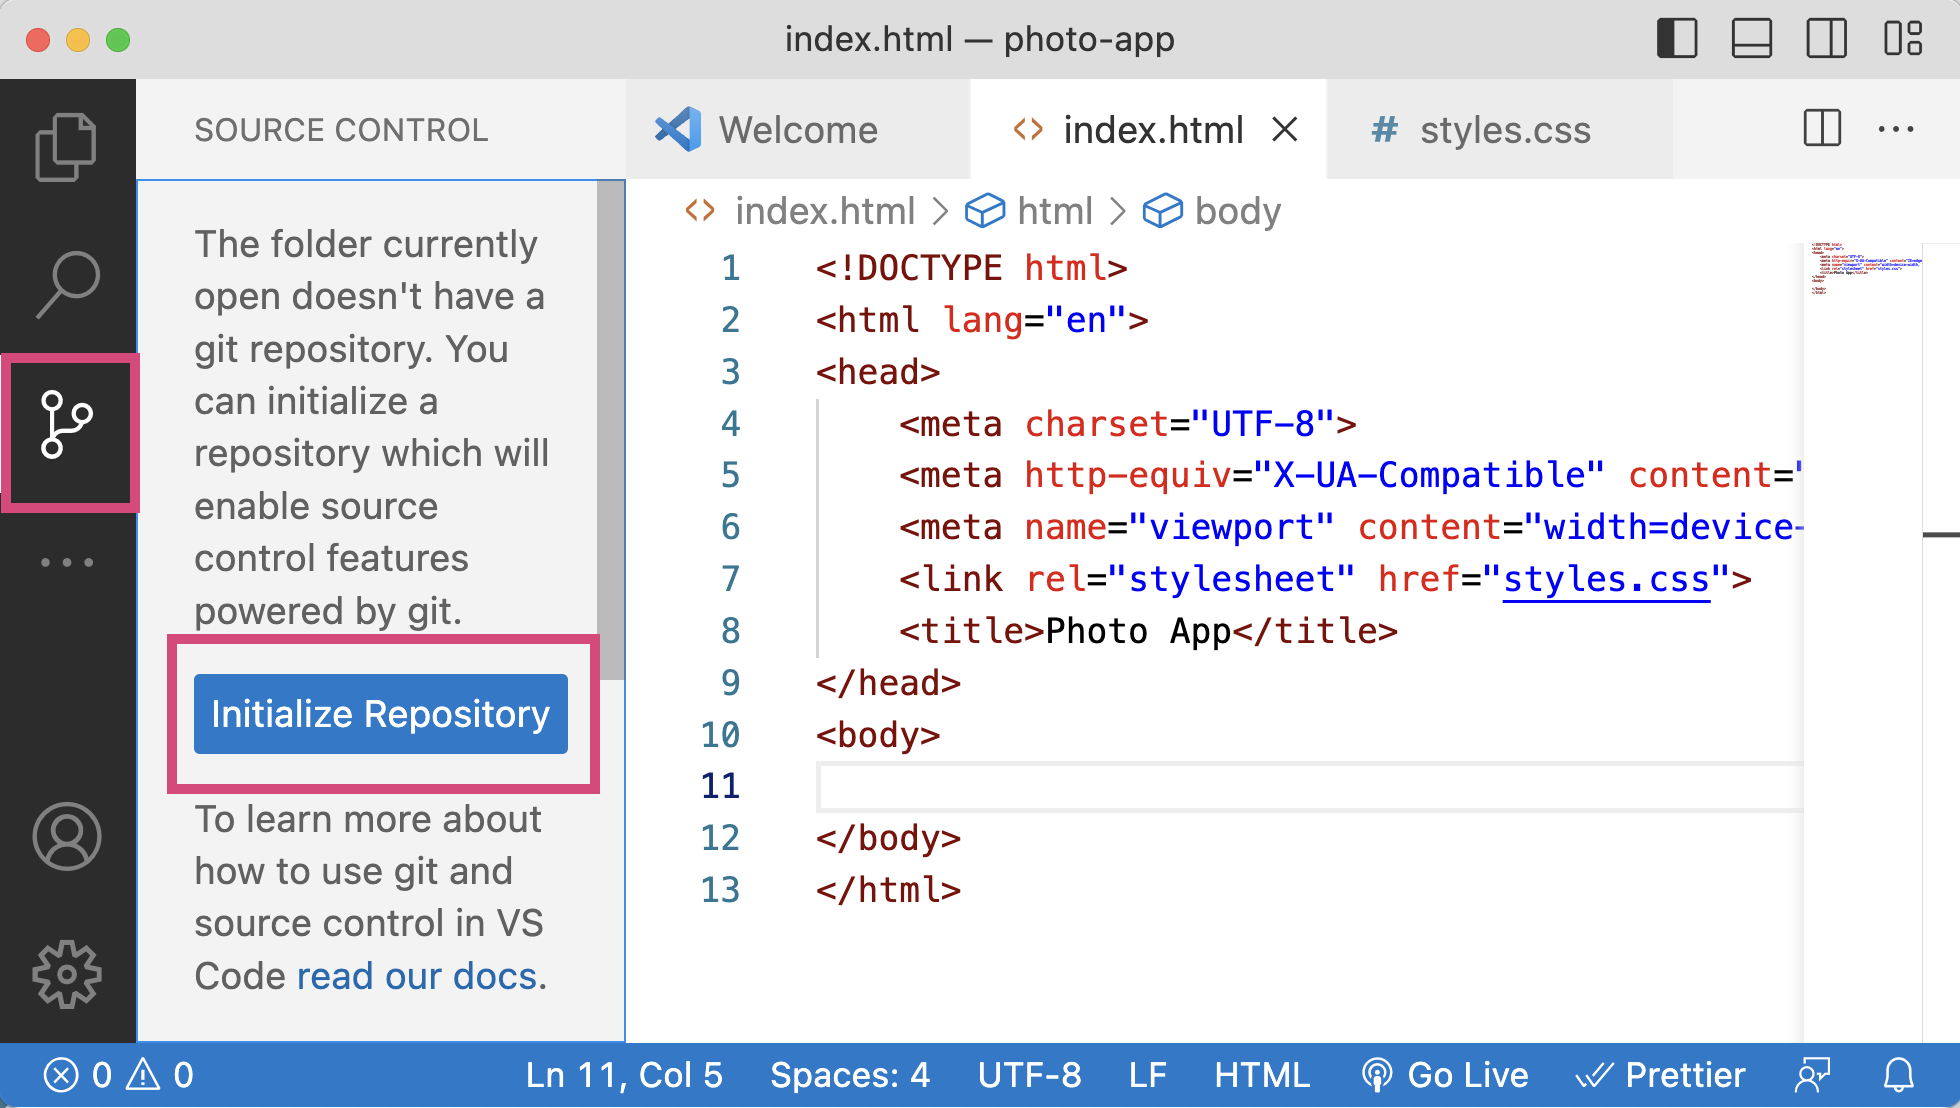
Add a message to the message text box (e.g., “My first commit”), and then click the blue “Commit” button.
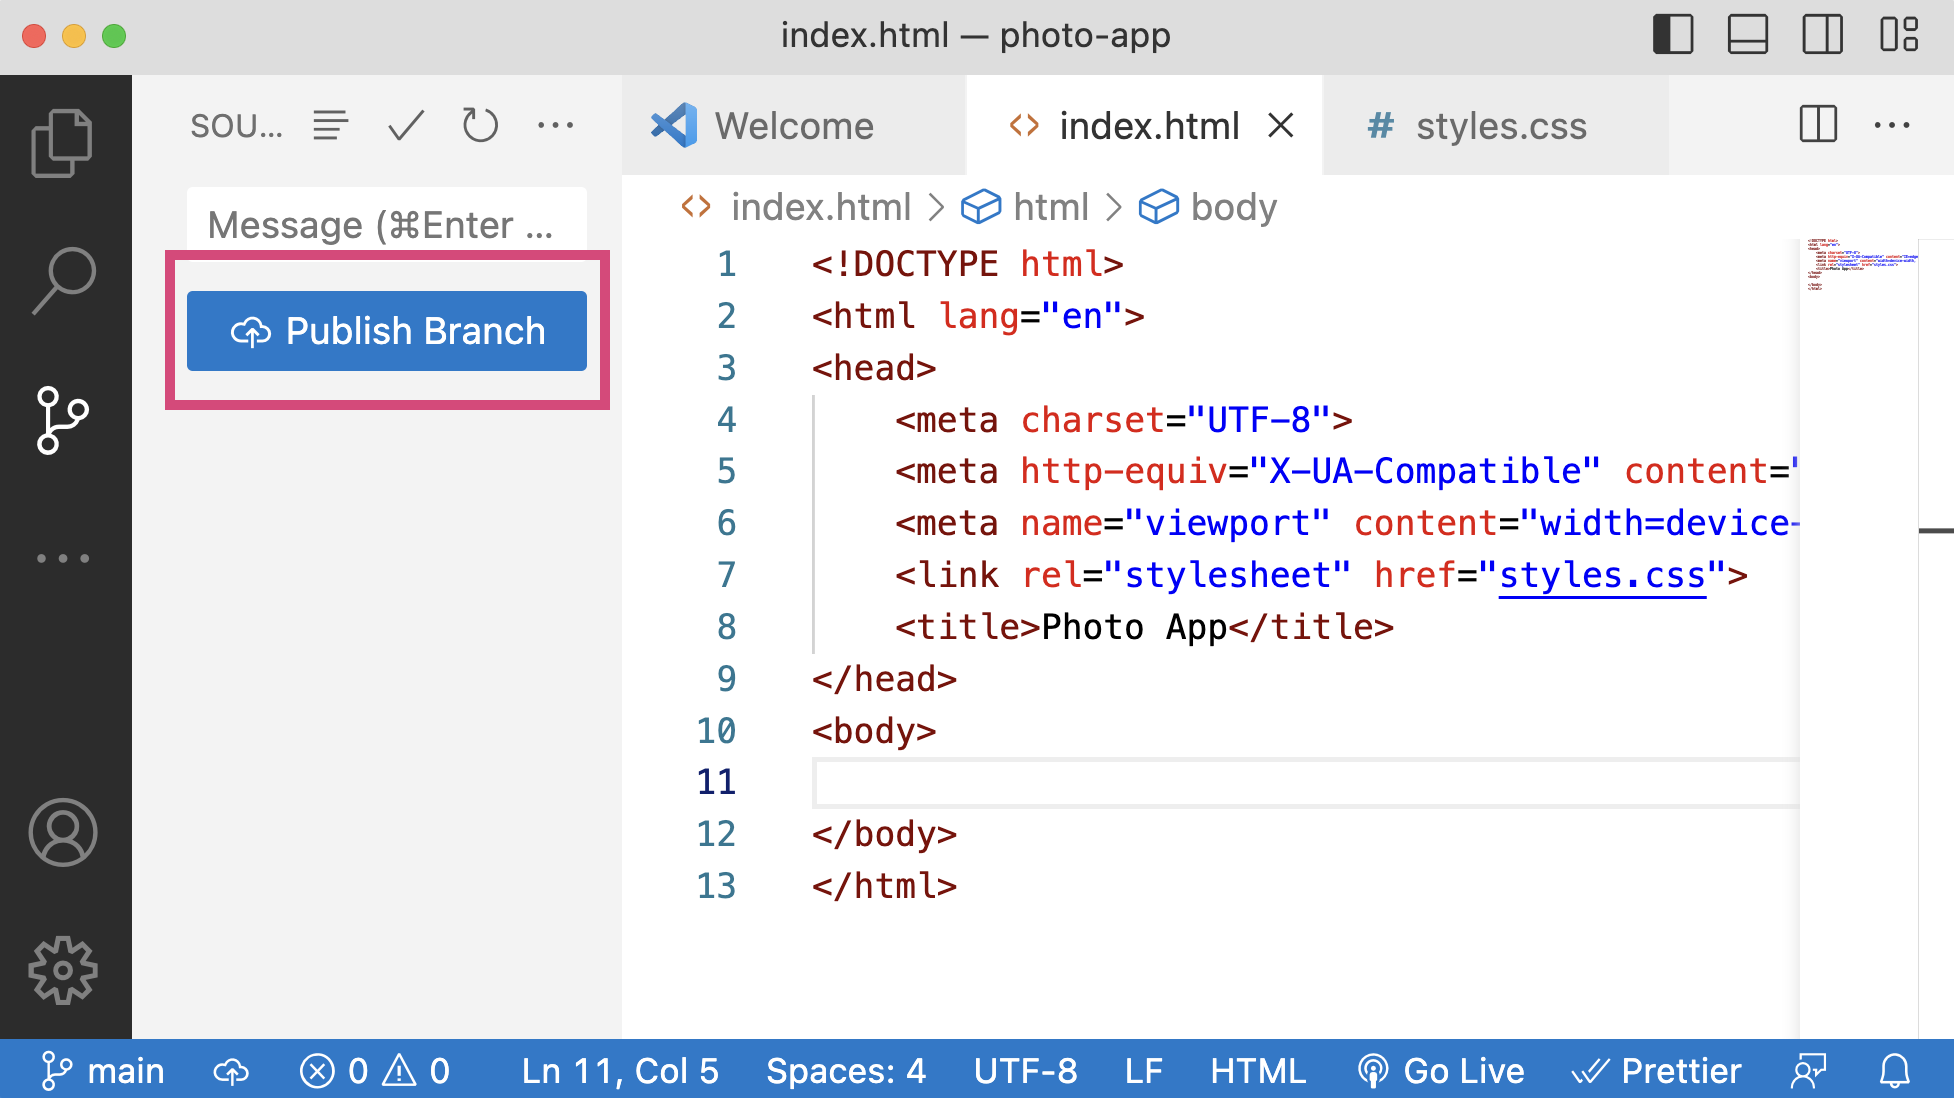
6. Create a remote branch and send your files to GitHub
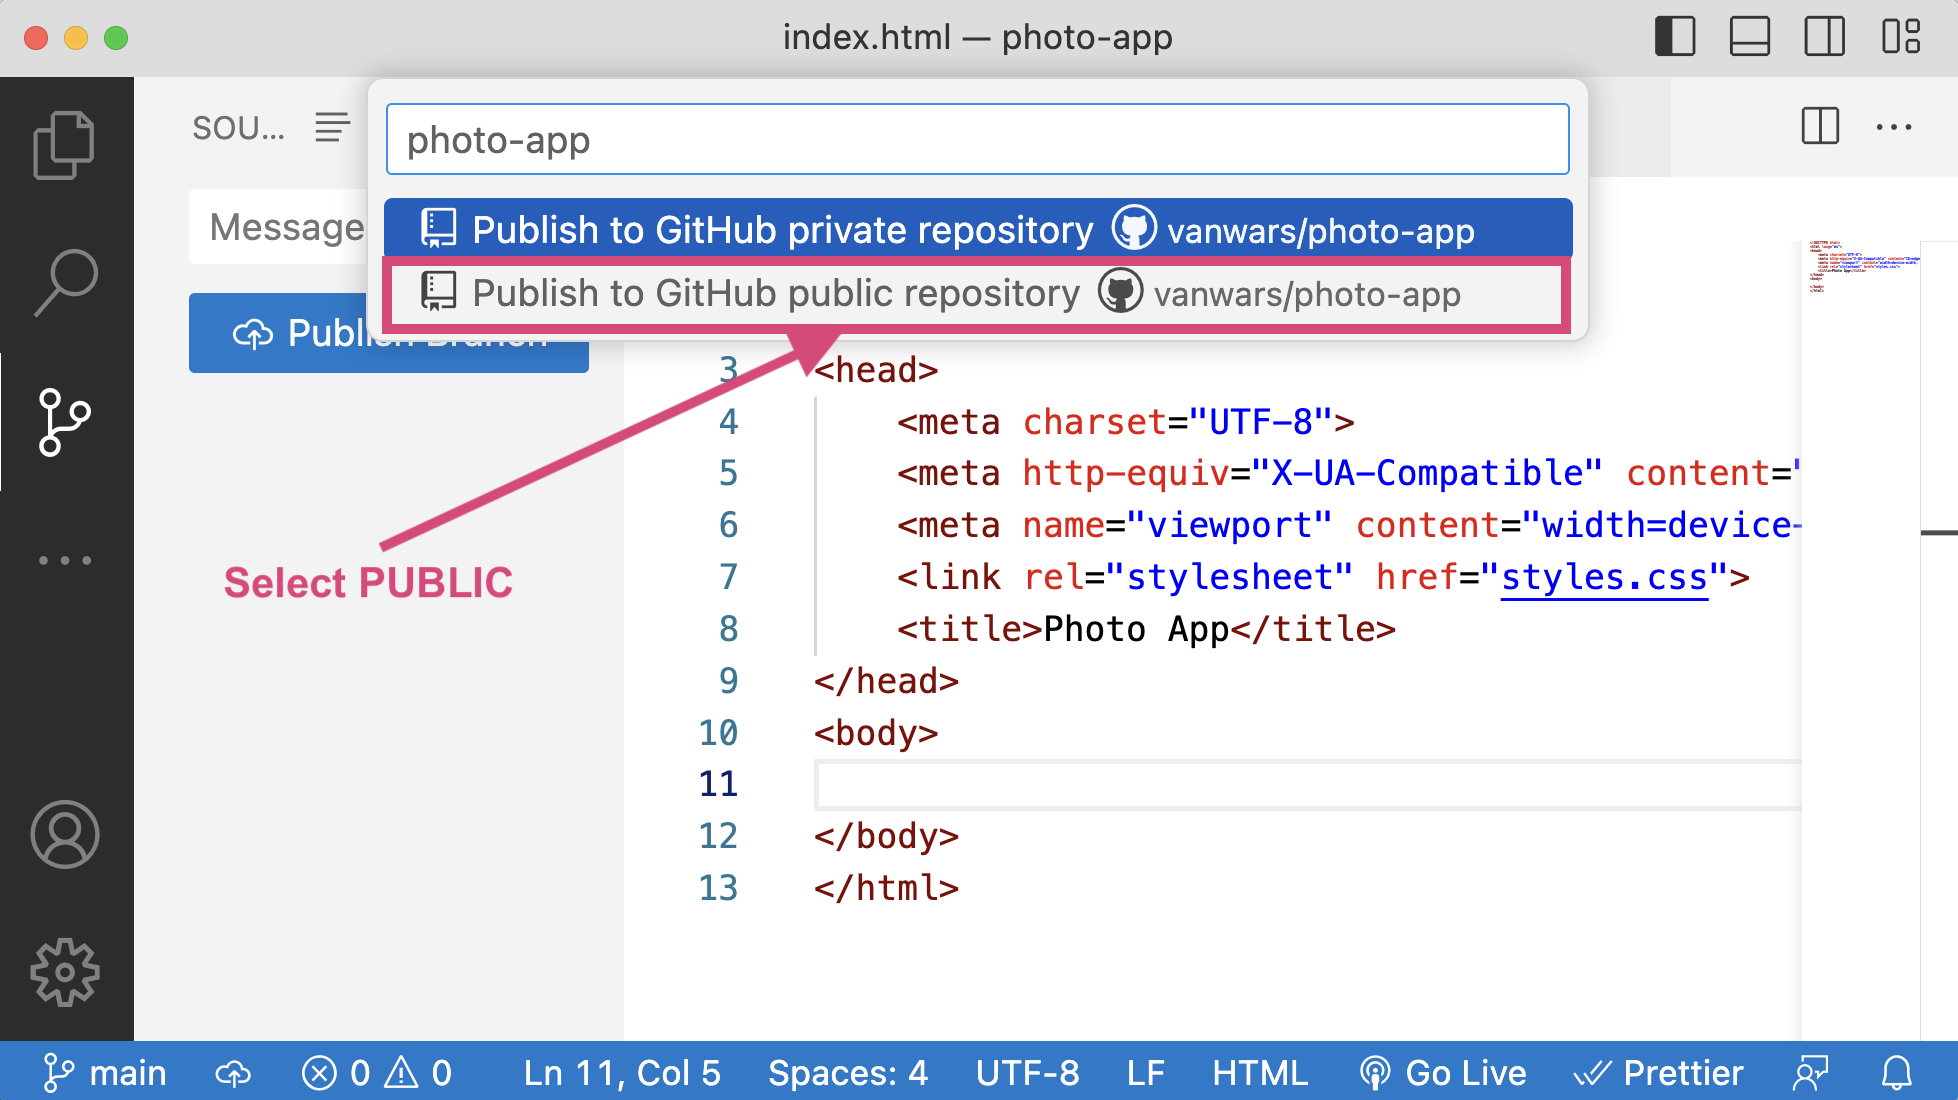
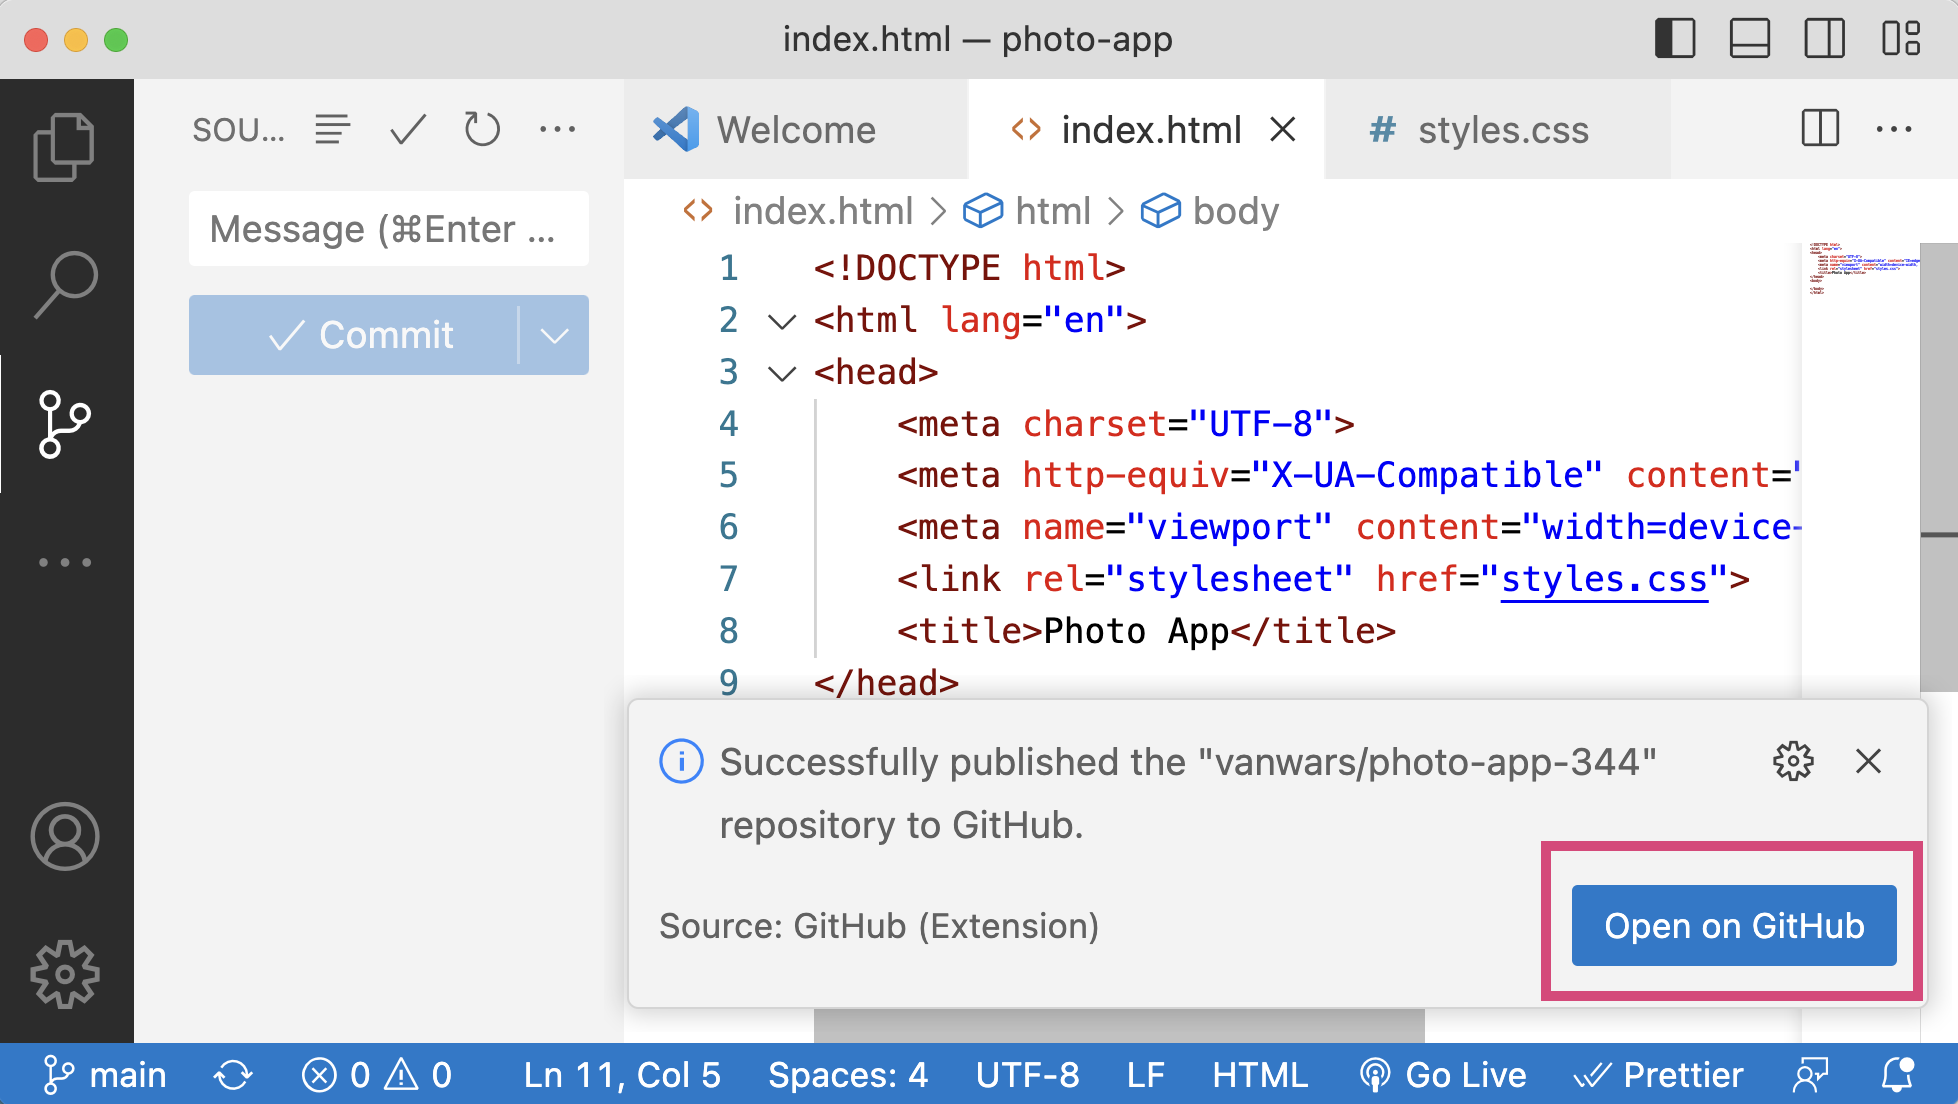
After you’ve committed your changes, you will publish your branch by clicking the “Publish Branch” button.
Then, make sure you ask for a public repo.
You may be prompted multiple times to give VS Code permissions to interact with GitHub (and vice versa). Please grant permissions. When you’re done, you may see a confirmation screen that suggests that you view your files on GitHub. Click the blue “Open on GitHub” button.
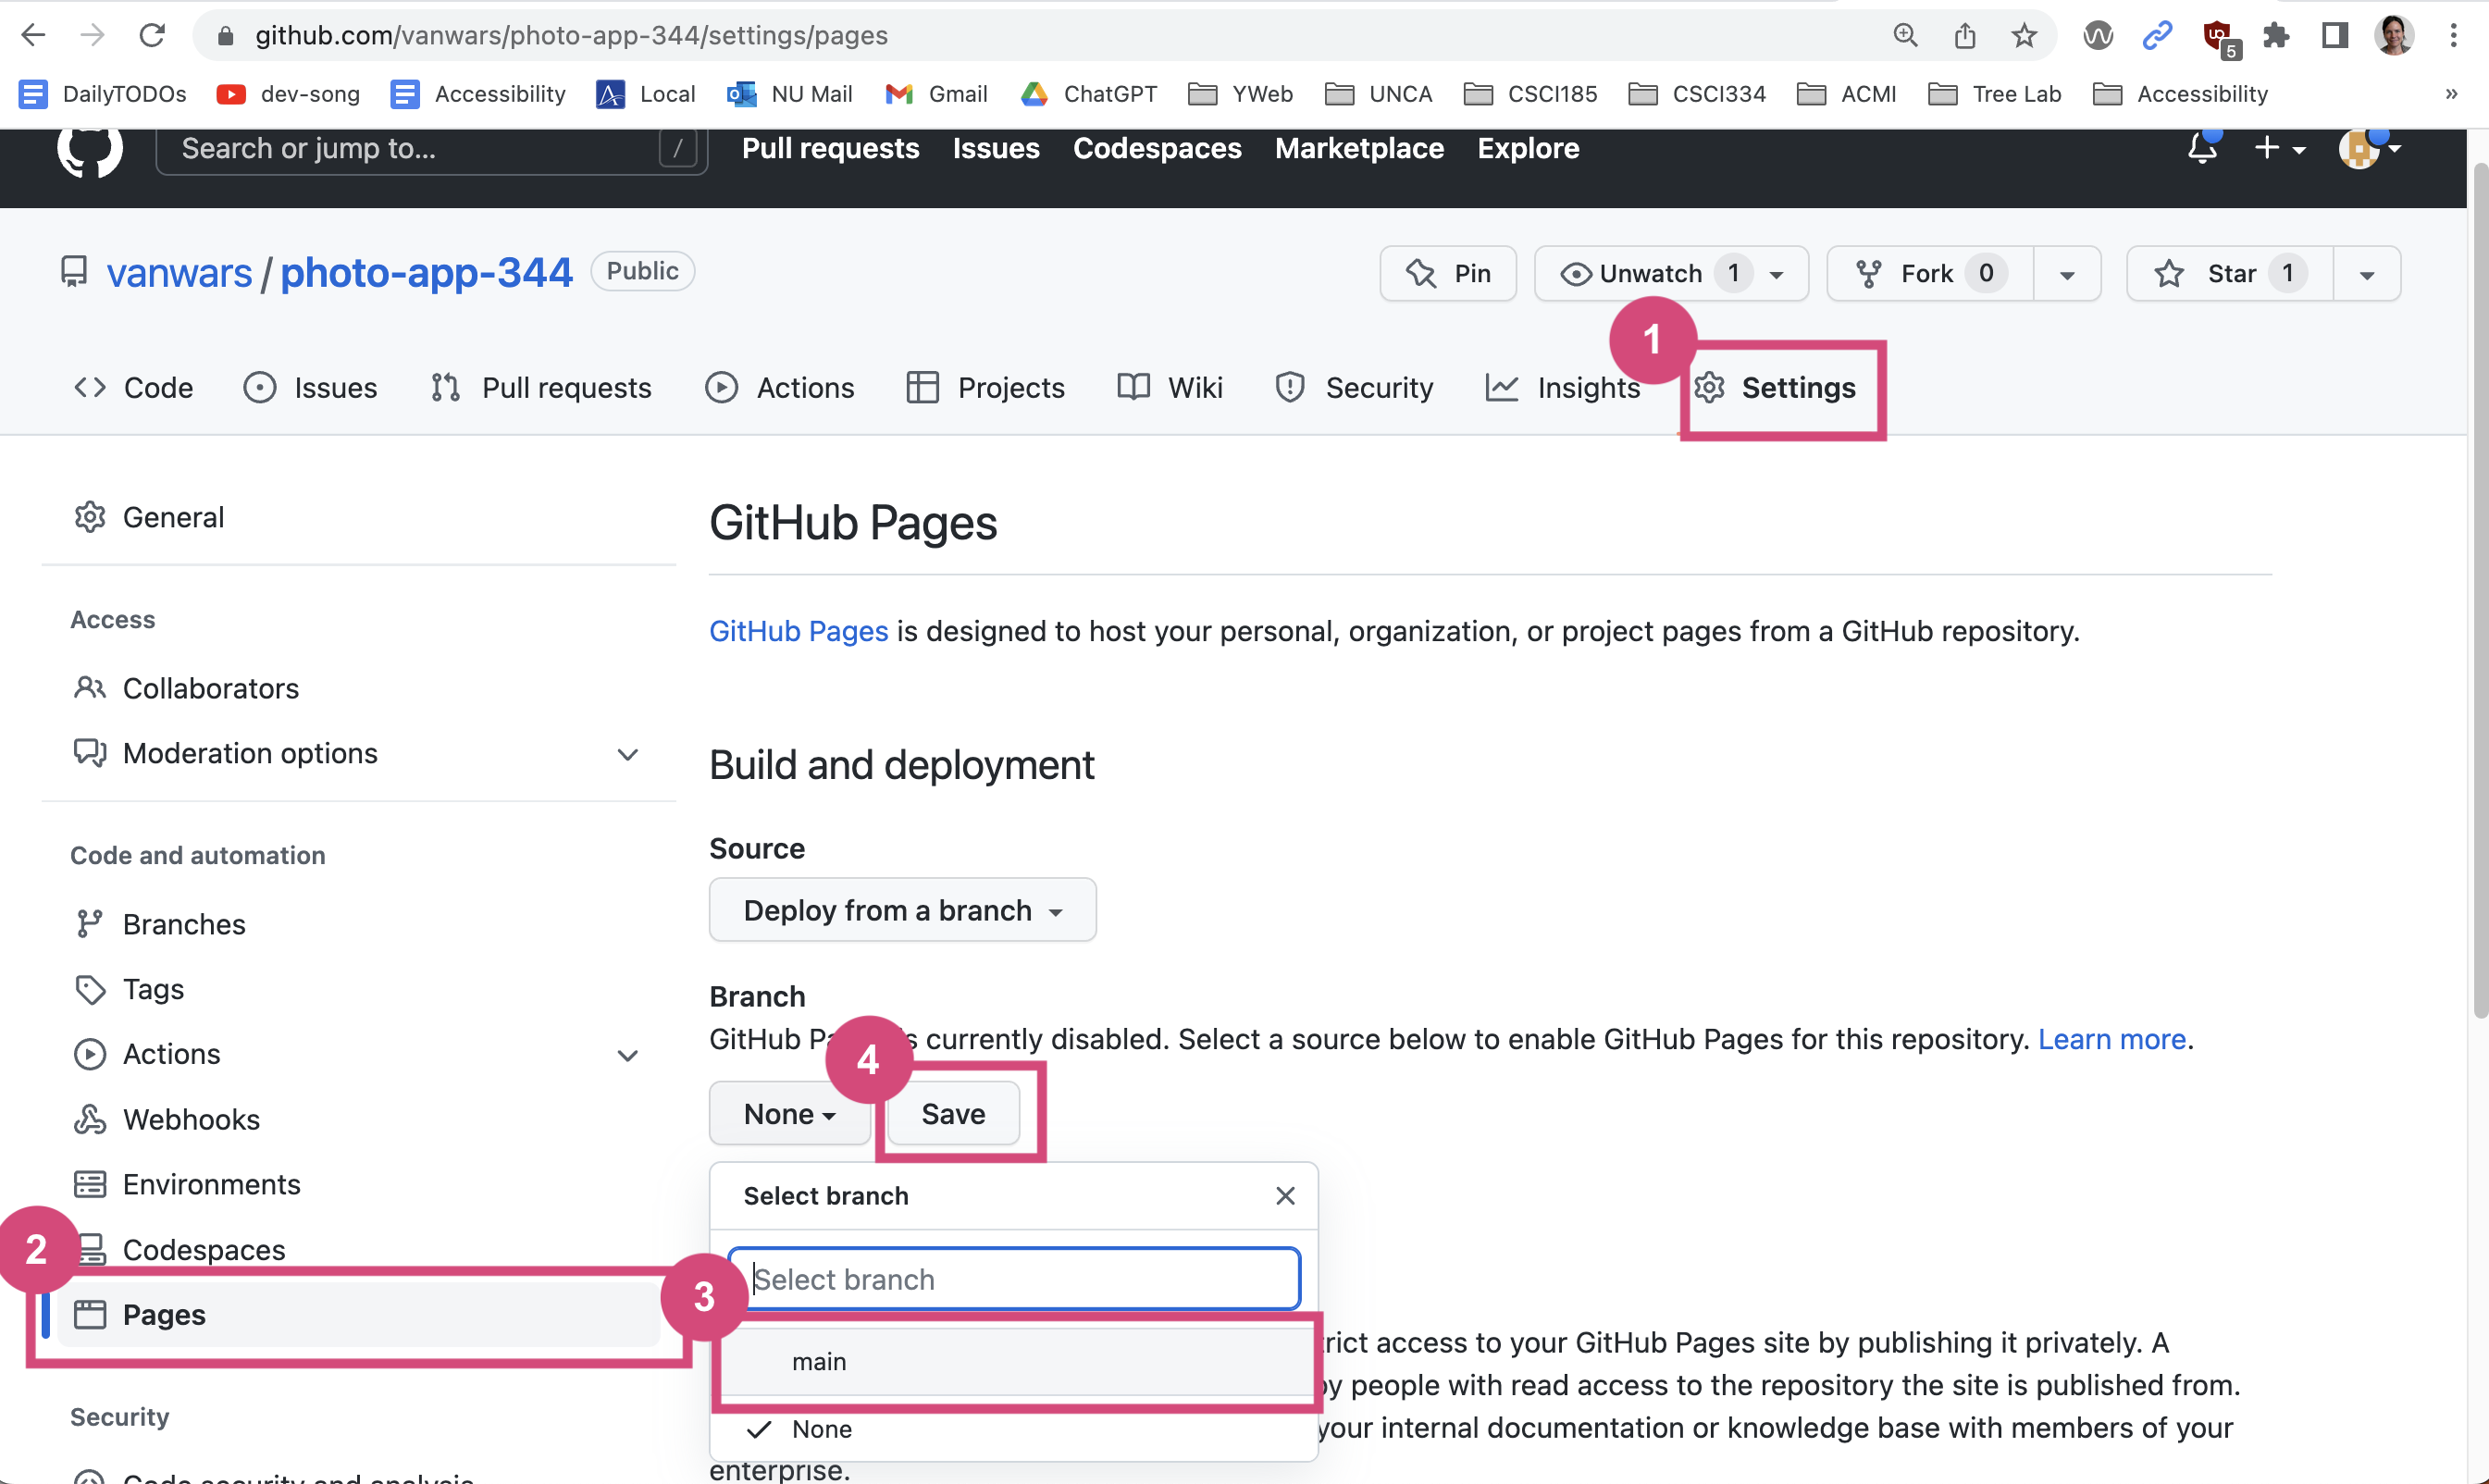
7. Configure GitHub Pages
Navigate to your repository and configure GitHub Pages by:
- Clicking the settings icon (upper right)
- Clicking on the Pages link (left menu, scroll down halfway)
- Clicking the “None” button below the “Branch” subheading.
- Selecting either the “master” or “main” branch (depending on how your git was configured).
- Clicking the “Save” button.
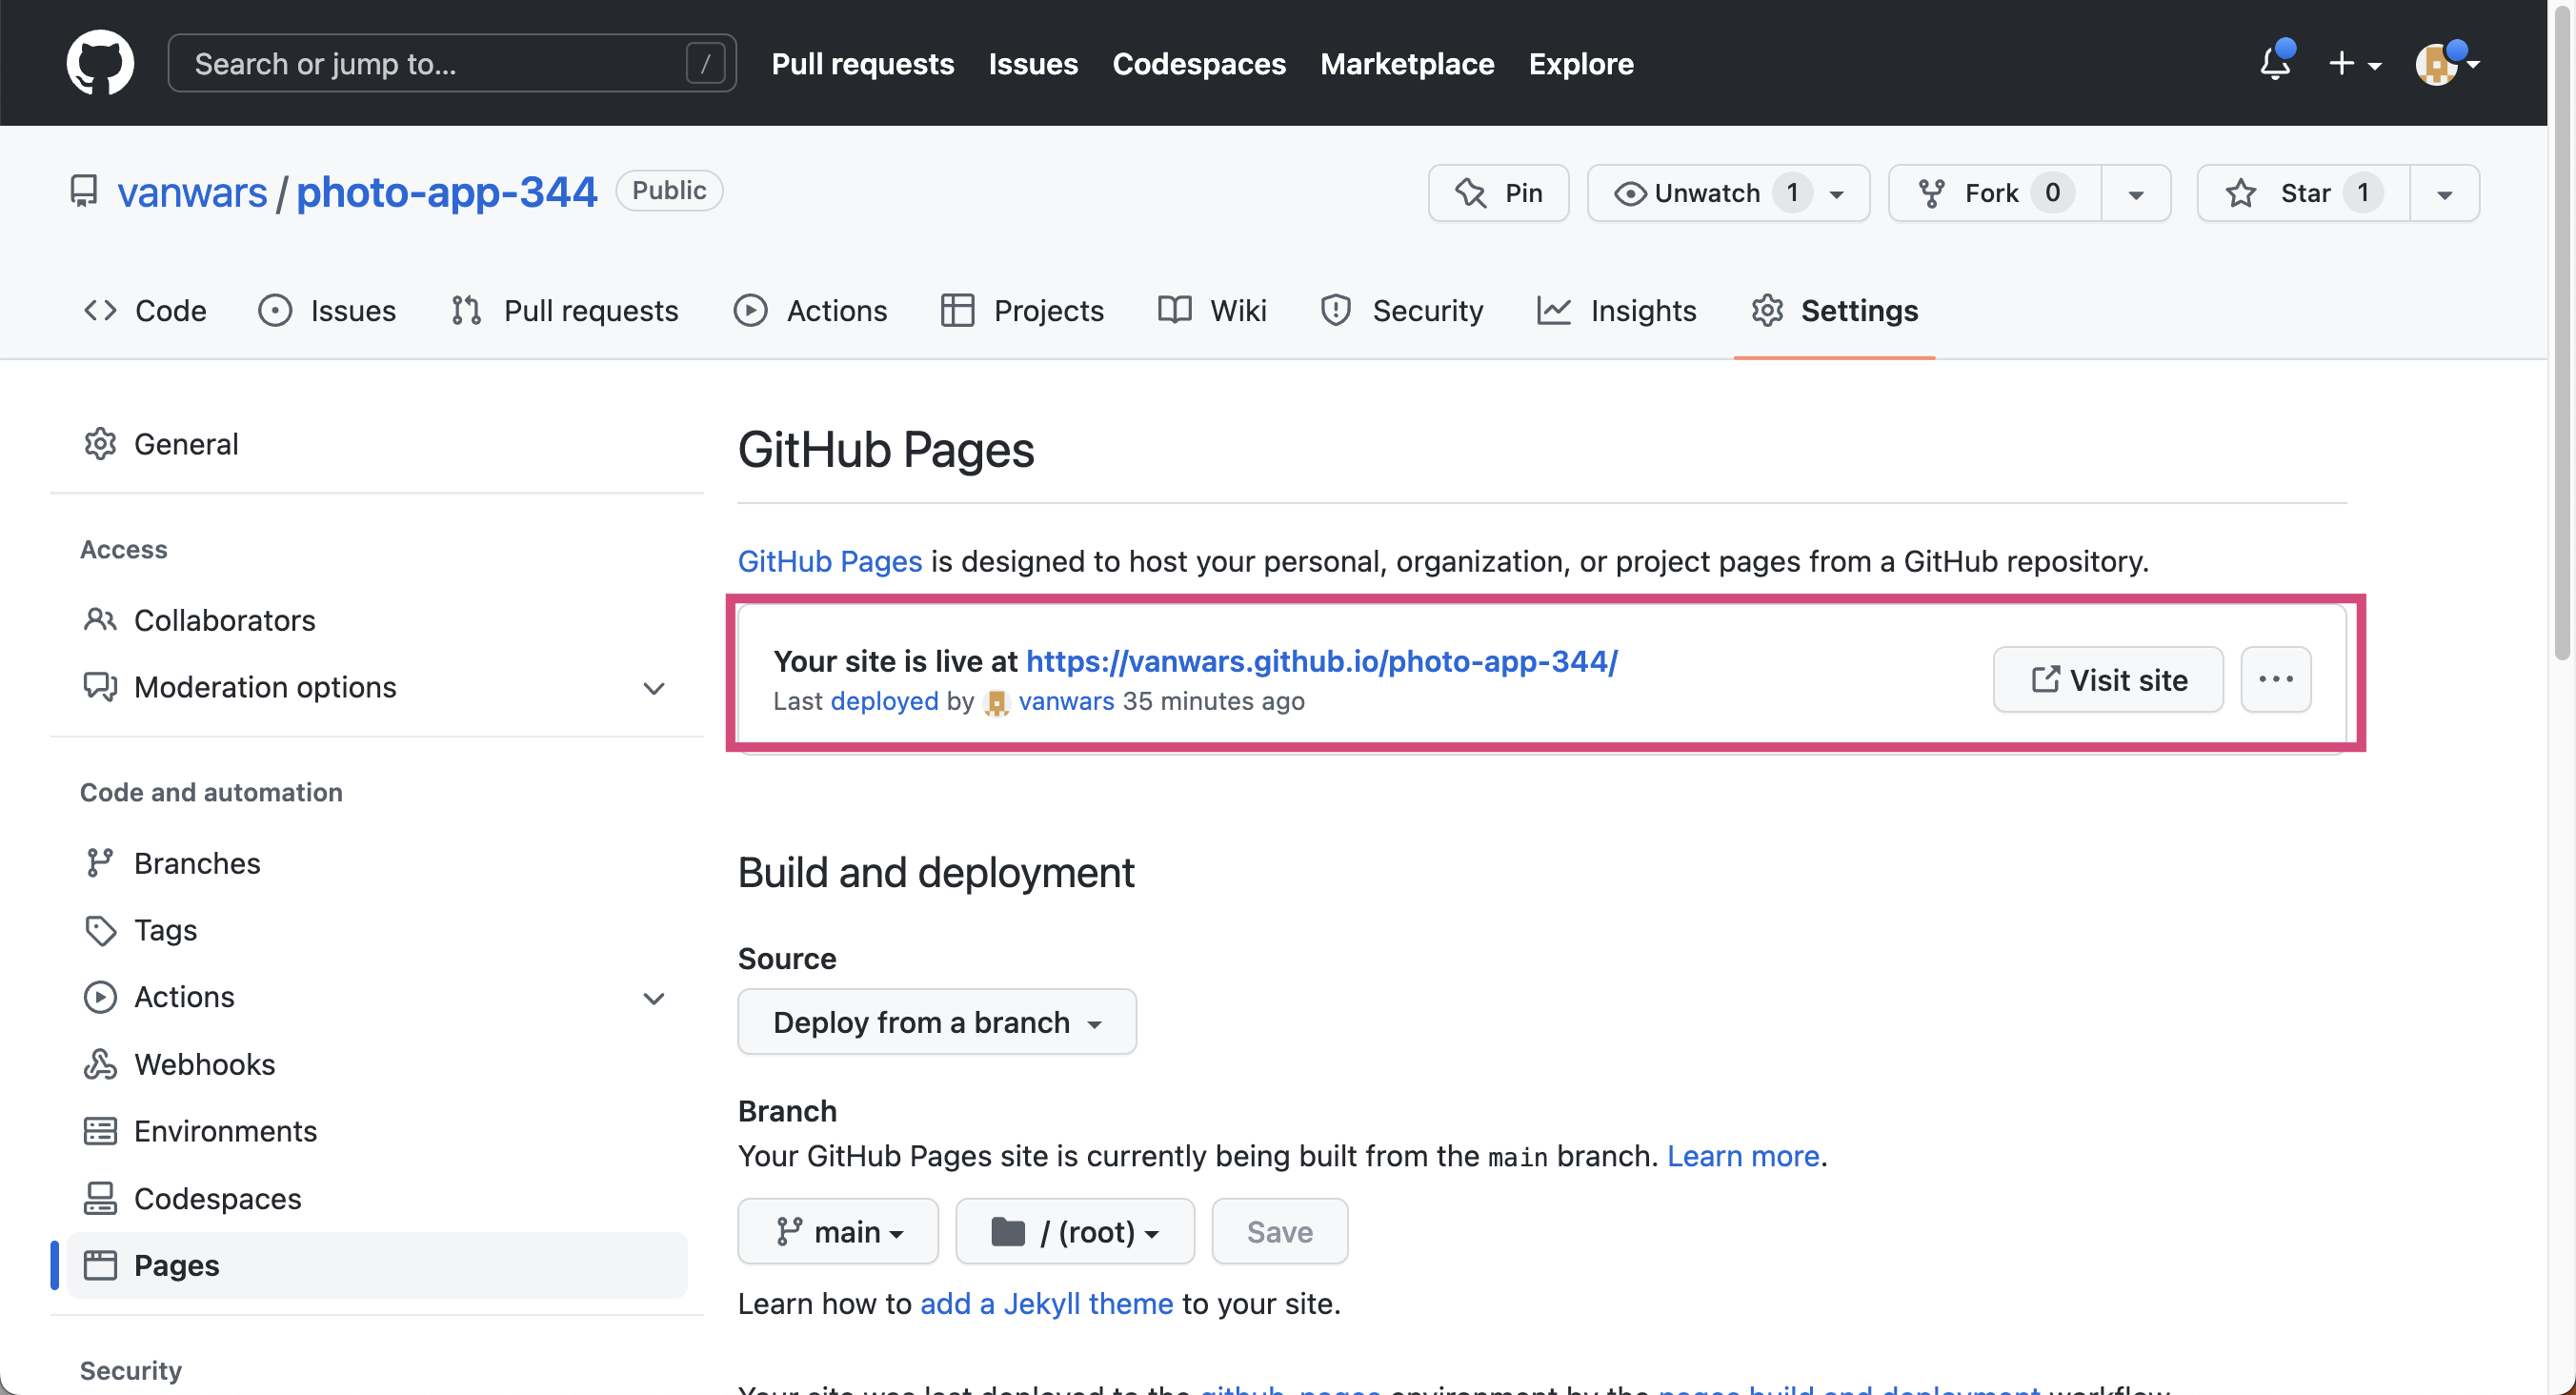
When you’re done, wait about 5 minutes and then refresh the page. You should be given a link to your GitHub pages, which you will be able to preview in your browser. Bookmark the page for your convenience.
3. Your Tasks
Please complete the tasks listed below. You’re more than welcome to add more CSS & JS files as needed (though this is not necessary).
Authentication Notes
- All fetch requests will need to pass a
Bearer Token(for now) to authenticate with the REST API. We will go over this in class.- There is a helper function in
js/utilities.jscalledgetAccessToken()that will help you retrieve the access token. You will store this token in a variable and include it as an HTTP header in all of your server requests.- We will go over this in class.
1. Page Initialization Tasks (10 Points)
The functionality in this section must be invoked when the page first loads (so that the user sees each of these panels right away).
| Points | Task | Description | Figure |
|---|---|---|---|
| 1pt | Right Panel: User Profile |
Inside of the right panel at the top, render an HTML representation of the current user's profile using data from the /api/profile endpoint.
|
Figure 1 |
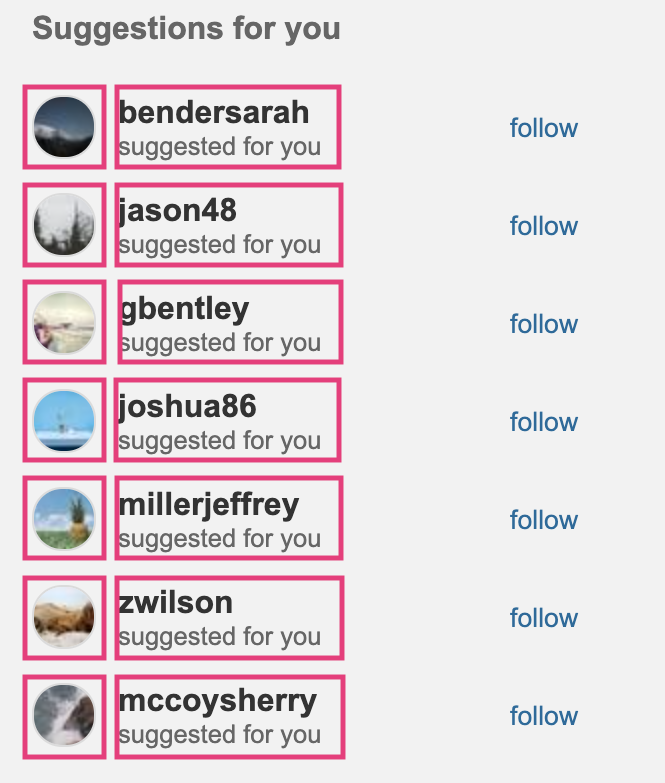
| 2pts | Right Panel: Suggested Accounts |
Inside of the right panel (underneath the user profile), render an HTML representation of suggested user accounts using data from the /api/suggestions endpoint.
|
Figure 2 |
| 2pts | Stories Panel |
Render an HTML representation of stories from the user's network using data from the /api/stories endpoint.
|
Figure 3 |
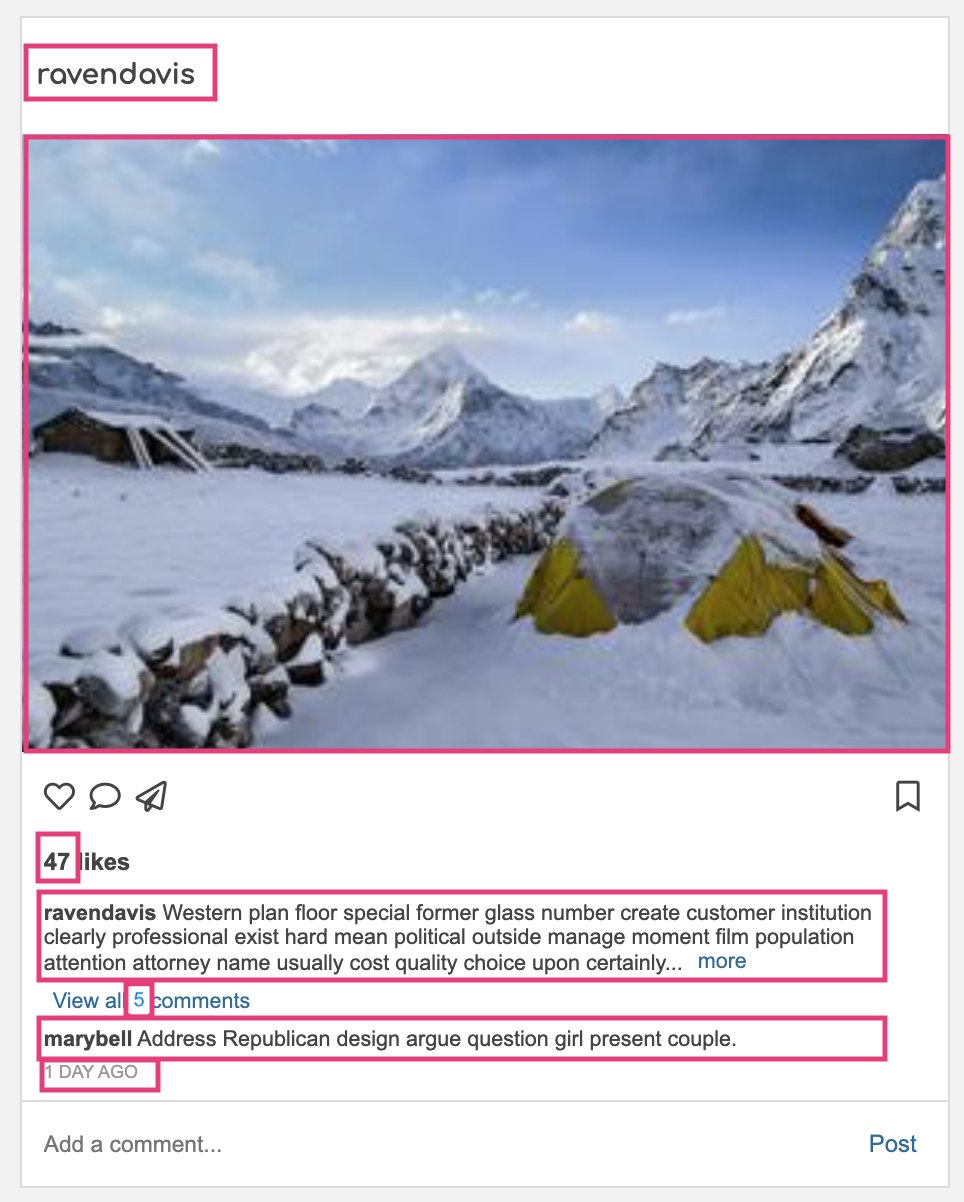
| 5pts | Posts Panel |
Underneath the stories panel, renter an HTML representation of the first 10 posts from the user's network using data from the /api/posts endpoint. Please ensure that the following rules are honored:
|
Figure 4 |
Note that the content from each box should be generated from the API data (no hard-coding).


2. Post Detail Modal (5 Points)
Next, you will make a modal window that displays a more detailed representation of the post.
| Points | Task | Description |
|---|---|---|
| 2pts | "View all X comments" Button Click |
|
| 2pts | Modal Body |
|
| 1pt | Close Button Click |
|
Note: in this example, the picture changes because of the way that picsum.photos works. Just ignore that for now.

3. Accessibility Features (4 points)
Accessibility can be tricky when you’re relying on the fetch API, because a screen reader doesn’t always know that content has changed on the page. In addition, you don’t want to be over-reliant on the mouse. Please take a look at the Accessibility Resources, and specifically the resources pertaining to aria roles and attributes.
| Points | Task | Description |
|---|---|---|
| 2pts | Keyboard Navigation |
|
| 2pts | Modal Box (Post Detail) |
Please ensure that the following accessibility features have been implemented. See this online resource
|
4. Commit Everything to GitHub (2 points)
When you’re done, please commit and push everything to GitHub.
4. What to Turn In
Rubric
Please review the requirements above and ensure you have met them. Specifically:
| Points | Category |
|---|---|
| 10 points | Page initialization |
| 5 points | post detail modal |
| 4 points | Accessibility features |
| 2 points | Successfully Deployed to GitHub + GitHub Pages |
| 4 points | Composition and CSS (the UI looks like the screenshots provided). Everything still has to look good and be responsive. |
Moodle Submission
When you’re done, please submit the following to the Moodle:
- A link to your GitHub Repository
- A link to your GitHub Pages
- The name of your partner (if applicable)
- Whether you completed any of the extra credit (so that I can look for it)