Assignments > Tutorial 6c: Objects & Product Display Exercise
Due Mon, 03/02 at 11:59pm
Walthrough Videos Available
If you get stuck or need help, I have made some walkthrough videos.
Please try to do as much as you can on your own before referring to the videos: following along can be helpful for learning, but it doesn’t engage your brain in the same way as trying to solve these problems on your own. Good luck!
1. Setup
- Within
tutorial06, create another folder called03-product-catalogfolder for this exercise - Within
03-product-catalog, create three files:index.htmlstyles.cssscript.js.
Starter HTML Code
Copy the HTML starter code into index.html:
<!DOCTYPE html>
<html lang="en">
<head>
  <meta charset="UTF-8" />
  <meta name="viewport" content="width=device-width, initial-scale=1.0" />
  <title>Product Catalog</title>
  <link rel="stylesheet" href="styles.css" />
  <script src="script.js" defer></script>
</head>
<body>
  <div class="container">
    <h1>Product Catalog</h1>

    <form id="productForm">
      <h2>Add New Product</h2>
      <div class="form-group">
        <label for="productName">Product Name:</label>
        <input type="text" id="productName" required />
      </div>
      <div class="form-group">
        <label for="productPrice">Price:</label>
        <input type="number" id="productPrice" step="0.01" min="0" required />
      </div>
      <div class="form-group">
        <label for="productDescription">Description:</label>
        <textarea id="productDescription" rows="3" required></textarea>
      </div>
      <div class="form-group">
        <label for="productCategory">Category:</label>
        <select id="productCategory" required>
          <option value="">Select a category</option>
          <option value="Electronics">Electronics</option>
          <option value="Appliances">Appliances</option>
          <option value="Furniture">Furniture</option>
          <option value="Clothing">Clothing</option>
          <option value="Books">Books</option>
          <option value="Other">Other</option>
        </select>
      </div>
      <div class="form-group">
        <label for="productInStock">
          <input type="checkbox" id="productInStock" />
          In Stock
        </label>
      </div>
      <button type="submit">Add Product</button>
    </form>

    <div id="productGrid"></div>
  </div>
</body>
</html>
Starter CSS Code
body {
  font-family: Arial, sans-serif;
  margin: 0;
  padding: 20px;
  background-color: #f4f4f4;
}

.container {
  max-width: 800px;
  margin: 0 auto;
}

h1 {
  text-align: center;
  color: #333;
}

#productForm {
  background: white;
  padding: 20px;
  border-radius: 8px;
  margin-bottom: 30px;
  box-shadow: 0 2px 4px rgba(0,0,0,0.1);
}

#productForm h2 {
  margin-top: 0;
  color: #333;
}

.form-group {
  margin-bottom: 15px;
  display: flex;
  align-items: center;
  gap: 10px;
}

.form-group label {
  min-width: 120px;
  font-weight: bold;
  color: #333;
  flex-shrink: 0;
}

.form-group input[type="text"],
.form-group input[type="number"],
.form-group textarea,
.form-group select {
  flex: 1;
  padding: 10px;
  font-size: 16px;
  border: 1px solid #ddd;
  border-radius: 4px;
  box-sizing: border-box;
}

#productPrice {
  flex: 0 0 150px;
  max-width: 150px;
}

.form-group select {
  cursor: pointer;
}

.form-group textarea {
  resize: vertical;
  font-family: Arial, sans-serif;
}

.form-group input[type="checkbox"] {
  width: auto;
  margin-right: 5px;
  margin-left: 0;
}

.form-group:has(input[type="checkbox"]) {
  align-items: flex-start;
}

.form-group:has(input[type="checkbox"]) label {
  min-width: 120px;
  display: flex;
  align-items: center;
  cursor: pointer;
  margin-top: 0;
}

.form-group:has(input[type="checkbox"]) input[type="checkbox"] {
  margin-left: 0;
  margin-right: 8px;
}

#productForm button {
  background-color: #4CAF50;
  color: white;
  padding: 12px 24px;
  border: none;
  border-radius: 4px;
  font-size: 16px;
  cursor: pointer;
  font-weight: bold;
  margin-left: 130px;
}

#productForm button:hover {
  background-color: #45a049;
}

#productGrid {
  display: grid;
  grid-template-columns: repeat(2, 1fr);
  gap: 20px;
}

@media (max-width: 768px) {
  #productGrid {
    grid-template-columns: 1fr;
  }
}

.product-card {
  background: white;
  border-radius: 8px;
  padding: 20px;
  box-shadow: 0 2px 4px rgba(0,0,0,0.1);
}

.product-card h2 {
  margin-top: 0;
  color: #333;
}

.product-card .price {
  font-size: 24px;
  font-weight: bold;
  color: #4CAF50;
  margin: 10px 0;
}

.product-card .description {
  color: #666;
  margin: 10px 0;
}

.product-card .category {
  display: inline-block;
  background-color: #e0e0e0;
  padding: 4px 8px;
  border-radius: 4px;
  font-size: 12px;
  color: #666;
  margin-top: 10px;
}

.product-card .stock-status {
  display: inline-block;
  padding: 4px 8px;
  border-radius: 4px;
  font-size: 12px;
  font-weight: bold;
  margin-top: 10px;
  margin-left: 10px;
}

.product-card .stock-status.in-stock {
  background-color: #4CAF50;
  color: white;
}

.product-card .stock-status.out-of-stock {
  background-color: #f44336;
  color: white;
}
2. Displaying Products
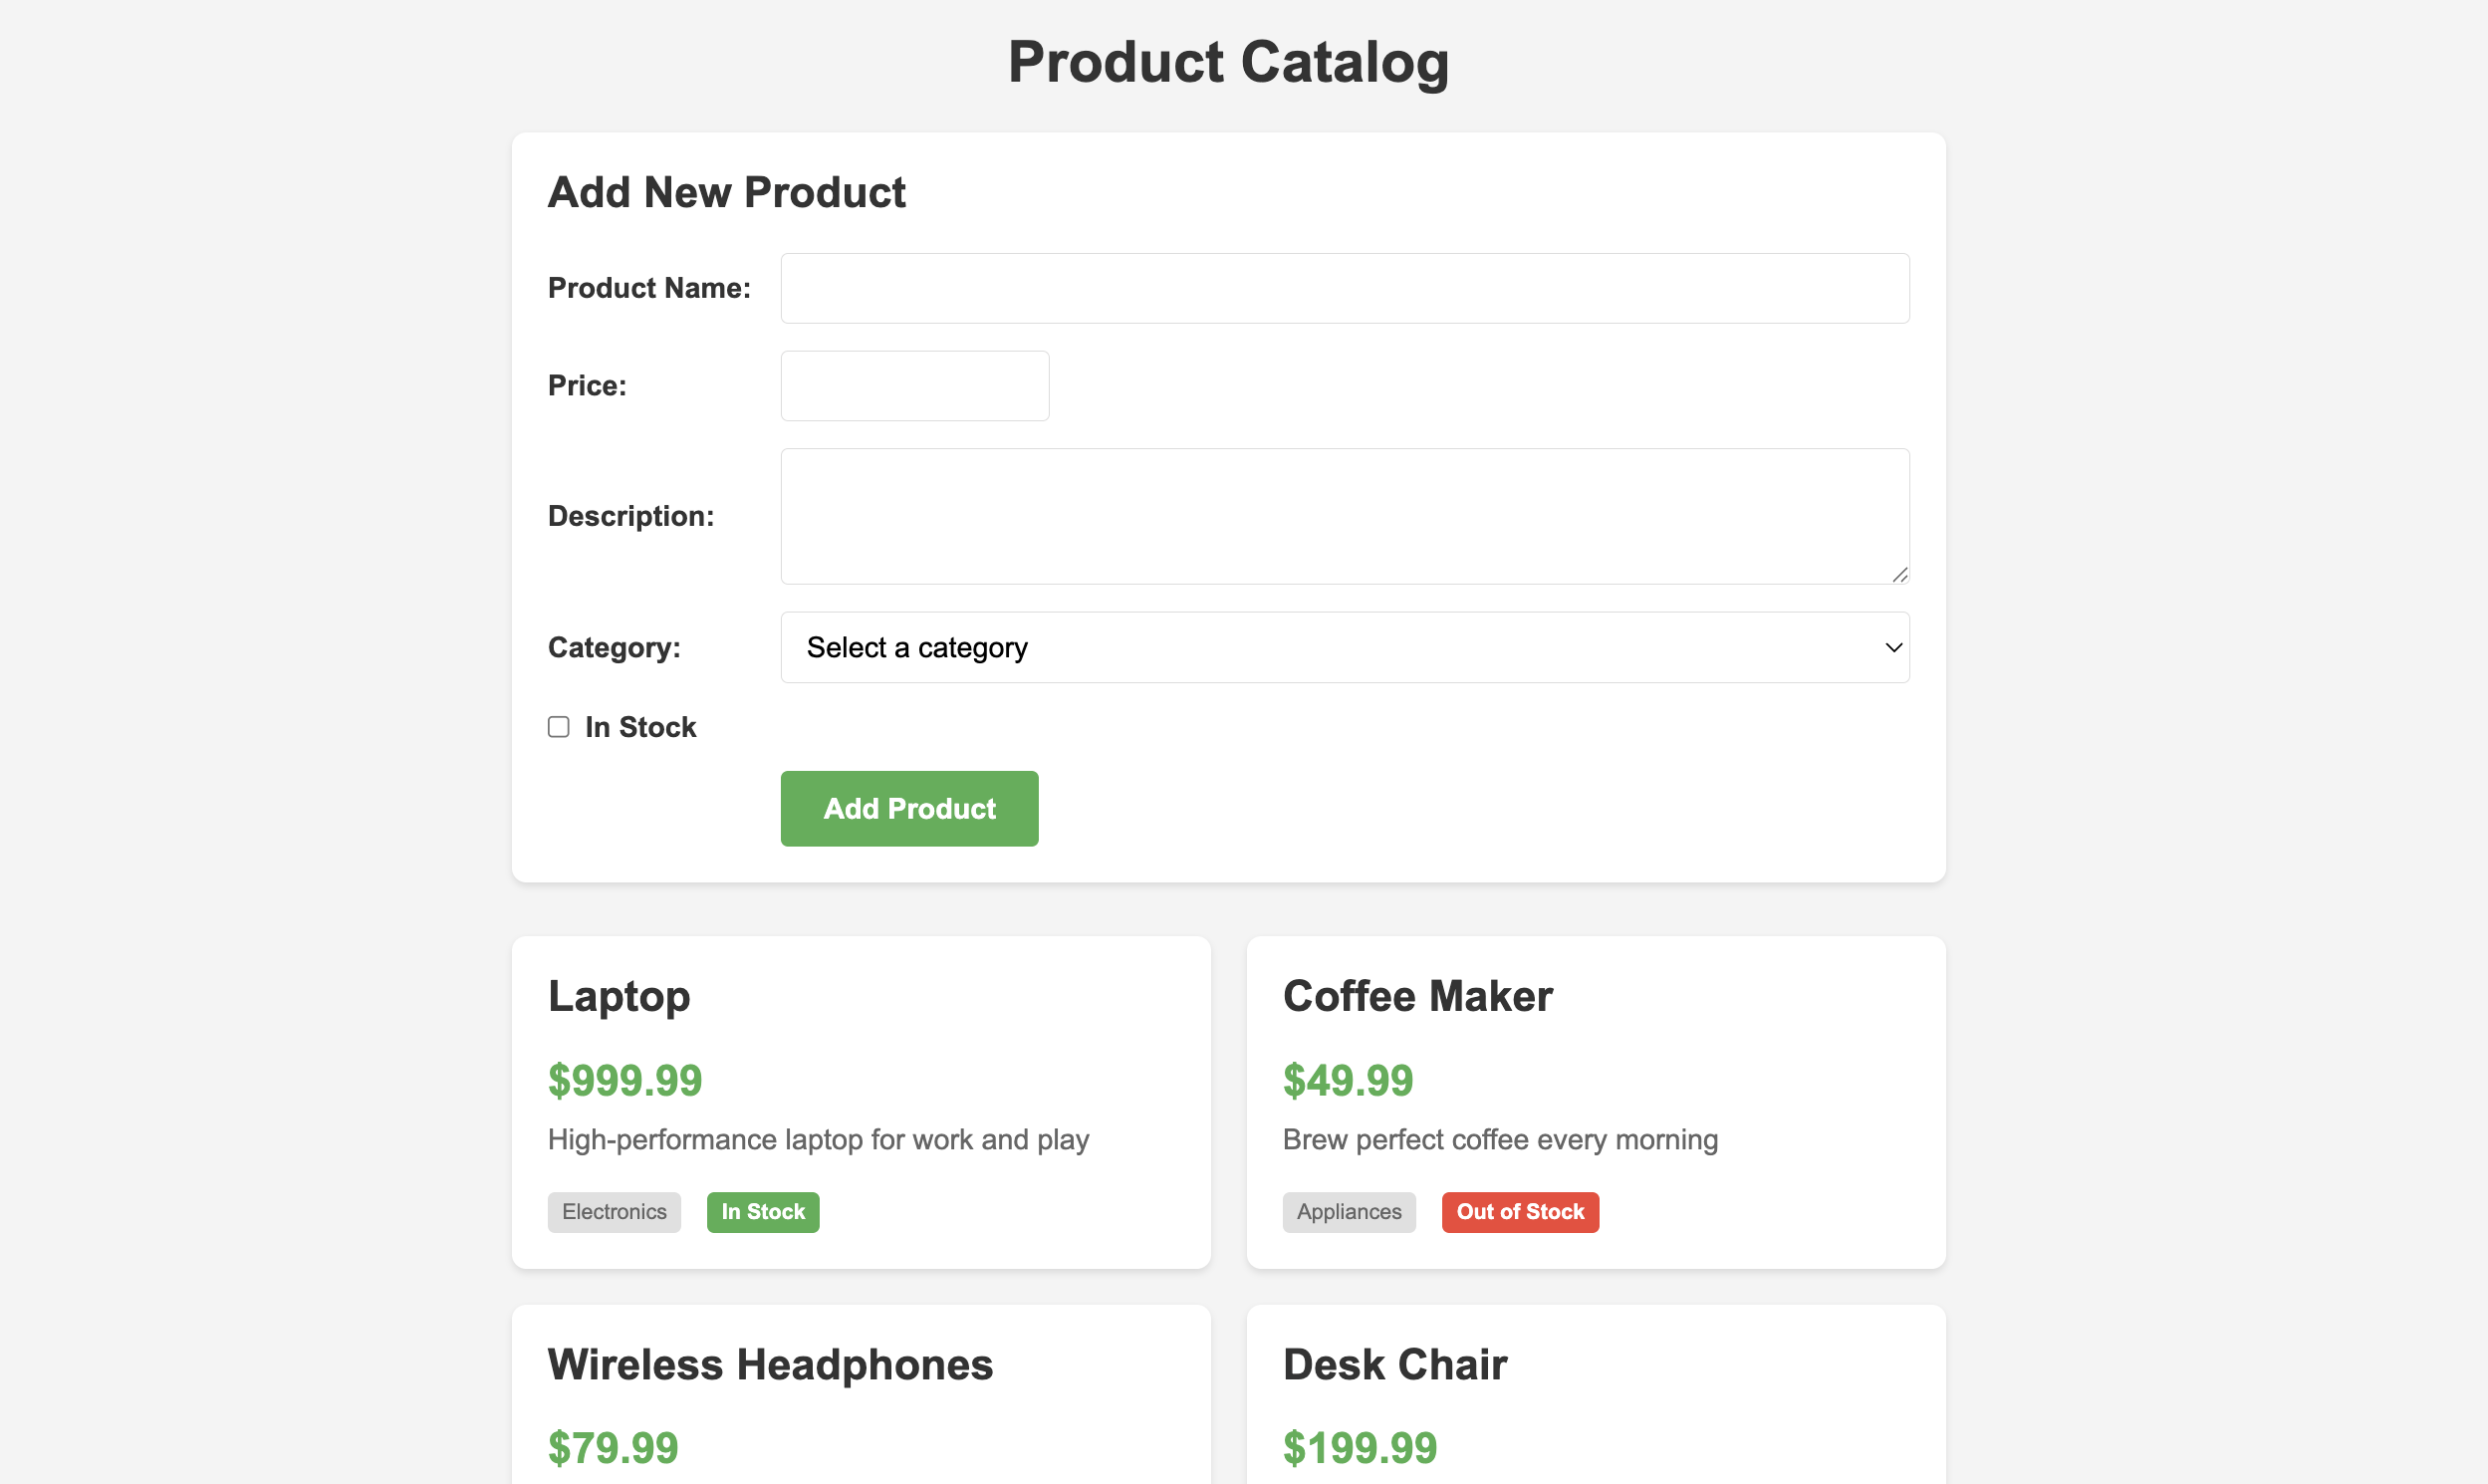
Your job is to write the JavaScript functionality to display products from an array and allow the user to add new products to the website as shown below.
Please refer to the JavaScript Cheatsheet at the bottom of the page, which lists all of the relevant JavaScript language features that you will need to complete the assignment.
1. Create an array of product objects and select elements
At the top of your JavaScript file, create a const array called products with at least 3 product objects. Each object should have these properties:
name(string)price(number)description(string)category(string)inStock(boolean)
Tip: You can check if it worked by printing the array and elements to the console. View the console in the browser inspector.
2. Create a function to format price
Create a function called formatPrice() that takes a price (number) as a parameter and returns a formatted string with a dollar sign and two decimal places (e.g., 999.99 becomes "$999.99").
Tip: Use
.toFixed(2)to format the number to 2 decimal places, and use template literals to add the dollar sign.
3. Create a function to create product card HTML
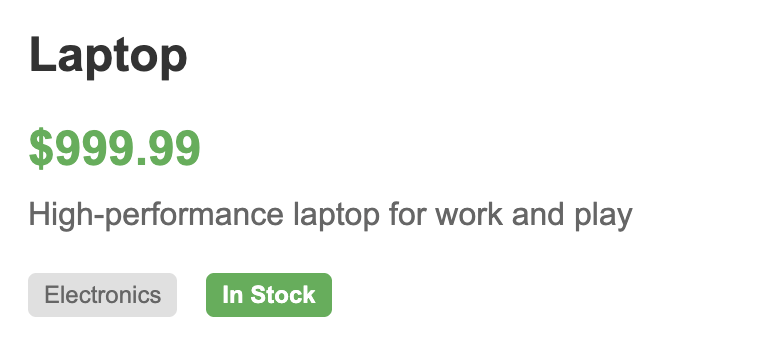
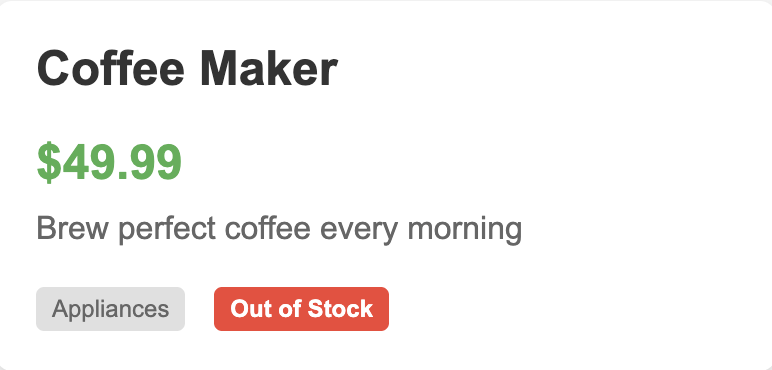
Create a function called createProductCard(). It should:
- Take a product object as a parameter
- Return an HTML string using template literals. The HTML should include:
- The product name in an
<h2>tag - The formatted price in a
<div>with classprice - The description in a
<p>tag with classdescription - The category in a
<span>with classcategory - A stock status badge: if
inStockistrue, show “In Stock” with classstock-status in-stock, otherwise show “Out of Stock” with classstock-status out-of-stock
- The product name in an
Tip: Use the ternary operator (
condition ? valueIfTrue : valueIfFalse) to determine the stock status HTML.
Your cards should look something like this:
4. Create a function to render products
Create a function called renderProducts() that:
- Clears the
productGridelement by setting itsinnerHTMLto an empty string. - Uses a
forloop to iterate through theproductsarray (from index0toproducts.length). - Inside the loop:
- Calls
createProductCard(), passing in the current product as an argument - Stores the resulting HTML string in a variable, and
- Appends the resulting HTML string to the
productGrid
- Calls
3. Adding Products via Form
Now you’ll add functionality to allow users to add new products via the form.
1. Handle form submission
Form submission has a few quirks (as noted in the JavaScript Cheatsheet), so we’re providing some starter code here:
function addItemToList(event) {
  // Prevent the default form submission behavior (which would reload the page)
  event.preventDefault();
  // TODO: Add your code here

}

productForm.addEventListener('submit', addItemToList);
Inside the addItemToList function, complete the following steps:
- Get the values from each form field and store each in a variable.
- Convert the price value to a number.
- Create a new product object with the form values.
- Add the new product to the
productsarray using.push(). - Call
renderProducts()to update the display. - Reset the form using
.reset().
Tips:
- Use
.trim()on text inputs to remove extra whitespace.- Use
.checkedfor checkbox values (returnstrueorfalse), and.valuefor anything else.
2. Initialize the display
At the bottom of your JavaScript file, call renderProducts() to display the initial products when the page loads.
4. JavaScript Cheatsheet
Here’s a list of JavaScript language features you’ll need to complete this exercise:
| Concept | Example |
|---|---|
| Objects |
|
| Arrays of Objects |
|
| For Loops |
|
| Template Literals |
|
| Ternary Operator |
|
| Number Methods |
|
| Array Methods |
|
| Form Event Listeners |
|
| Getting Form Values |
|
| String Methods |
|
| Form Methods |
|
5. Test
- Verify that all products from the array appear in the grid when you open the page.
- Fill out the form and click “Add Product” to verify that new products are added to the grid.
- Check that the form clears after adding a product.