Assignments > HW3: Building a "Vanilla" JavaScript Client
Due Fri, 04/03 at 11:59pm
Collaboration and Code Sharing Policy: Read Carefully
For this homework, you are welcome to work in pairs (optional). Even if you collaborate with someone else, you must still submit your own work on Moodle. If you collaborate, just list your partner in the comments section of Moodle.
For those of you who are collaborating, please do not (a) “free ride” on your teammates or (b) enable free riders. Everyone in your group should understand every line of code they submit.
Introduction
In this assignment, you will build a “data-driven” version of the interface you built in HW2 using JavaScript. Specifically, you will:
- Build a very simple HTML “skeleton,” and then write some “client-side” JavaScript to:
- Query data from a server (using a REST API) and
- Build DOM elements based on the data returned from the server.
- Ensure that your interface is accessible.
For this assignment, everything should be done by writing your own “vanilla” JavaScript. In HW4, we will rebuild this client using React so that you can get a sense of some of the pros and cons of using a JavaScript framework.
Working Demo
If you want to see a working demo of what Photo App will look like at the end of the course, take a look here:
https://photo-app-secured.herokuapp.com/
- username: your unca username (for email) (all lowercase)
- password: password
Note that we will only be implementing a subset of these features for HW3.
Set Up
-
Download the starter files, unzip them, and save them in your
csci344/homeworkdirectory. Yourhw03structure should look like this:hw03 ├── README.md ├── index.html ├── js │ ├── main.js │ └── utilities.js ├── package.json ├── public │ └── output.css ├── src │ └── input.css └── tailwind.config.js -
Open your entire
csci344folder in VS Code. -
In your terminal, navigate to your
csci344/homework/hw03folder. Then run the following command:npm installThis command will install your Tailwind dependencies and create a
package-lock.jsonfile and anode_modulesdirectory. Please verify that both were created. -
While still in your
hw03directory, run the following command so that Tailwind continuously compiles your stylesheet as you make changes to your HTML and CSS files:npm run build:tailwind -
You are now ready to begin HW03. Open your
index.htmlfile with Live Server to verify that it works.
Course REST API
For this assignment, you will be using Sarah’s version of the PhotoApp REST API, located here: https://photo-app-secured.herokuapp.com/. In Homework 5, you will actually be building this REST API, but for now, I’m giving you a working version that you can interact with as you build your Photo App browser client. Credentials:
- username: your unca username (all lowercase)
- password: password
Obviously this is not secure, but this is just a practice API so if it gets hacked, I can just rebuild it in one click :).
After logging in, you can view all of your available REST API endpoints by navigating to the API Docs: https://photo-app-secured.herokuapp.com/api. You’re welcome to click as many buttons as you want. I will periodically clear out and rebuild the data so you can’t mess anything up.
Authentication Notes
- All fetch requests will need to pass a
Bearer Token(for now) to authenticate with the REST API. We will go over this in class. - There is a helper function in
js/utilities.jscalledgetAccessToken()that will help you retrieve the access token. You will store this token in a variable and include it as an HTTP header in all of your server requests.
1. Display Tasks
The functionality in this section must be invoked when the page first loads (so that the user sees each of these panels right away).
1.1. Right Panel: User Profile (2 pts)
Inside of the right panel at the top, render an HTML representation of the current user’s profile using data from the /api/profile endpoint.

Code Hint
async function showProfileHeader() {
    // fetch the current user's profile data from /api/profile
    // select the container where the profile header should go
    // build an HTML string for the user's image + username
    // insert that HTML into the DOM
}
1.2. Right Panel: Suggested Accounts (4 pts)
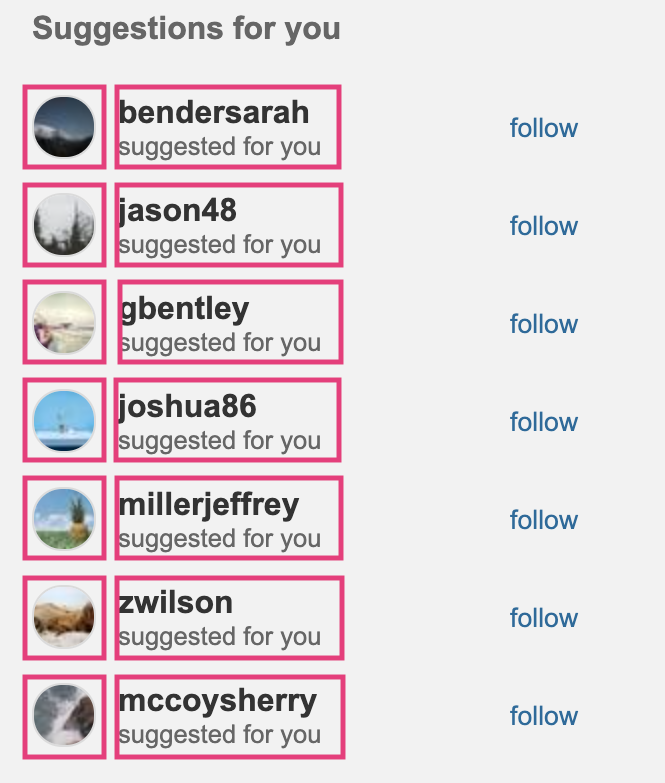
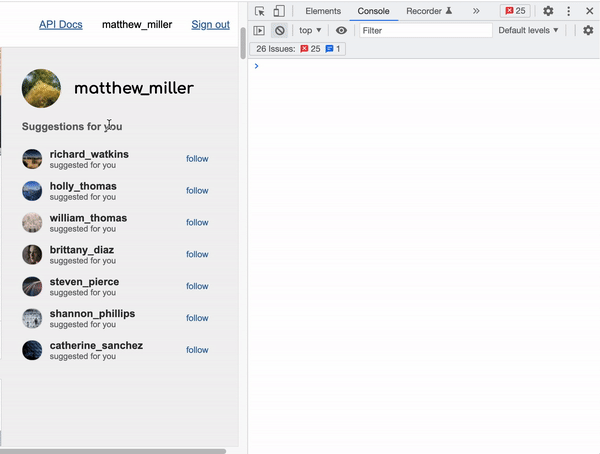
Inside of the right panel (underneath the user profile), render an HTML representation of suggested user accounts using data from the /api/suggestions endpoint.
Code Hint
async function showSuggestions() {
    // fetch the suggested accounts from /api/suggestions
    // select the container where the suggestions should go
    // loop through or map over the returned accounts
    // build an HTML string for each suggested account
    // insert the combined HTML into the DOM
}
1.3. Stories Panel (4 pts)
Render an HTML representation of stories from the user’s network using data from the /api/stories endpoint.

Code Hint
async function showStories() {
// fetch the stories from /api/stories
// select the stories container
// loop through or map over the returned stories
// build an HTML string for each story
// insert the combined HTML into the DOM
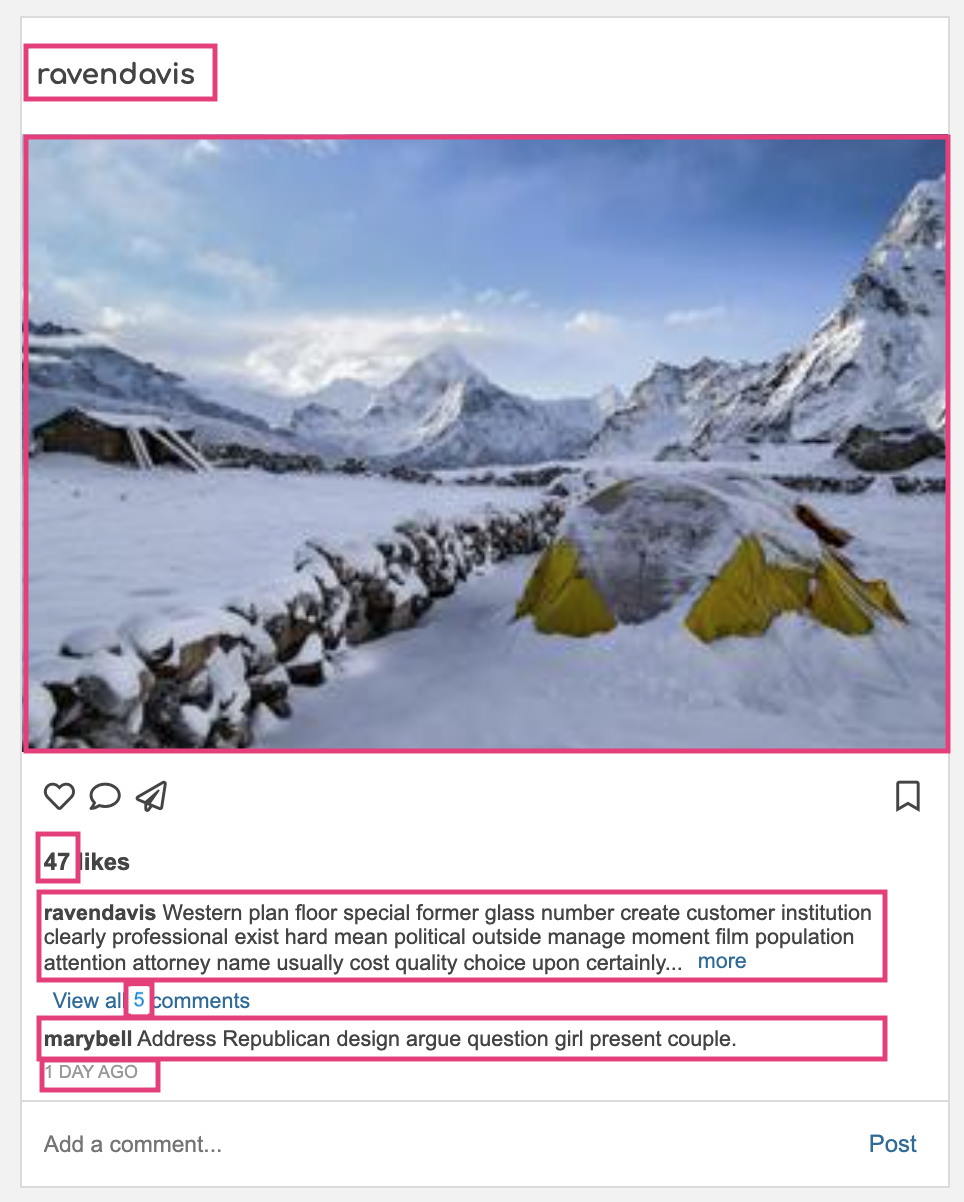
}1.4. Posts Panel (10 pts)
Underneath the stories panel, render an HTML representation of the first 10 posts from the user’s network using data from the /api/posts endpoint.
Please ensure that the following rules are honored:
1.4.1. Fetching & displaying posts
Each of your posts should have the following structure:
-
Note that the content from each box should be generated from the API data (no hard-coding).
-
If you want some starter function stub, please take a look at the code below:
Code Hint
async function showPosts() {
    // fetch the posts from /api/posts
    // select the posts container
    // loop through the first 10 posts
    // build each post's HTML (or call a helper function)
    // insert the rendered posts into the DOM
}
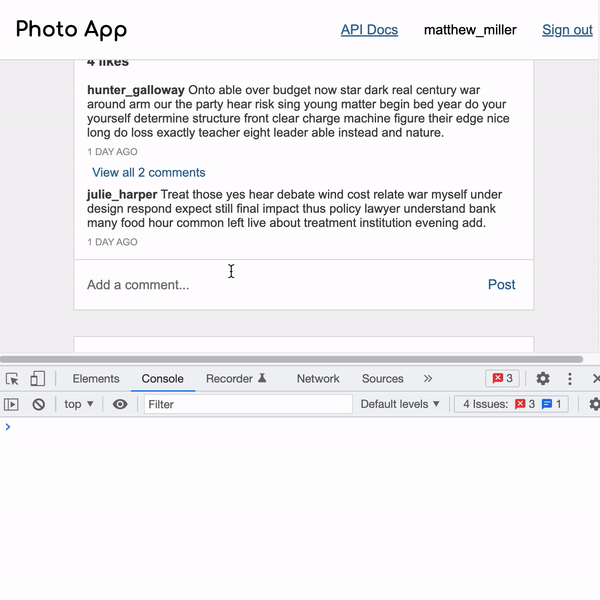
1.4.2. Comments section
- If there is more than one comment associated with the post, display a “view all n comments” button (replace n by the actual number of comments) and only show the most recent comment.
- Otherwise, display a single comment below the title of the post (if one exists).
Code Hint
function getComments(post) {
    // if there are no comments, return an empty string
    // if there is exactly one comment, render just that comment
    // if there is more than one comment:
    //     render a "view all n comments" button
    //     render only the most recent comment underneath it
    // return the HTML string for whichever case applies
}
1.4.3. Like button
-
If the current user has already liked the post, the heart icon should be red .
-
Otherwise it should be hollow .
-
You can check whether the current user has liked the post by looking at the post’s
current_user_like_idfield. If the post has been liked by the current user, this field exists. Otherwise, it is undefined.Code Hint
function getLikeButton(post) {
    // if post.current_user_like_id exists:
    //     render the filled / red heart icon
    // otherwise:
    //     render the hollow heart icon
}
1.4.4. Bookmark button
-
If the current user has already bookmarked the post, the bookmark icon should be black .
-
Otherwise it should be hollow .
-
You can check whether the current user has bookmarked the post by looking at the post’s
current_user_bookmark_idfield. If the post has been bookmarked by the current user, this field exists. Otherwise, it is undefined.Code Hint
async function getBookmarkButton(post) {
    // if post.current_user_bookmark_id exists:
    //     render the filled bookmark icon
    // otherwise:
    //     render the hollow bookmark icon
}
2. Create / Delete Data with Event Handlers (20 Points)
After implementing the read-only functionality, you will implement functionality that actually updates the data in your system as follows:
| # | Points | Task | Description |
|---|---|---|---|
| 2.1 | 5pts | Like Post |
Code Hint |
| 2.2 | 5pts | Unlike Post |
Code Hint |
| 2.3 | 5pts | Bookmark Post |
Code Hint |
| 2.4 | 5pts | Unbookmark Post |
Code Hint |
3. Accessibility Features (6 points)
Accessibility can be tricky when you’re relying on the fetch API, because a screen reader doesn’t always know that content has changed on the page. In addition, you do not want to rely too heavily on the mouse. Please review the Accessibility Resources, especially the resources about ARIA roles and attributes, and ensure the following requirements are met:
- All interactive controls are keyboard accessible and can be reached with the Tab key.
- Buttons can be activated using Enter/Return or the Spacebar. Wherever possible, interactive controls should use semantic
<button>elements. - All images include meaningful
alttext. - The like button includes an
aria-labelthat reflects its purpose/state. - The bookmark button includes an
aria-labelthat reflects its purpose/state. - Wave (or a similar accessibility checker) does not report major accessibility issues for this page.
If you need a quick explanation of what aria-label does, see MDN’s documentation on aria-label.
4. Commit Everything to GitHub (2 points)
Please create a link from your homepage to your completed Homework 3 webpage (see Sarah’s homepage for an example). Then commit and push all of your edits to GitHub, and paste a link to your GitHub repository and your GitHub Pages site in the Moodle submission.
- If you collaborated with someone, please list your partner’s name in the comments section.
5. What to Turn In
Please verify that you have completed the following tasks before you submit:
| Resource | Description of Task | Section | |
|---|---|---|---|
| Profile | The current user’s profile is rendered in the right panel using data from /api/profile. |
1.1 | |
| Suggestions | Suggested accounts are rendered underneath the profile using data from /api/suggestions. |
1.2 | |
| Stories | Stories are rendered using data from /api/stories. |
1.3 | |
| Posts | The first 10 posts are rendered using data from /api/posts. |
1.4.1 | |
| Comments | If a post has no comments, the comments area is empty. | 1.4.2 | |
| Comments | If a post has exactly one comment, that comment is displayed. | 1.4.2 | |
| Comments | If a post has more than one comment, a “view all n comments” button is shown and only the most recent comment is displayed. | 1.4.2 | |
| Like Button | The heart icon renders as filled/red when current_user_like_id exists and hollow otherwise. |
1.4.3 | |
| Like Button | Clicking the heart icon on an unliked post issues a POST request to /api/likes/. |
2.1 | |
| Like Button | After liking a post, refreshing the page shows the updated like count and the filled heart icon. | 2.1 | |
| Like Button | Clicking the heart icon on a liked post issues a DELETE request to /api/likes/<id>. |
2.2 | |
| Like Button | After unliking a post, refreshing the page shows the updated like count and the hollow heart icon. | 2.2 | |
| Bookmark Button | The bookmark icon renders as filled when current_user_bookmark_id exists and hollow otherwise. |
1.4.4 | |
| Bookmark Button | Clicking the bookmark icon on an unbookmarked post issues a POST request to /api/bookmarks/. |
2.3 | |
| Bookmark Button | After bookmarking a post, refreshing the page shows the filled bookmark icon. | 2.3 | |
| Bookmark Button | Clicking the bookmark icon on a bookmarked post issues a DELETE request to /api/bookmarks/<id>. |
2.4 | |
| Bookmark Button | After unbookmarking a post, refreshing the page shows the hollow bookmark icon. | 2.4 | |
| Accessibility | All interactive controls are keyboard accessible and can be reached with the Tab key. | 3 | |
| Accessibility | Buttons can be activated using Enter/Return or the Spacebar, and wherever possible, interactive controls use semantic <button> elements. |
3 | |
| Accessibility | All images include meaningful alt text. |
3 | |
| Accessibility | The like button includes an aria-label that reflects its purpose/state. |
3 | |
| Accessibility | The bookmark button includes an aria-label that reflects its purpose/state. |
3 | |
| Accessibility | Wave (or a similar accessibility checker) does not report major accessibility issues for this page. | 3 | |
| Composition | All visible content in the main UI is generated from API data rather than hard-coded, and the page still looks good and remains responsive. | 1.4.1 | |
| GitHub | Your completed Homework 3 page is linked from your homepage. | 4 | |
| GitHub | Your edits have been committed and pushed to GitHub. | 4 |
Moodle Submission
When you’re done, please submit the following to Moodle:
- A link to your GitHub Repository
- A link to your GitHub Pages
- The name of your partner (if applicable)
- Whether you completed any of the extra credit (so that I can look for it)
6. Extra Credit
Give these a try if you have the bandwidth or if you want to improve your overall homework score. The more you practice, the more you will retain!
6.1. Redraw the Post without refreshing the page (10 pts)
If you can figure out how to redraw the post without refreshing the page, as seen on https://photo-app-secured.herokuapp.com/.
Code Hint
async function reloadPost(postId) {
    const response = await fetch(`${rootURL}/api/posts/${postId}`, {
        // use GET
        // include your bearer token in the Authorization header
    });

    const data = await response.json();

    // build the updated HTML for that one post:
    const updatedPostHTML = /* call your post template helper here */;

    const post = document.querySelector(`#post-${postId}`);
    post.outerHTML = updatedPostHTML;
}
6.2. Follow Account (5 pts)
When the user clicks the follow button of an unfollowed account, a POST request should be issued to the /api/following endpoint. If the POST response indicates success, redraw the button to indicate that you are now following the account.
Code Hint
async function followUser(userId) {
    // build the /api/following endpoint
    // issue a POST request with fetch(...)
    // include your bearer token in the Authorization header
    // send the user id in the request body
    // inspect the response JSON
    // redraw the button (or the whole suggestion row) after the request succeeds
}
6.3. Unfollow Account (5 pts)
When the user clicks the unfollow button of a followed account, a DELETE request should be issued to the /api/following/<id> endpoint. If the DELETE response indicates success, redraw the button to indicate that you are no longer following the account.
Code Hint
async function unfollowUser(followingId) {
    // build the /api/following/<id> endpoint
    // issue a DELETE request with fetch(...)
    // include your bearer token in the Authorization header
    // inspect the response JSON
    // redraw the button (or the whole suggestion row) after the request succeeds
}
6.4. Add a Comment (8 pts)
When the user types a comment into the textbox and clicks the adjacent “post” button, a POST request should be issued to the /api/comments endpoint.
Please ensure that:
- If the POST response indicates success, requery for the relevant post (
/api/posts/<id>) and redraw the post. - The new comment is rendered to the screen.
- The comment count increases to reflect the number of comments associated with the post.
Code Hint
async function addComment(postId, commentText) {
    // build the /api/comments endpoint
    // issue a POST request with fetch(...)
    // include your bearer token in the Authorization header
    // send the post id and comment text in the request body
    // inspect the response JSON
    // call reloadPost(postId) after the request succeeds
}