Assignments > Tutorial 9: Setting up Flask
Due on Fri, 03/24 @ 11:59PM. 6 Points.
Background Readings
Before beginning this tutorial, please read (or at least skim) the following:
- Towards Data Science. Intro to Python Virtual Environments
- Flask website. Flask Quickstart Guide
- Janetakis, Nick (Oct., 2017). Server Side Templates vs REST API and Javascript Front-End.
1. Intro to Flask
Flask is a framework, built with Python, for helping people build dynamic, scalable web applications. I have selected Flask as our web server engine for this semester because it has a relatively simple set of common abstractions, and is therefore easier to learn than some other frameworks. At the same time, it is also very powerful, and has features such as:
- Templating, using the Jinja template engine
- A simple way to define routes (which bind URL addresses to functions), and to specify which HTTP methods are valid for a particular route (HEAD, OPTIONS, GET, POST, PUT, PATCH, DELETE)
- A way to listen for and parse HTTP requests over a specified port
- A way to create and send HTTP responses
In addition, since Flask is written in Python, you have access to any and all Python libraries (e.g., for connecting to various databases, taking advantage of pretrained models, and so forth).
Most frameworks have abstractions similar to those offered by Flask, so once you learn Flask, learning new server-side web frameworks will be easier. Some other web frameworks that are analagous to Flask (that you may have heard of) include:
| Python | Flask, Django, Web2Py, Pyramid, etc. |
| Node.js | Express, etc. |
| PHP | Larvel, Symfony, etc. |
| Ruby | Rails, etc. |
| Java | Spring, Struts, Guice, etc. |
| C# | ASP.NET |
2. Intro to Python Virtual Environments
To run Flask, we are going to create a self-contained Python virtual environment, to ensure that your python dependencies don’t interfere with any global python installations you might have.
From the Python Docs:
A virtual environment is a Python environment such that the Python interpreter, libraries and scripts installed into it are isolated from those installed in other virtual environments, and (by default) any libraries installed in a “system” Python, i.e., one which is installed as part of your operating system.
Practically speaking, a virtual environment (venv) “sandboxes” your Python installation so that anything installed within a venv is not available outside of it. Libraries installed in a “system” Python ARE available to your venv, but can be overridden from within the venv. For instance, if numpy version 1.15.4 is installed on your “system” Python and you decide to install numpy version 1.16.1 in your venv, then within the venv, 1.16.1 will take precedence.
Some commands to know:
Mac / Unix / Linux
python3 -m venv env      # creates a new virtual environment called "env"
source env/bin/activate  # activates the virtual environment
deactivate               # deactivates the virtual environment
Windows Powershell or Command Prompt
py -m venv env          # creates a new virtual environment called "env"
env\Scripts\activate    # activates the virtual environment
deactivate              # deactivates the virtual environment
Note that when your venv is activated, there will be a (env) prefix in front of your command prompt. When activated, any python or pip install commands will be interacting with your virtual environment.
3. Set Up
If you haven’t used Python before, please download and install it: https://www.python.org/downloads/. Any version of python >= 3.7 will work.
Once Python is installed, download tutorial09.zip (below), unzip it, and move your tutorial09 folder inside of your tutorials folder.
Set Up Your Virtual Environment
Open the terminal and navigate to your tutorial09 folder. Then, set up a virtual environment and install the dependencies as follows (depending on your operating system):
For Mac, Unix, Linux, or GitBash
python3 -m venv env
source env/bin/activate
pip install -r requirements.txt    # install dependencies
For Windows Powershell or Command Prompt
# create the virtual environment
py -m venv env

# run the activate.bat script as follows:
env\Scripts\activate

# and finally, install the Python dependencies
py -m pip install -r requirements.txt
Run Your Flask Web Server
When you’re done, try running your flask app from your command line:
flask run --debug

# if you named your app something other than app.py (say, hello.py) type this:
# flask flask --app hello run --debug
You should see the following output:
 * Serving Flask app "app.py" (lazy loading)
 * Environment: development
 * Debug mode: on
 * Running on http://127.0.0.1:5000/ (Press CTRL+C to quit)
 * Restarting with stat
 * Debugger is active!
 * Debugger PIN: 273-580-071
Navigate to http://127.0.0.1:5000/, and you should see a screen that lists the exercises that you are to complete:
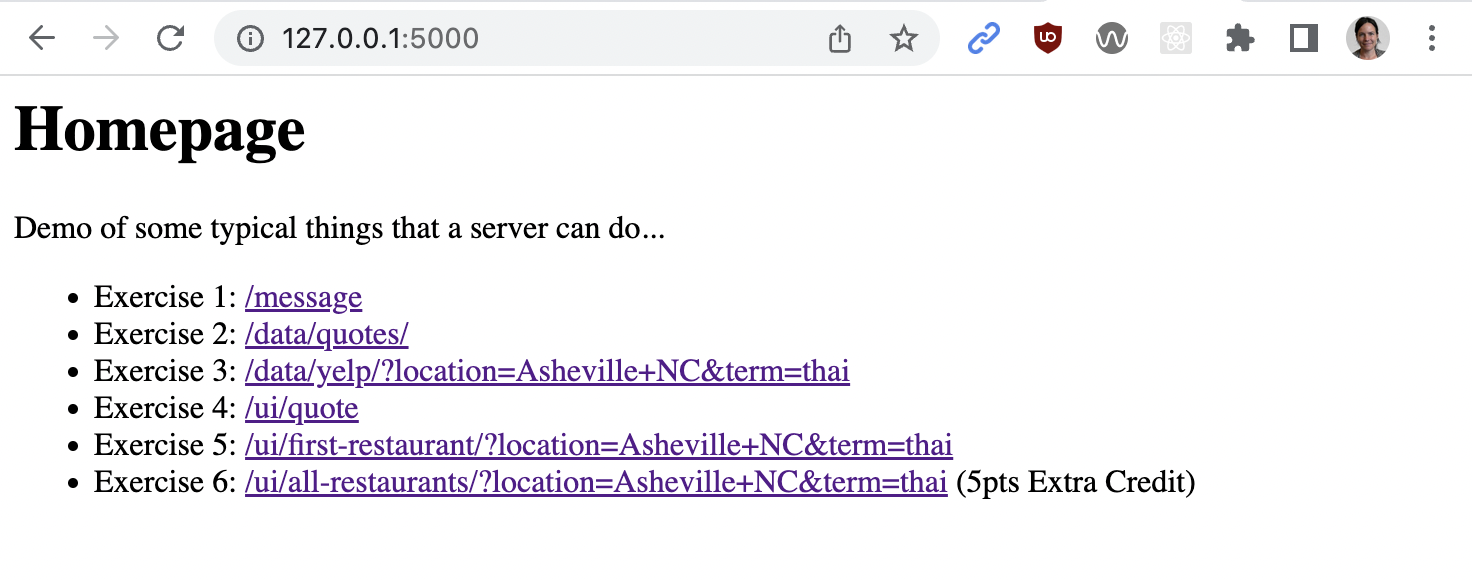
4. Required Flask Exercises
Once you’ve set up your flask installation, you will complete 5 required exercises. You may also complete the optional exercise (#6) for extra credit:
| Exercise | Purpose | |
|---|---|---|
| 1. | Display personalized greeting | Practice generating and sending a dynamic string via HTTP |
| 2. | Grab data from a “database” | Practice sending a JSON string from a “database” via HTTP |
| 3. | Grab data from another server | Query another REST API and then forward the resulting data as an HTTP response. Allow the user to specify criteria using query parameters. |
| 4. | Merge your data with a template | Practice creating a data-driven, server-side HTML file from a template. Templates allow you to separate the data from the presentation of the data. |
| 5. | Merge someone else’s data with a template | Merge yelp data with a template that you design. |
| 6. | Merge someone else’s data with a template (more practice) | Extra Credit Same as task 5 except that you will loop through each restaurant using Jinja looping syntax. |
Each of these exercises is intended to help you get a sense of the kinds of things you can do with Flask (or any web framework):
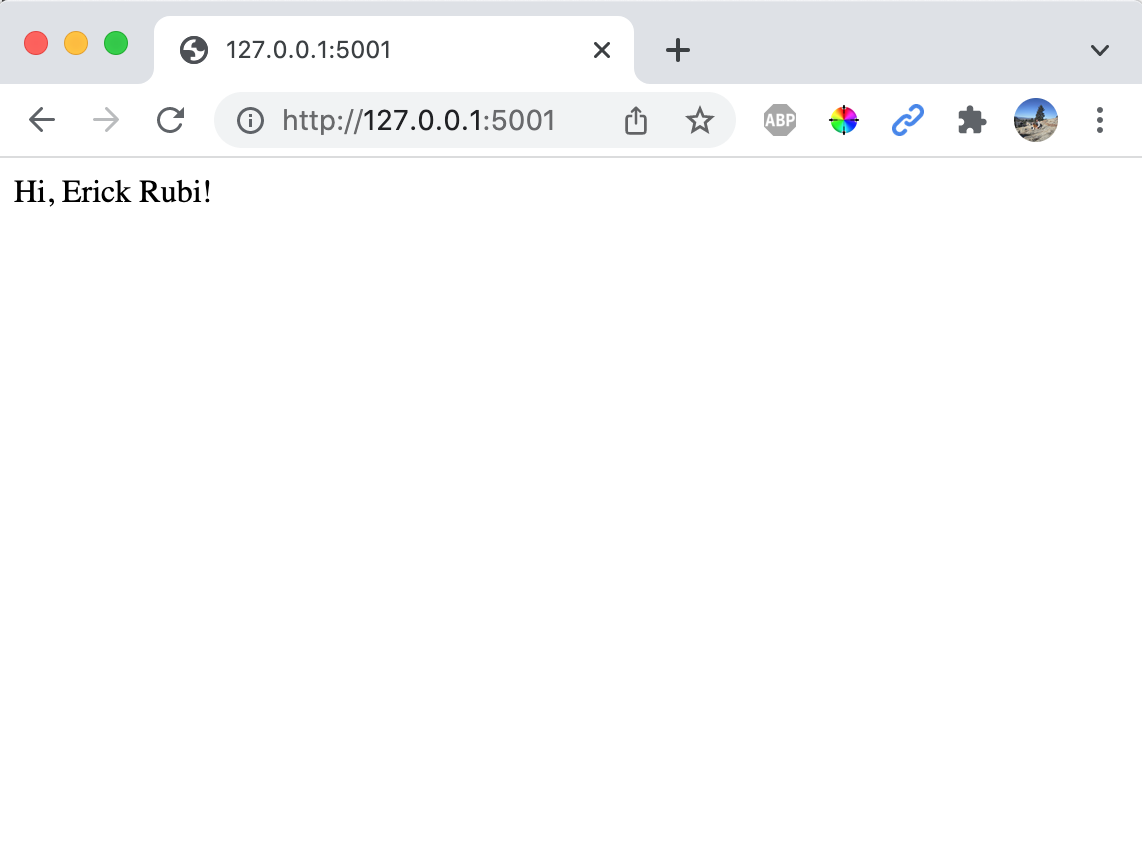
1. Display personalized greeting
Update the exercise1 function so that it returns a personalized greeting to the user. In other words, replace “Hello World!” with something like, “Hi Erick Rubi!”
- Assume that the
current_uservariable, defined at the top ofapp.pyrepresents the user who is currently logged in.
2. Grab Data from “database”
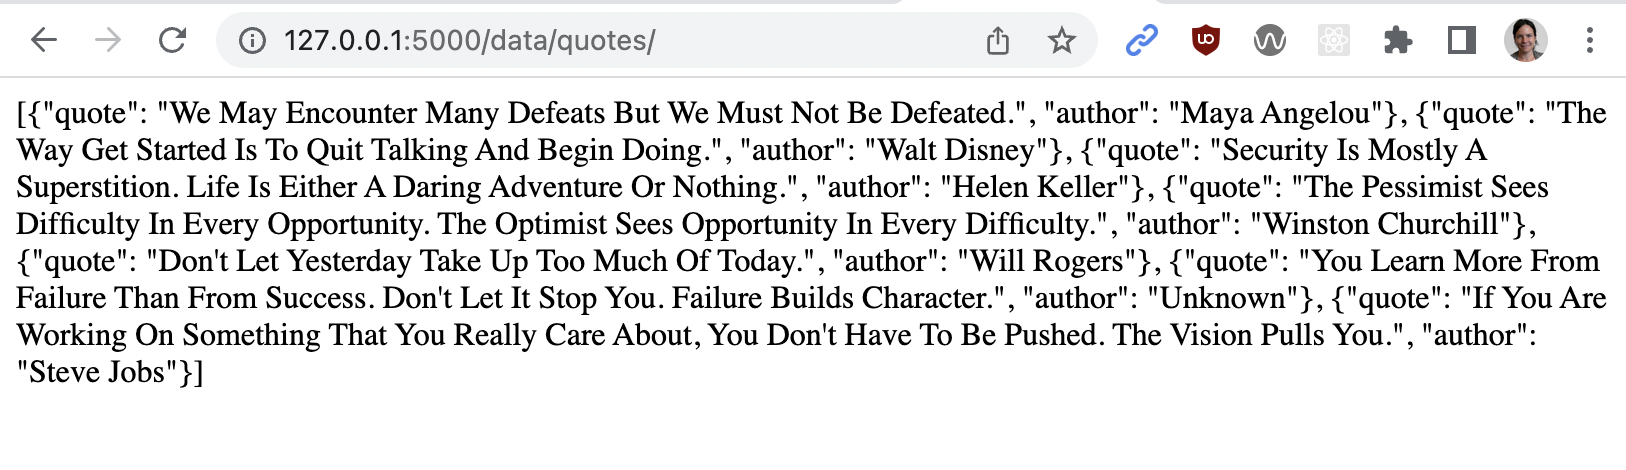
The big idea with REST APIs is that they expose a subset of your organization’s data (from a database) to the outside world. Within app.py, scroll down to the exercise2 function. This function opens a simple “database” file (just a JSON file), loads the data into memory, and then sends it as response to the requestor. Currently, it just returns an empty dictionary. You will replace the return statement with the following:
return json.dumps(data)
After editing the function, test your endpoint by accessing http://127.0.0.1:5000/data/quotes/. If your code worked, you should see JSON of “famous quotes.”
A quick note on the json library:
json.dumps()converts a Python dictionary into JSON (a string).json.loads()convert JSON (a string) into a Python dictionary.
3. Grab data from another server
Servers can also be clients that issue requests to other servers (the thing doing the “asking” is usually referred to as the client). In other words, your Flask server can query data from other servers (using HTTP or other protocols) and then make use of that data in their own way. The exercise3 function queries a proxy server that Sarah made (https://www.apitutor.org) for accessing Yelp (and other providers). In this example, we are querying Yelp for restaurants that match a location and term:
@app.route('/data/yelp/')
@app.route('/data/yelp')
def exercise3():
    args = request.args
    print(args)
    search_term = 'pizza'
    location = 'Asheville, NC'
    # go fetch data from another server and give it to the requestor:
    url = 'https://www.apitutor.org/yelp/simple/v3/businesses/search?location={location}&term={search_term}&limit={count}'.format(
        location=location,
        search_term=search_term,
        count=5)
    response = requests.get(url)
    data = response.json()
    return json.dumps(data)
You are going to make this route more customizable by allowing the requestor to pass query parameters to the /data/yelp/ endpoint. For instance:
http://127.0.0.1:5000/data/yelp/?location=Asheville+NC&term=thai
Recall from previous lectures:
- The
?character is used to specify where the route ends and the query parameters begin. - If there is more than one query parameter, then each parameter/argument pair is separated by an
&character (see examples below). - The parameter name is on the left side of the
=and the value is on the right side. - In flask, you can access the query parameters via the
request.args, which stores a dictionary representation of any query parameters associated with a given route.
Your Task
Replace the hard-coded ‘pizza’ and ‘Asheville, NC’ terms with the user’s preferences, using the the request.args dictionary. In python, to get a key from a dictionary, you can do this:
search_term = request.args.get('term')
location = request.args.get('location')
Also, be sure to check if they passed in both a “location” and a “term” parameter. If they didn’t, give them an error message and tell them to try again:
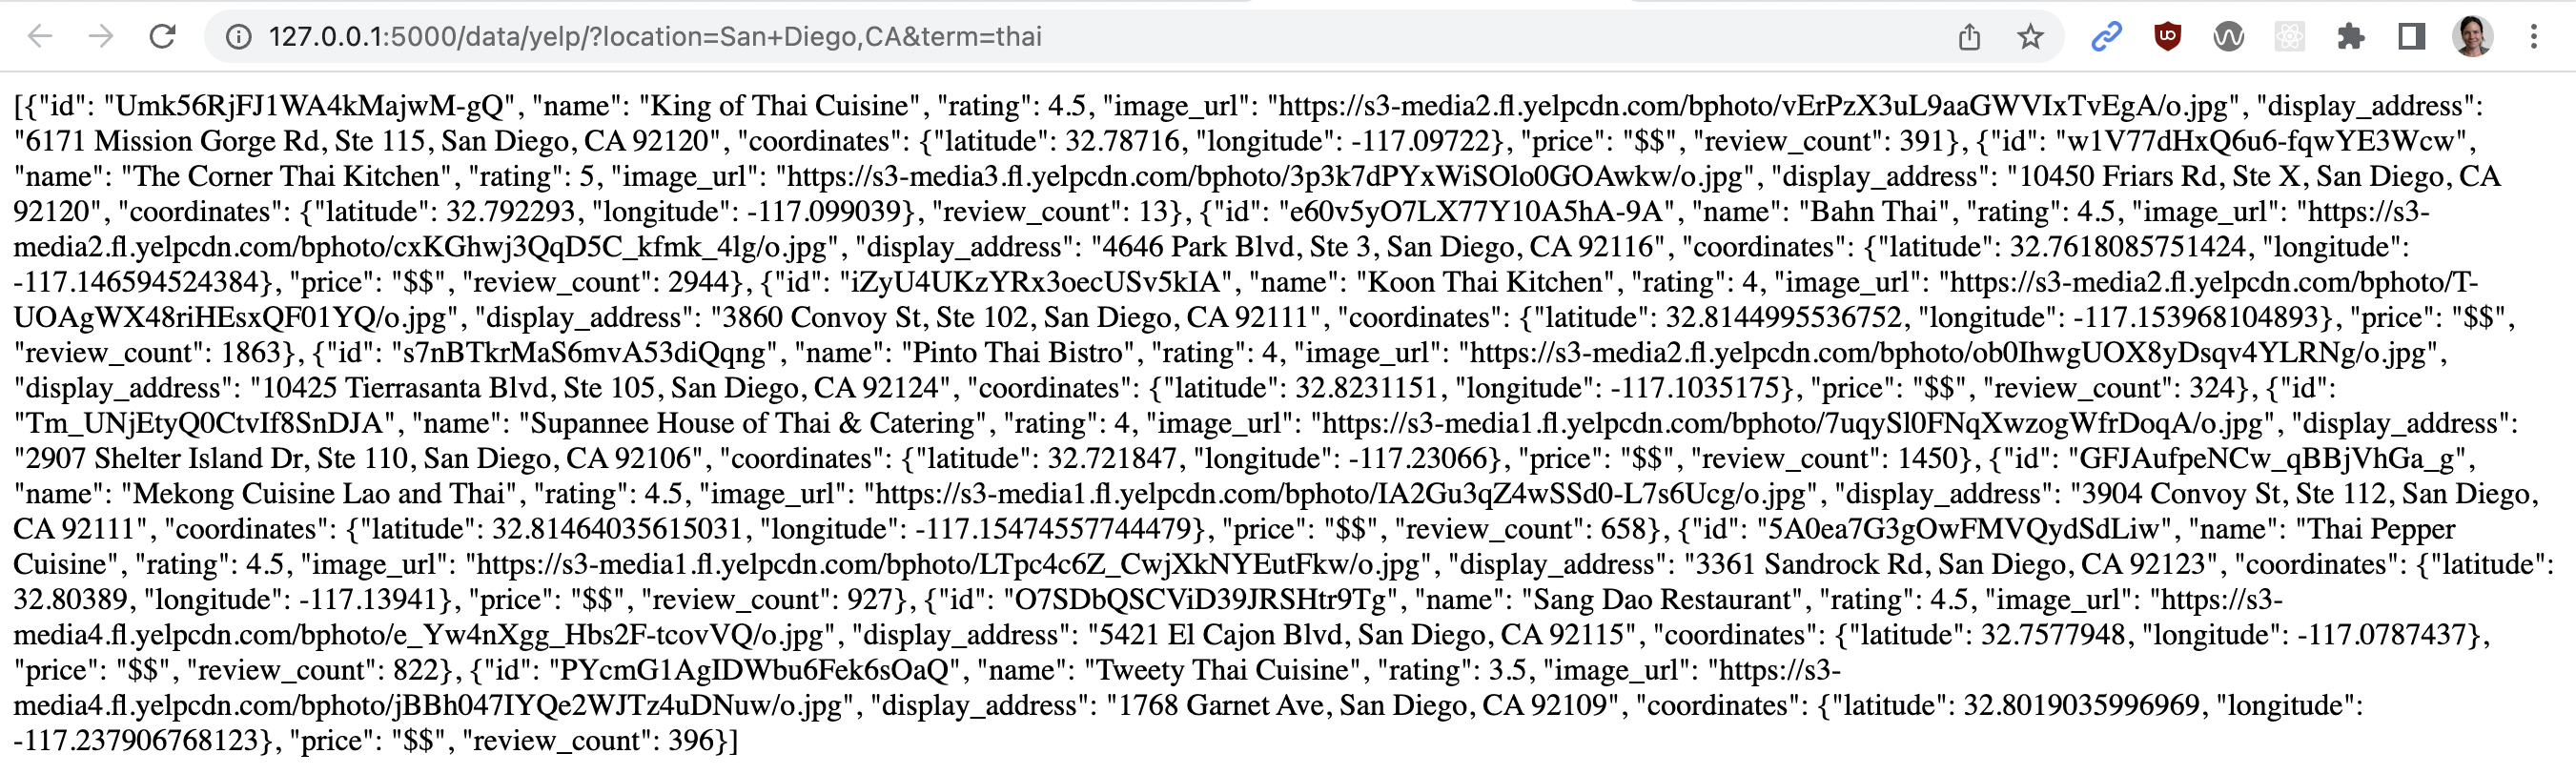
- http://127.0.0.1:5000/data/yelp/?location=Asheville,+NC&term=chinese (Chinese restaurants in Asheville)
- http://127.0.0.1:5000/data/yelp/?location=San+Diego,CA&term=thai (Thai restaurants in San Diego)
If you implemented this function correctly:
- The “location” search parameter is honored
- The “term” search parameter is honored
- If either parameter is missing, an error message displays
4. Merge your data with a template
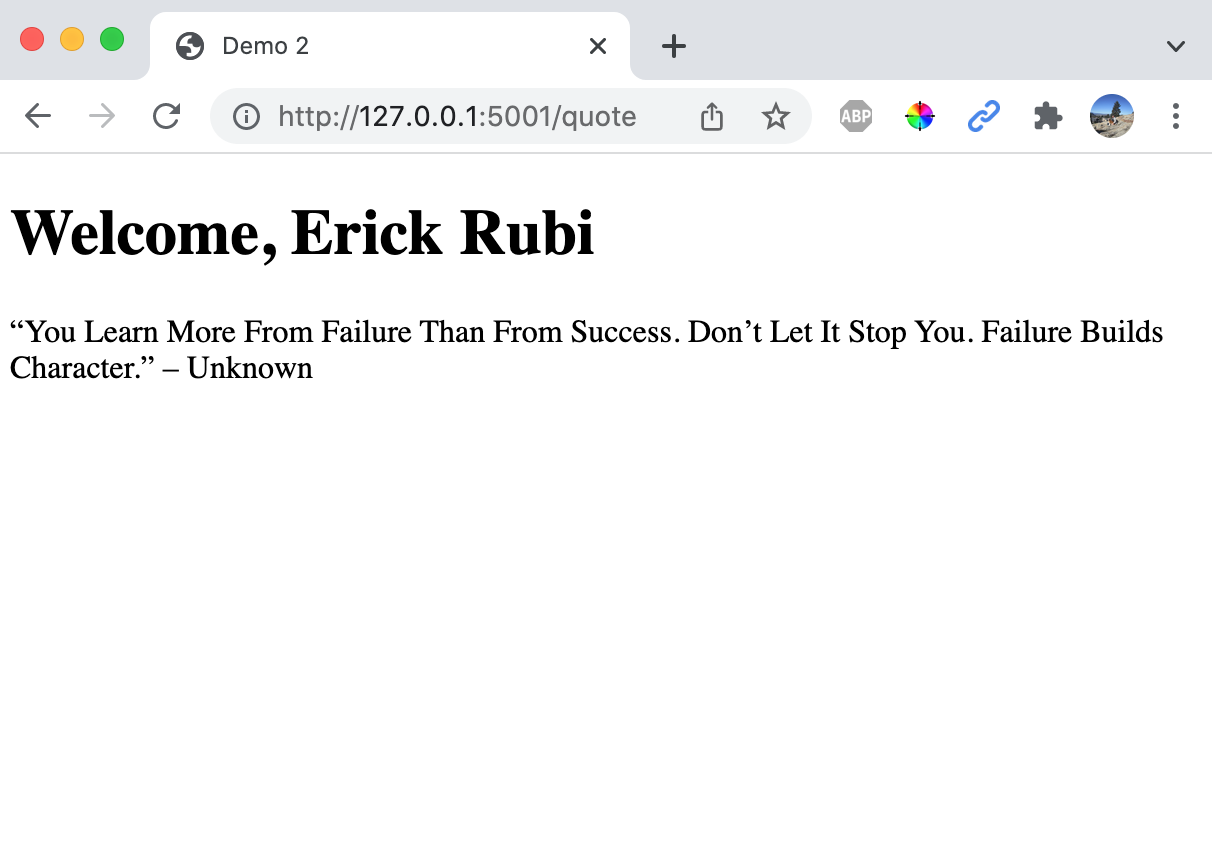
The exercise4 function uses a template to generate an HTML string, which is returned as a response. Specifically, python parses the templates/quote-of-the-day.html file, finds any Jinja syntax, evaluates that syntax, and finally sends a “plain” HTML file back to the client (very similar to a template literal or JSX, but with more power):
@app.route('/quote')
def exercise2():
    return render_template(
        'quote-of-the-day.html',
        user=current_user
    )
Open the templates/quote-of-the-day.html file and examine how the Jinja template allows python logic to be evaluated from within the HTML template (using double curly brace notation). Note that in order to give your template access to data, it must be passed into the render_template function as a keyword argument (from app.py). You may pass in as many keyword arguments (i.e. pieces of data) as you like into the template. These pieces of data are often referred to as the template’s “context.”
Your Task
Please make the following modifications:
- In
app.py, add another context variable, calledquotethat holds a randomly selected quote from thequoteslist (see ~line 17).- The context variable must be included as a keyword argument in your
render_templatefunction. - I recommend that you use Python’s built-in random.choice function to select a random element from a list.
- The context variable must be included as a keyword argument in your
- In
templates/quote-of-the-day.html, update the template so that the quote of the day is displayed.
5. Merge someone else’s data with a template
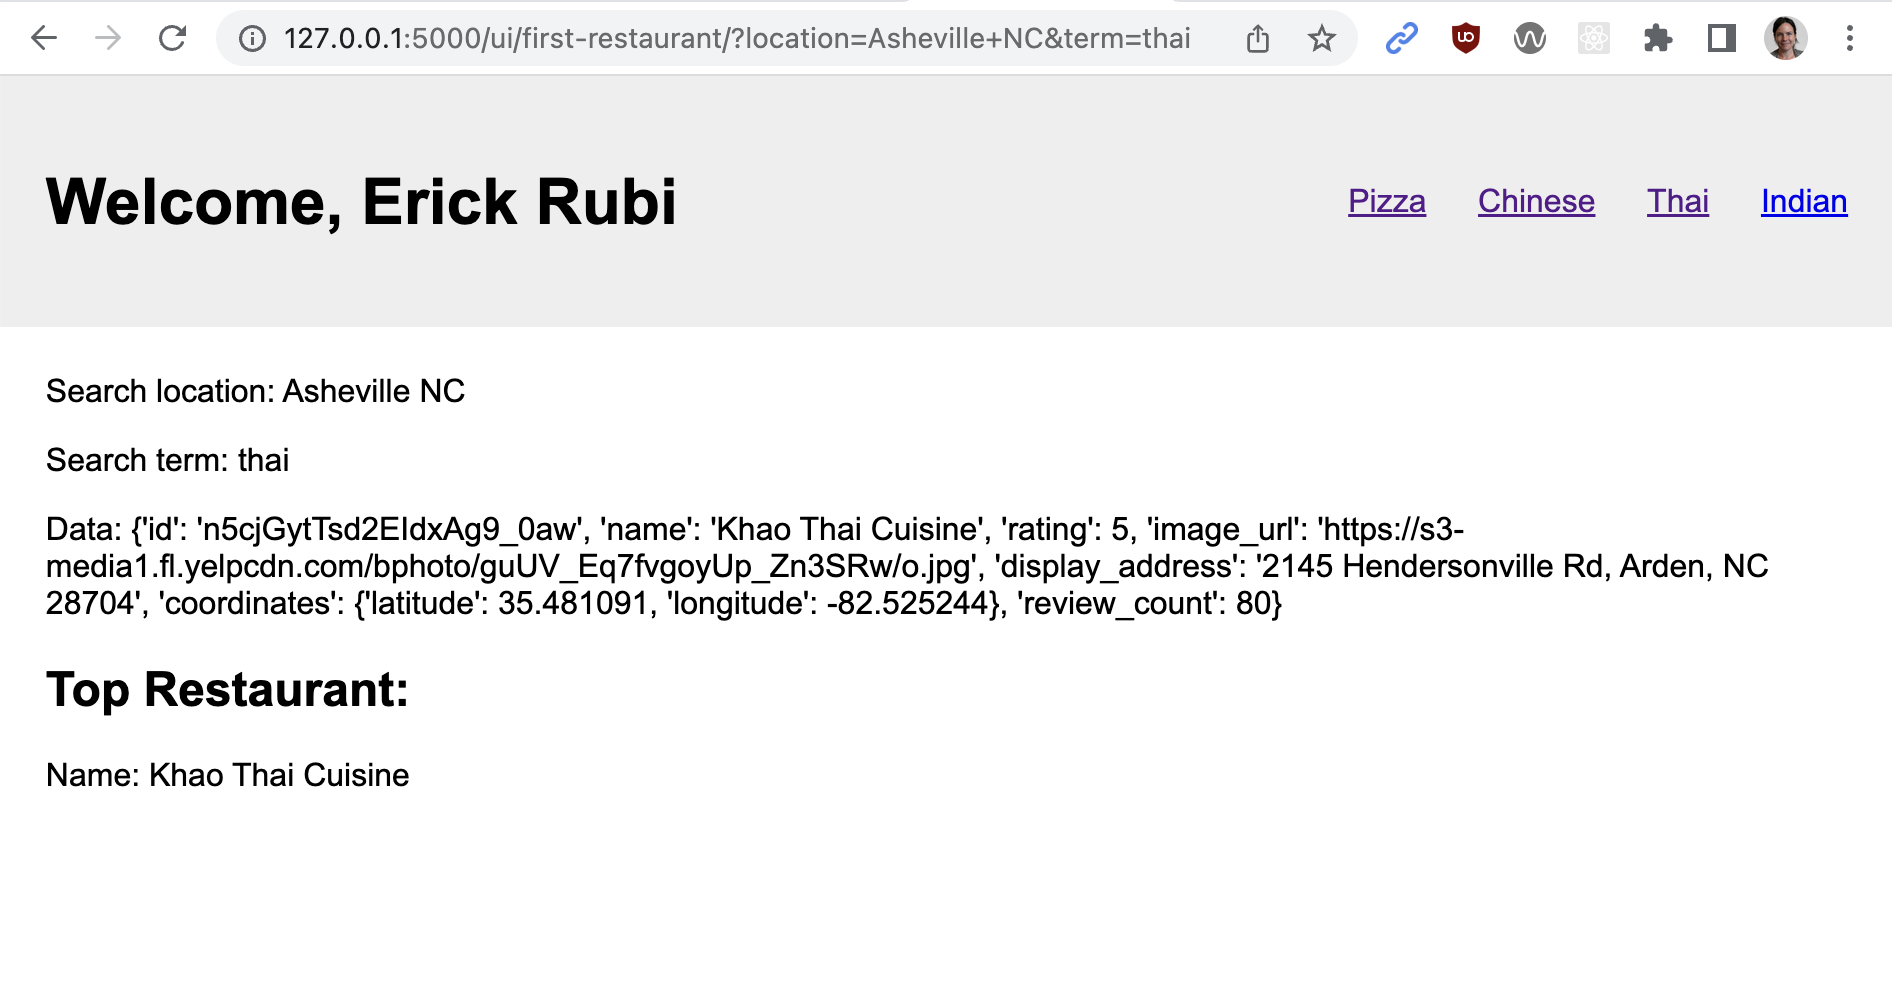
Now, you’re going to create a data-driven template to display information about the “Top Restaurant” (according to Yelp) that matches your search criteria. Consider the following code:
@app.route('/ui/first-restaurant/')
@app.route('/ui/first-restaurant')
def exercise5():
    # code to parse the query parameters (like in exercise 3):
    args = request.args
    location = args.get('location')
    search_term = args.get('term')

    # error handling:
    if not (location and search_term):
        return '"location" and "term" are required query parameters'

    # code to query yelp:
    url = 'https://www.apitutor.org/yelp/simple/v3/businesses/search?location={0}&term={1}&limit=1'.format(
        location, search_term)
    response = requests.get(url)
    restaurants = response.json()

    # code to render the template (and to pass the template the data it needs)
    return render_template(
        'restaurant.html',
        endpoint='/ui/first-restaurant/',
        user=current_user,
        search_term=search_term,
        location=location,
        restaurant=restaurants[0] # just show the first restaurant
    )
It works very similarly to the code in exercise 3, except for it merges with the restaurant.html template (instead of dumping raw JSON data). Please try testing these routes by experimenting with the following URLs:
- http://127.0.0.1:5000/ui/first-restaurant/?location=Asheville,%20NC&term=chinese (Chinese restaurants in Asheville)
- http://127.0.0.1:5000/ui/first-restaurant/?location=San Diego,%20CA/thai (Thai restaurants in San Diego)
Note that the restaurant.html template uses a new construct – the “include” – as a way to modularize code.
Your Task
Modify the HTML in the restaurant.html template so that it displays the Yelp data in a more visual format. For instance, Sarah made her’s look like this:
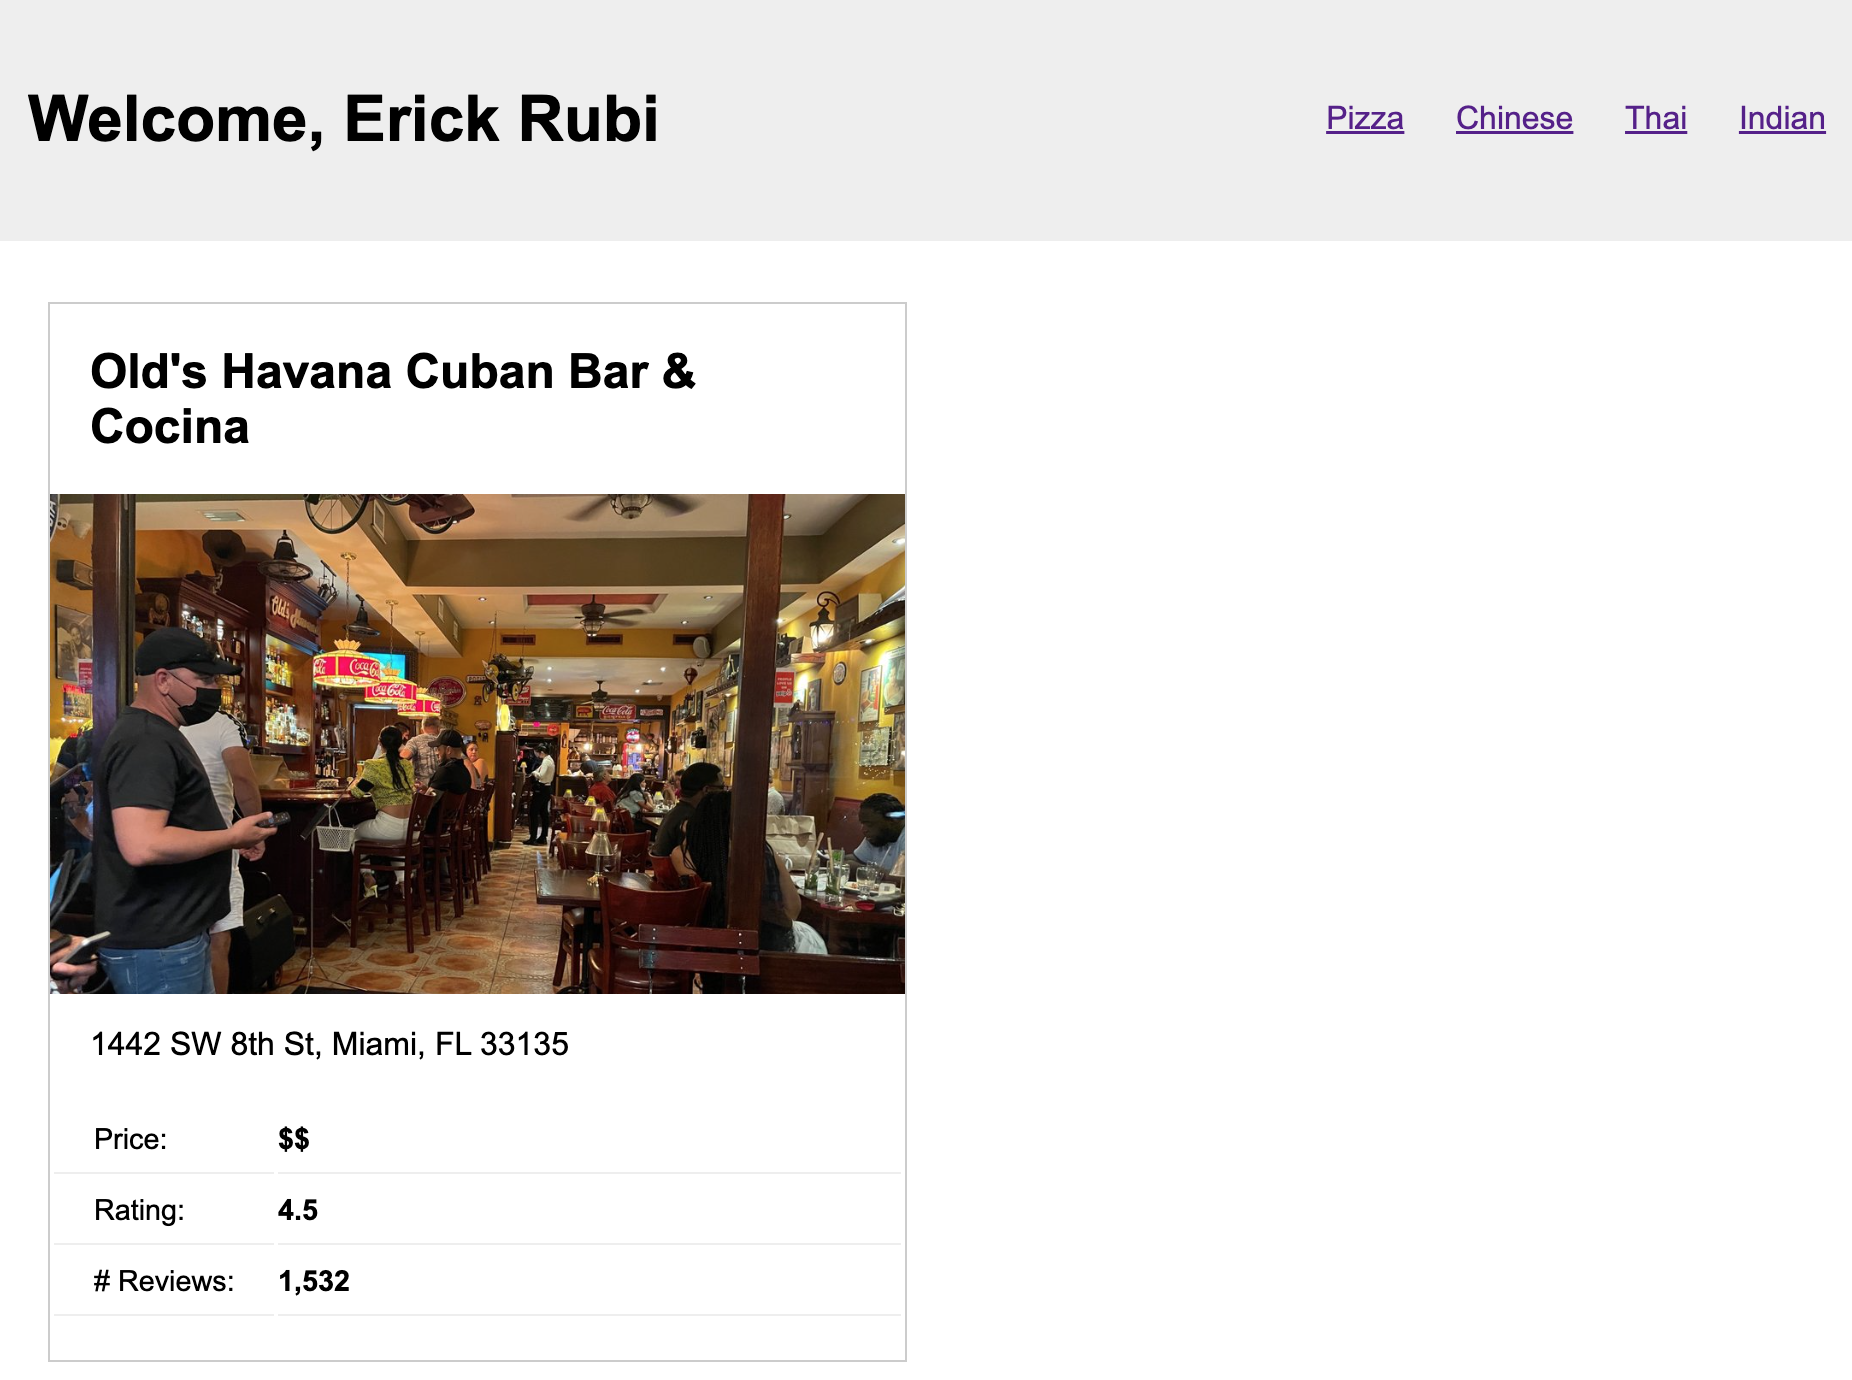
Feel free to jazz up your template any way you like!
5. Extra Credit (5pts)
If you have more time, please also try exercise6. It’s similar to exercise5, but requires a Jinja
1. Looping using Jinja
In exercise5, you only display a single restaurant. Look at the Jinja documentation and see if you can figure out how to output all of the matching restaurants for the search (not just the first one). See if you can make your template look like this one:
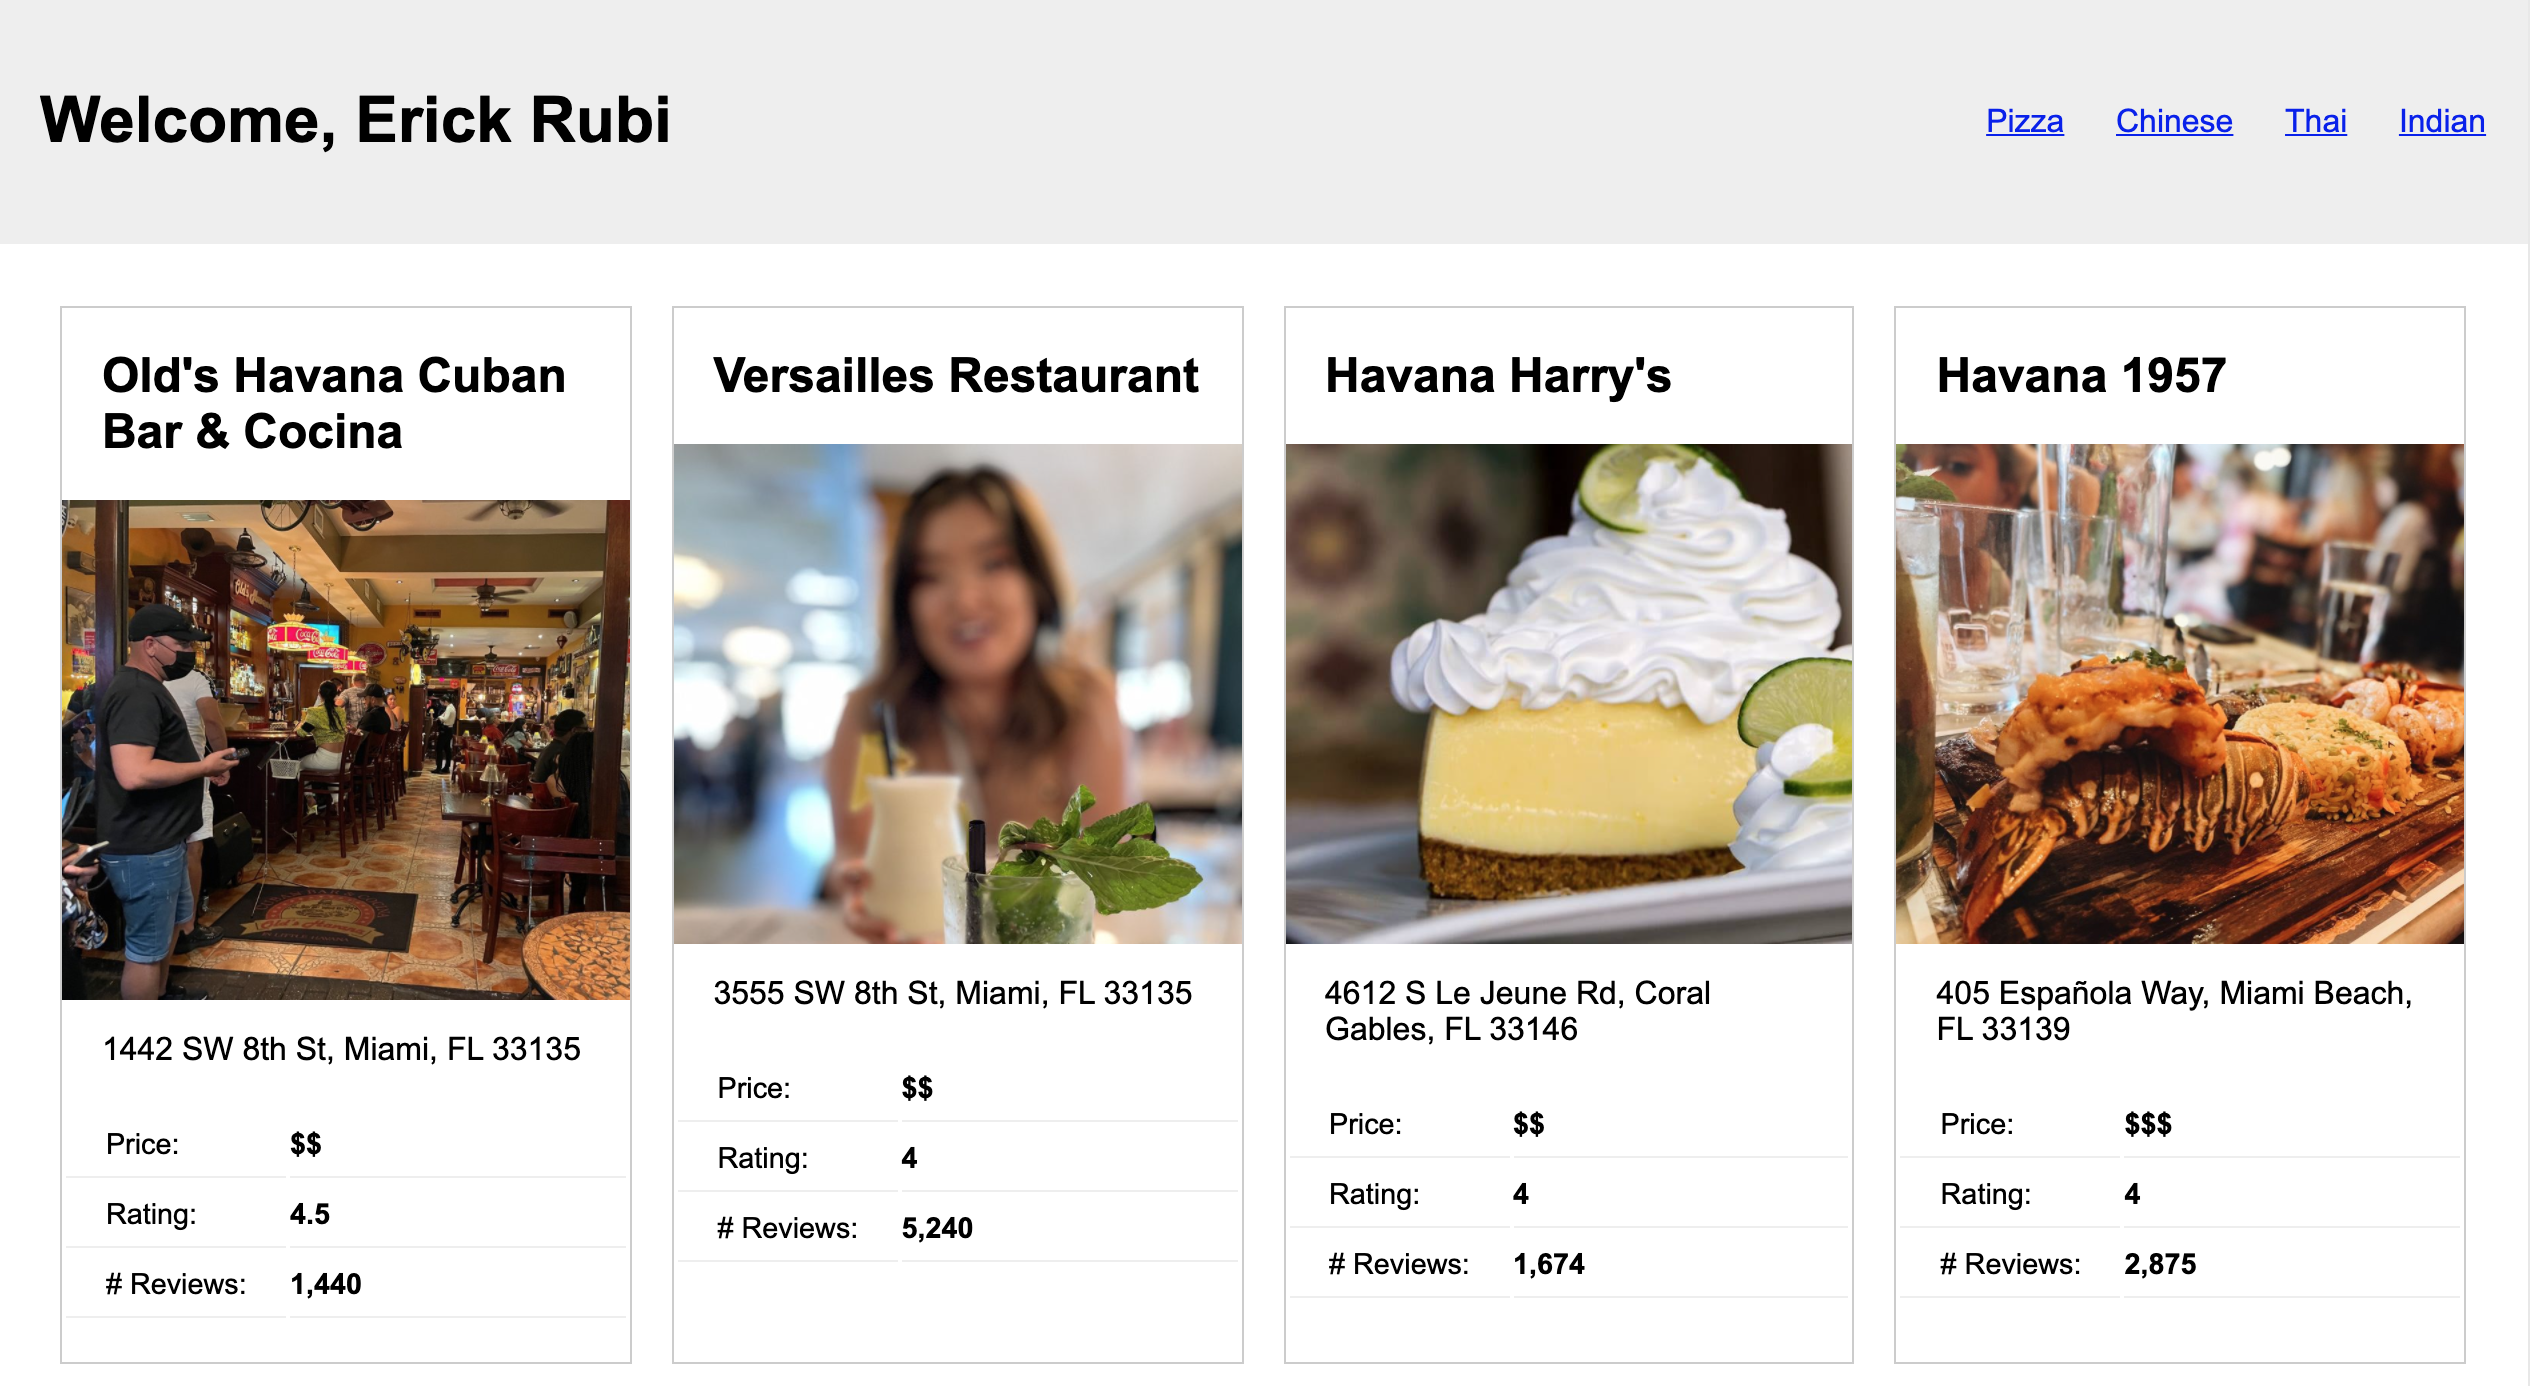
2. Includes
See if you can convert the HTML that shows a single restaurant card into an include file (similar to includes/header.html)
What to Turn In
To submit Tutorial 9, you can either:
- Commit and sync your code to GitHub using git and paste a link to your repo, or
- Zip your tutorial 9 EXCLUDING YOUR VIRTUAL ENVIRONMENT (env) folder
If you worked with a partner, list your partner as a comment. If you did the extra credit, tell me so that I can look for it.