Assignments > HW3: Building a "Vanilla" JavaScript Client
Due on Mon, 11/11 @ 11:59PM. 50 Points.
Video Walkthroughs
The folder of videos can be found here. I’ve also linked them individually:
- from 11/1 lecture Set Up
- from 11/1 lecture Retrieving Posts
- from 11/1 lecture Rendering the Post (Part 1)
- New Rendering the Post (Part 2)
- New Rendering the Post (Part 3): Comments
- New Rendering the Post (Part 4): Buttons
- New Creating Bookmarks
- New Deleting Bookmarks
Collaboration and Code Sharing Policy: Read Carefully
For this homework, you are welcome to work in pairs (optional). Even if you collaborate with someone else, you must still submit your own HTML and CSS files on Moodle. If you collaborate, you’ll just list your partner in the comments section of Moodle.
For those of you who are collaborating, please do not (a) “free ride” on your teammates or (b) enable free riders. Everyone in your group should understand every line of code they submit.
1. Introduction
1.1. Overview
In this assignment, you will build a “data-driven” version of the interface you built in HW2 using JavaScript. Specifically, you will:
- Build a very simple HTML “skeleton,” and then write some “client-side” JavaScript to:
- Query data from a server (using a REST API) and
- Build DOM elements based on the data returned from the server.
- Ensure that your interface is accessible.
For this assignment, everything should be done by writing your own “vanilla” JavaScript. In HW4, we will rebuild this client using React so that you can get a sense of some of the pros and cons of using a JavaScript framework.
Working Demo
If you want to see a working demo of what Photo App will look like at the end of the course, take a look here:
https://photo-app-secured.herokuapp.com/
- username: your first name (all lowercase)
- password: password
Note that we will only be implementing a subset of these features for HW3.
1.2. Set Up
- Download the starter files, unzip them, and save them in your
csci344/homeworkdirectory. Yourhw03structure should look like this:hw03 ├── README.md ├── index.html ├── js │ ├── main.js │ └── utilities.js ├── package.json ├── public │ └── output.css ├── src │ └── input.css └── tailwind.config.js - Open your entire
csci344folder in VS Code. - On your terminal and navigate to your
csci/homework/hw03folder. Then run the following command:npm installThis command will install your Tailwind dependencies and create a
package-lock.jsonfile and anode_modulesdirectory. Please verify that this is the case. - Run the following command from the terminal (from within your
hw03directory so that Tailwind continuously compiles your Tailwind stylesheet based on the changes you make in the HTML and CSS files:npm run build:tailwind - You are now ready to begin your HW03. Please view your
index.htmlfile in live server to verify that it works.
1.3. Course REST API
For this assignment, you will be using Sarah’s version of the PhotoApp REST API, located here: https://photo-app-secured.herokuapp.com/. In Homework 5, you will actually be building this REST API, but for now, I’m giving you a working version that you can interact with as you build your Photo App browser client. Credentials:
- username: your first name (all lowercase)
- password: “password”
Obviously this is not secure, but this is just a practice API so if it gets hacked, I can just rebuild it in one click :).
After logging in, you can view all of your available REST API endpoints by navigating to the API Docs: https://photo-app-secured.herokuapp.com/api. You’re welcome to click as many buttons as you want. I will periodically clear out and rebuild the data so you can’t mess anything up.
1.4. Authentication Notes
- All fetch requests will need to pass a
Bearer Token(for now) to authenticate with the REST API. We will go over this in class. - There is a helper function in
js/utilities.jscalledgetAccessToken()that will help you retrieve the access token. You will store this token in a variable and include it as an HTTP header in all of your server requests.
3. Your Tasks
Please complete the tasks listed below. You’re more than welcome to add more CSS & JS files as needed (though this is not necessary).
1. Page Initialization Tasks (20 Points)
The functionality in this section must be invoked when the page first loads (so that the user sees each of these panels right away).
| Points | Task | Description | Figure |
|---|---|---|---|
| 2pt | Right Panel: User Profile |
Inside of the right panel at the top, render an HTML representation of the current user's profile using data from the /api/profile endpoint.
|
Figure 1 |
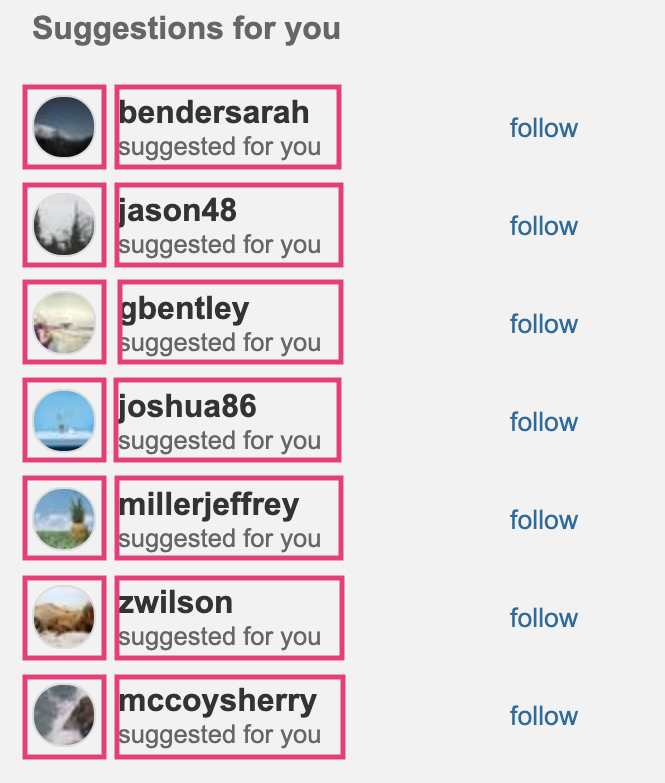
| 4pts | Right Panel: Suggested Accounts |
Inside of the right panel (underneath the user profile), render an HTML representation of suggested user accounts using data from the /api/suggestions endpoint.
|
Figure 2 |
| 4pts | Stories Panel |
Render an HTML representation of stories from the user's network using data from the /api/stories endpoint.
|
Figure 3 |
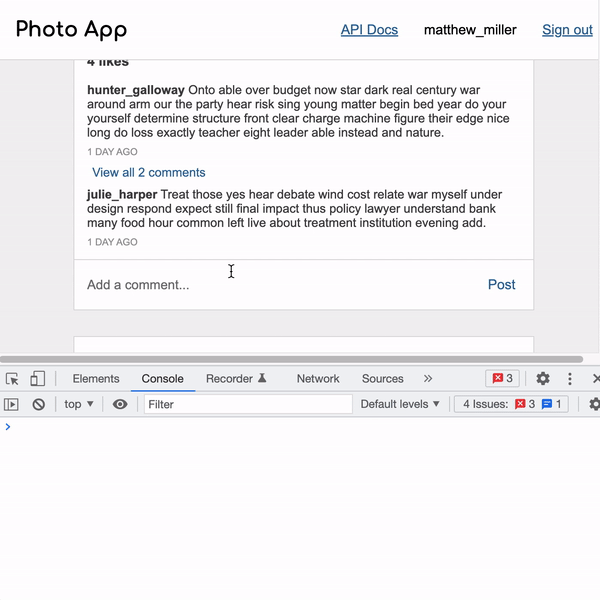
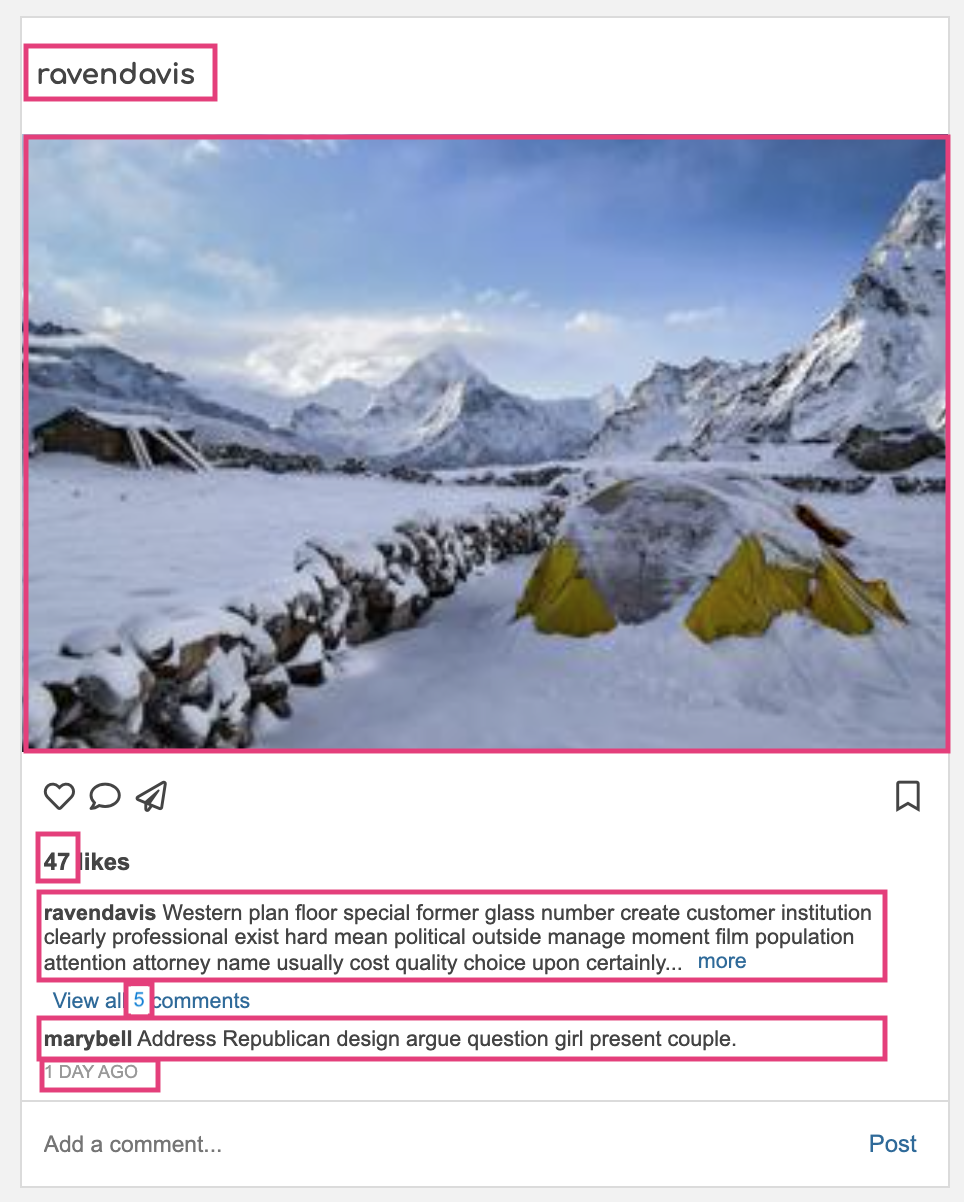
| 10pts | Posts Panel |
Underneath the stories panel, render an HTML representation of the first 10 posts from the user's network using data from the /api/posts endpoint. Please ensure that the following rules are honored:
|
Figure 4 |
Note that the content from each box should be generated from the API data (no hard-coding).


2. Create / Delete Data with Event Handlers (20 Points)
After implementing the read-only functionality, you will implement functionality that actually updates the data in your system as follows:
| Points | Task | Description |
|---|---|---|
| 5pts | Like Post |
|
| 5pts | Unlike Post |
|
| 5pts | Bookmark Post |
|
| 5pts | Unbookmark Post |
|
3. Accessibility Features (6 points)
Accessibility can be tricky when you’re relying on the fetch API, because a screen reader doesn’t always know that content has changed on the page. In addition, you don’t want to be over-reliant on the mouse. Please take a look at the Accessibility Resources, and specifically the resources pertaining to aria roles and attributes.
| Points | Task | Description |
|---|---|---|
| 2pts | Keyboard Navigation |
|
| 2pts | Alt Text and Contrast |
|
| 2pts | Aria attributes | Use the 'aria-label' attribute to indicate to the screen reader the purpose of the "like" and "bookmark" buttons (and any other button). |
4. Commit Everything to GitHub (2 points)
Please create a link from your homepage to your completed homework 2 webpage (see Sarah’s homepage for an example). Then, commit and push all of your edits to GitHub and, paste a link to your GitHub Repository and to your GitHub pages in the Moodle submission.
- If you collaborated with someone, please list your partner’s name in the comments section.
4. What to Turn In
Rubric
Please review the requirements above and ensure you have met them. Specifically:
| Points | Category |
|---|---|
| 20pts | Page initialization |
| 20pts | Create / delete data features |
| 6pts | Accessibility features |
| 2pts | Successfully Deployed to GitHub + GitHub Pages and linked to your homepage |
| 2pts | Composition and CSS (the UI looks like the screenshots provided). Everything still has to look good and be responsive. |
Moodle Submission
When you’re done, please submit the following to the Moodle:
- A link to your GitHub Repository
- A link to your GitHub Pages
- The name of your partner (if applicable)
- Whether you completed any of the extra credit (so that I can look for it)
Extra Credit
If Helene hadn’t happened, these tasks would be required. Instead, I am making them extra credit. Give them a try if you have the bandwidth! The more you practice, the more you will retain!
| Points | Task | Description | |
|---|---|---|---|
| 5pts | Follow Account |
|
Extra Credit #1 |
| 5pts | Unfollow Account |
|
Extra Credit #1 |
| 8pts | Add a Comment |
|
Extra Credit #2 |
| 10pts | Redraw the Post without refreshing the page | If you can figure out how to redraw the post without refreshing the page, as seen on https://photo-app-secured.herokuapp.com/ | Extra Credit #2 |
Note that each button click is issuing a request to your API and redrawing the screen (console messages just used for demonstration purposes).
Note that each button click is issuing a request to your API and redrawing the screen (console messages just used for demonstration purposes).