Intro to SQLAlchemy
As stated on the SQL Alchemy project page: “SQLAlchemy is the Python SQL toolkit and Object Relational Mapper that gives application developers the full power and flexibility of SQL.” In other words, SQL Alchemy is a python abstraction that makes communication with databases easier. It is database agnostic, meaning that you use the same commands, regardless of whether you’re interacting with PostgreSQL, SQLite, MySQL, or some other relational database.
Set Up Today’s Exercises
-
Create an empty database by opening your terminal / dos prompt and typing (you will need to type in your database password):
psql -U postgresOnce you’re on the psql command prompt, create a new database called
orm_testas follows:create database orm_test;Once you get a “Database Created” message, exit
psqlby typing\q -
Download today’s lecture files, unzip them, and save the
orm_introductionfolder in yourcsci344/lecturesdirectory.
ORM Sample Files -
Open VS Code
-
From within the VS Code terminal, to your
lectures/orm-introductionfolder. Then, set up a virtual environment and install the dependencies as follows (depending on your operating system):For Mac, Unix, Linux, or GitBash:
 python3 -m venv env
 source env/bin/activate
 pip install -r requirements.txt    # install dependencies
For Windows Powershell or Command Prompt:
# create the virtual environment py -m venv env # run the activate.bat script as follows: env\Scripts\activate # and finally, install the Python dependencies py -m pip install -r requirements.txt -
Update your database connection string with your password. To do this, open in the
.envfile and edit theDB_URLstring. So, instead of…DB_URL=postgresql://postgres:12345@localhost/orm_testYou will change it to…
DB_URL=postgresql://postgres:your_password@localhost/orm_test # but replace your_password -
After updating your database connection string, run the database populate script from your command prompt (from within the
orm-introductionfolder).python populate.py -
Finally, run your flask server as follows:
 flask run --debug

 # if you named your app something other than app.py (say, hello.py) type this:
 # flask flask --app hello run --debug
You should see the following output:
 * Serving Flask app "app.py" (lazy loading)
 * Environment: development
 * Debug mode: on
 * Running on http://127.0.0.1:5000/ (Press CTRL+C to quit)
 * Restarting with stat
 * Debugger is active!
 * Debugger PIN: 273-580-071
Navigate to http://127.0.0.1:5000/, and you should see a screen that lists the exercises that you are to complete:
What just happened?
In the intructions above, we created a new database, installed and configured our python files / libraries to interact with our database, populated our database, and are now running the flask server.
This infrastructure will allow your users to query a database from their client code!
What is an Object Relational Mapping (ORM)?
ORMs allow a programmer to associate user-defined Python classes with database tables, and instances of those classes (objects) with rows in their corresponding tables (more on ORM here). In other words, rather than writing SQL directly, you interact with SQL Alchemy “models” that issue SQL queries under-the-hood.
Post Model
class Post(db.Model):

    # name of table I want to connect to:
    __tablename__ = 'posts'

    # reference to the columns with which I want the application
    # to interact:
    id = db.Column(db.Integer, primary_key=True)
    image_url = db.Column(db.String(200), nullable=False)
    caption = db.Column(db.Text, nullable=True)
    alt_text = db.Column(db.Text, nullable=True)
    pub_date = db.Column(db.DateTime, nullable=False,
        default=datetime.utcnow)
    user_id = db.Column(db.Integer, db.ForeignKey('users.id', ondelete='cascade'),
        nullable=False)

    # read-only property for referencing User properties
    user = db.relationship('User', backref="posts", lazy=False)
    comments = db.relationship('Comment', cascade="all,delete-orphan", lazy='select',
        order_by='Comment.pub_date', backref=db.backref('posts', lazy='joined'))
    likes = db.relationship('LikePost', cascade="all,delete-orphan", lazy='select',
        order_by='LikePost.timestamp', backref=db.backref('posts', lazy='joined'))

    def __init__(self, image_url:str, user_id:int, caption:str=None, alt_text:str=None, pub_date:datetime=None):
        self.image_url = image_url
        self.user_id = user_id
        self.caption = caption
        self.alt_text = alt_text
        self.pub_date = pub_date
Post Table
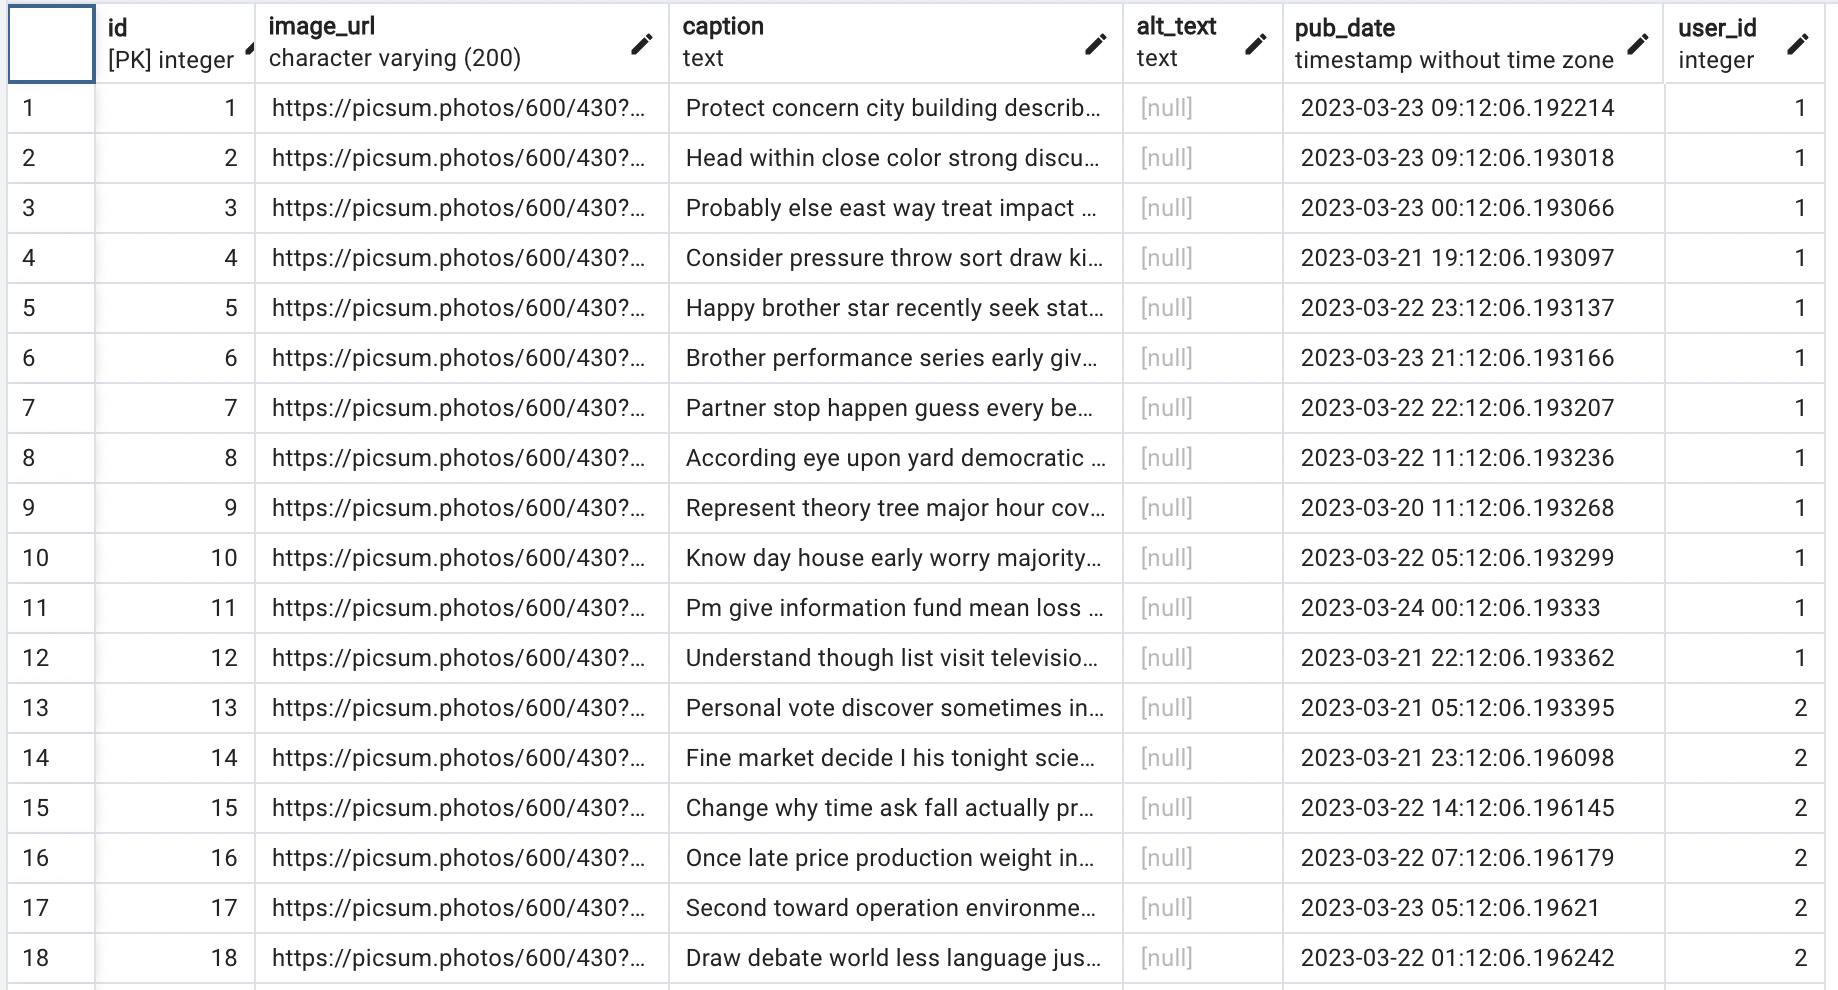
With this Post model definition, I am able to create, read, update, and delete records from the posts table. Some examples of how you would perform each of these operations are listed below:
Tips for following along
Please read the SQL Alchemy section carefully, and try executing some of the sample commands using the flask shell. To access the flask shell:
- Open your Terminal / command prompt,
- Navigate to your
hw05files, - Make sure your virtual environment is activated, and
- Type
flask shell
Within the flask shell, you can interact with any of the data models (described in more detail below).
1. Create New Objects
Creating a Post resource:
SQL
To create a new record in the posts table using SQL, you would issue this command:
    INSERT INTO posts(image_url, user_id, caption, alt_text, pub_date)
    VALUES(
        'https://picsum.photos/600/430?id=668',
        3,
        'Some caption text',
        'Some alt text',
        now()
    )
Flask SQLAlchemy
In SQL Alchemy, you create a record just like you would create any object. The only difference is that you have to add and commit the object to the database session:
from models.post import Post
from models import db

# 1. Create:
new_post = Post(
    image_url='https://picsum.photos/600/430?id=668',
    user_id=3, # must be a valid user_id or will throw an error
    caption='Some caption text',
    alt_text='Some alt text'
)
db.session.add(new_post)    # issues the insert statement
db.session.commit()         # commits the change to the database
Try running the above command using the flask shell (and don’t forget the import statement).
2. Simple Queries
Just like in SQL, querying operations can be complex, as you often want to filter, join, and aggregate data. You will be using the Flask SQL Alchemy library for simple queries (Flask SQL Alchemy documentation here).
Retrieve all posts
Using SQL:
SELECT * FROM posts;
Using Flask SQLAlchemy via the flask shell:
from models.post import Post
from models import db

# get all of the posts:
posts = Post.query.all()

# print posts:
print(posts)

# use loop to output specific post attributes:
for post in posts:
    print(
        post.id, '|',
        post.image_url, '|',
        post.user.username, '| # comments:',
        len(post.comments)
    )
Retrieve the first 10 posts
Using SQL:
SELECT * FROM posts LIMIT 10;
Using Flask SQLAlchemy via the flask shell:
from models.post import Post
from models import db
posts = Post.query.limit(10).all()
Retrieve all the posts created by user #5
Using SQL:
SELECT * FROM posts WHERE user_id = 5;
Using Flask SQLAlchemy via the flask shell:
from models.post import Post
from models import db
# filter the posts (simple):
posts = Post.query.filter_by(user_id=5).all()
Retrieve all the posts created by user with a username of “chad_marks”
SELECT * FROM posts
INNER JOIN users ON
    posts.user_id = users.id
WHERE users.username = 'chad_marks';
Using Flask SQLAlchemy via the flask shell:
from models.post import Post
from models import db
# filter the posts (by attribute of a joined table):
posts = Post.query.filter(Post.user.has(username='chad_marks')).all()
Retrieve a single post with id = 5
SELECT * FROM posts where id = 5;
Using Flask SQL Alchemy via the flask shell:
from models.post import Post
from models import db
# get single post based on primary key (id column):
post = Post.query.get(5)
print(post)
Other cool stuff you can do w/SQLAlchemy
With SQLAlchemy, you can also query related tables via foreign keys. For instance, in the code below, post.user queries the users table and post.comments queries the comments table:
from models.post import Post
from models import db
# get single post based on primary key (id column):
post = Post.query.get(5)

# get the user of a post (from the users table)
post.user # under the hood, queries the users table for the user_id associated with the post

# get all of the comments on a post (from the comments table)
post.comments # under the hood, queries for all comments associated with the post
3. Advanced Queries with REGULAR SQLAlchemy
“Flask SQLAlchemy” also inherits from “SQLAlchemy,” so if you’re looking to execute more complex queries, consult the regular SQLAlchemy documentation (SQL Alchemy documentation here). Some samples of some more complex queries are shown below. Again, you are encouraged to run these commands for yourself using the flask shell:
from models import db
from models.post import Post
from models.user import User
from models.comment import Comment
from models.following import Following
from sqlalchemy import func

engine = db.engine
session = db.session

##########################################################
# 1. query for substring matches using a "like" function #
##########################################################
posts = Post.query.filter(Post.caption.ilike('%tree%')).all()
'''
-- analagous SQL query:
SELECT *
FROM posts
LEFT OUTER JOIN users
    AS users_1 ON users_1.id = posts.user_id
WHERE posts.caption ILIKE '%tree%';
'''

##################
# 2. "in" clause #
##################
# give me all the posts that created by users 3, 4, or 5.
posts = Post.query.filter(Post.user_id.in_([3, 4, 5])).all()
'''
-- analagous SQL query:
SELECT *
FROM posts
LEFT OUTER JOIN users
    AS users_1 ON users_1.id = posts.user_id
WHERE posts.user_id IN (3, 4, 5);
'''

######################
# 3. "not in" clause #
######################
# give me all the posts that were NOT created by users 3, 4, or 5.
posts = Post.query.filter(~Post.user_id.in_([3, 4, 5])).all()
'''
-- analagous SQL query:
SELECT *
FROM posts
LEFT OUTER JOIN users
    AS users_1 ON users_1.id = posts.user_id
WHERE posts.user_id NOT IN (3, 4, 5);
'''

######################################################################
# 4. get all of the users in my feed (e.g., the users I'm following) #
######################################################################
current_user_id = 1
following = Following.query.filter(Following.user_id==current_user_id).all()
'''
-- analagous SQL query:
SELECT *
FROM following
LEFT OUTER JOIN users
    AS users_1 ON users_1.id = following.user_id
LEFT OUTER JOIN users AS
    users_2 ON users_2.id = following.following_id
WHERE following.user_id = 1
'''

following

# 4a. build a list of all of the User ids that the current user is following:
user_ids = []
for result in following:
    user_ids.append(result.following_id)
user_ids

# 4b. or like this (using a list comprehension):
user_ids = [result[0] for result in user_ids_tuples]

#################################################
# 5. Get all of the posts in a user's news feed #
#################################################
# 5a. build a list of authorized users (same as #4):
current_user_id = 1
following = Following.query.filter(Following.user_id==current_user_id).all()
user_ids = [result[0] for result in user_ids_tuples]

# 5.b Add the current user to this user_ids list
# b/c a user should also be able to see their own posts
user_ids.append(current_user_id)

# 5.c. Now use the "in" query noted in #2 above to get a list
# of authorized posts:
posts = Post.query.filter(Post.user_id.in_(user_ids)).all()
'''
-- analagous SQL query:
SELECT *
FROM posts
LEFT OUTER JOIN users
    AS users_1 ON users_1.id = posts.user_id
WHERE posts.user_id IN (4, 6, 8, 12, 16, 18, 20, 21, 22, 23, 1);
'''

posts


#######################
# 6. Join: two tables #
#######################
# Sample query: "Give me back the Post and the User object
# for posts that were authored by someone with the string 'ar'
# in their username":
statement =
posts = (
    session
        .query(Post, User)
        .join(User, User.id==Post.user_id)
        .filter(User.username.ilike('%ar%')).all()
)

'''
-- analagous SQL query:
SELECT *
FROM posts
JOIN users ON
    users.id = posts.user_id
LEFT OUTER JOIN users AS users_1
    ON users_1.id = posts.user_id
WHERE users.username ILIKE '%ar%';
'''

#########################
# 7. Join: three tables #
#########################
# "List the post, author, and number of comments per post":
# Note that an "outer join" is needed on the comments table in the
# event that a post has no comments.
posts = (
    session
        .query(Post.id, User.username, func.count(Comment.id))
        .join(User, User.id==Post.user_id)
        .outerjoin(Comment, Post.id==Comment.post_id)
        .group_by(Post.id, User.username)
        .all()
)
'''
-- analagous SQL query:
SELECT posts.id AS posts_id, users.username AS users_username, count(comments.id) AS count_1
FROM posts
JOIN users ON
    users.id = posts.user_id
LEFT OUTER JOIN comments ON
    posts.id = comments.post_id
GROUP BY posts.id, users.username;
'''

############################################
# 8. You can also issue raw SQL statements #
############################################

# Raw SQL query example for more complex queries...
# The query below returns the post_id, username, # of comments, # of likes for every post:
from sqlalchemy import text

sql = '''
SELECT posts.id AS post_id, users.username AS username,
    count(distinct comments.id) AS comment_count,
    count(distinct likes_posts.id) AS likes_count
FROM posts
JOIN users ON
    users.id = posts.user_id
LEFT OUTER JOIN comments ON
    posts.id = comments.post_id
LEFT OUTER JOIN likes_posts ON
    posts.id = likes_posts.post_id
GROUP BY posts.id, users.username;
'''
with db.engine.connect() as conn:
    posts = list(conn.execute(text(sql)))
4. Update Objects
Updating a Post resource:
SQL
To update one or more resources in SQL, you need to specify:
- The table,
- The columns you would like to change (and their new values), and
- A WHERE clause indicating which records you’d like to change
UPDATE posts
SET image_url = 'https://picsum.photos/600/430?id=443',
    caption = 'Updated caption',
    alt_text = 'Updated alt text'
WHERE id=6;
Flask SQLAlchemy
In SQLAlchemy, you update the object (like you would any Python object) and then commit the change to the database:
from models.post import Post
from models import db

post = Post.query.get(5)

post.image_url = 'https://picsum.photos/600/430?id=443'
post.caption = 'Updated caption'
post.alt_text = 'Updated alt text'

# commit changes:
db.session.commit()
5. Delete Objects
Deleting a Post resource:
SQL
To delete one or more records in a table using SQL, you specify the table and the WHERE clause:
DELETE FROM posts WHERE id=5;
Flask SQLAlchemy
In SQLAlchemy, you specify the query matching the items you want to delete, and then invoke the delete() method:
from models.post import Post
from models import db

Post.query.filter_by(id=5).delete()
db.session.commit()

post = Post.query.get(5) # should return None
6. Challenge Problems
- Write a query that shows all of the posts liked by User #3
- Write a query that shows all of the posts bookmarked by User #3
- Write a query that shows all of the posts in User #3’s feed (we’ve already gone over this, but see if you can write it again from scratch – as you’ll need to do it for HW7)
- Write a query that creates a new Like entry reflecting that User #3 likes Post #10. Verify that it works (see #1).
- Write a query that creates a new Bookmark entry reflecting that User #3 bookmarked Post #10
- Delete the new Bookmark entry you just created.
Nice job issuing those SQL Alchemy queries! It just takes some practice to get the hang of interacting with your database using the ORM syntax.